The Ultimate S’mores Brownie Cupcakes
There’s something utterly captivating about the aroma of freshly baked brownies wafting through the kitchen, isn’t there? It’s like a warm hug on a chilly day, an invitation to indulge in a moment of pure bliss. Now, imagine that rich, fudgy goodness transformed into The Ultimate S’mores Brownie Cupcakes—a delightful fusion of two beloved treats that will have your taste buds dancing! These cupcakes are not just a dessert; they’re an experience that bridges the nostalgia of campfire s’mores with the decadence of brownie indulgence. As you bite into the layers of crunchy graham cracker crust and luscious brownie center, topped with a dreamy brown sugar frosting, you’ll find yourself transported to summer nights under the stars, laughter echoing all around. I promise you, this recipe will become a cherished favorite in your home.
Let’s talk about why these cupcakes stand apart from traditional treats. The contrast between the crispy graham cracker base and the velvety brownie filling creates a symphony of textures that is simply irresistible. The brown sugar frosting adds a touch of sweetness that perfectly complements the deep chocolate flavor without overwhelming it. Whether you’re celebrating a special occasion or simply treating yourself on a sunny afternoon, these ultimate s’mores brownie cupcakes are perfect for any gathering. And let’s be honest—who doesn’t love dessert that evokes such joyous memories? So grab your apron and let’s embark on this delightful culinary adventure together!
The Ultimate S’mores Brownie Cupcakes: A Perfectly Sweet Escape
Get ready to savor every bite as we dive into the world of these scrumptious s’mores brownie cupcakes! With layers of flavor and texture, they promise to bring smiles all around.
Ingredients:
As we gather our ingredients for this magical creation, take a moment to appreciate how each component contributes to the overall experience. Each ingredient plays its own role in crafting these delicious cupcakes.
- 1 3/4 cups graham cracker crumbs – These little crumbs form the foundation of our cupcakes, providing that iconic crunch synonymous with s’mores. When crushed finely, they create a delightful base that absorbs the flavors beautifully while holding everything together. If you can’t find pre-made crumbs, don’t hesitate to blitz whole graham crackers in your food processor until they resemble sandy perfection!
- 1/4 cup granulated sugar – This sugar is essential for balancing flavors in our graham cracker crust. It adds just enough sweetness to enhance those crunchy crumbs without overpowering their natural flavor. Look for fine granulated sugar as it dissolves easily when mixed with butter.
- 7 TBSP unsalted butter, melted – Butter is more than just fat; it brings richness and moisture to our crust while helping it bind together perfectly. By melting it first, we ensure even distribution throughout the crumbs for optimal texture.
- 1 stick (1/2 cup) salted butter – This salted butter works wonders in our brownie batter by intensifying chocolate’s flavor while adding depth through its savory notes. Using salted butter also means we can reduce other salt additions later on—it’s practically magic! Just make sure it’s softened but not melted for perfect creaming.
- 7 ounces bittersweet chocolate, chopped (I use 70% cocoa) – This rich chocolate is crucial for creating that dense brownie center we crave. Choosing high-quality chocolate elevates our treat from good to extraordinary—look for bars with at least 60% cocoa content for an intense depth of flavor that’ll have you swooning.
- 3/4 cup granulated sugar – Here’s where sweetness reigns supreme! This adds balance against our bittersweet chocolate and contributes to that shiny crackle top we all adore in brownies. Again, fine granulated sugar works best as it incorporates seamlessly into our batter.
- 3 medium eggs, room temperature – Eggs are not merely binding agents; they lend structure and stability while introducing moisture into our batter. Using room-temperature eggs allows them to emulsify better with other ingredients; this step is absolutely paramount in achieving an airy yet fudgy texture.
- 1 1/2 tsp vanilla – Ahh… vanilla—the heart and soul of baking! It enhances all other flavors present throughout our cupcake creation and adds an aromatic warmth that’s hard to resist. Opt for pure vanilla extract whenever possible; trust me—your desserts will thank you!
- 1/2 cup plus 2 TBSP all-purpose flour – Flour provides structure without making our brownies too cake-like—a delicate balance we aim to achieve here! Sifting before measuring ensures lightness while preventing clumps from forming in our batter.
- 1/4 cup Dutch process cocoa powder, sifted – Cocoa powder brings rich chocolaty goodness without additional fat—it’s crucial in deepening flavor while maintaining that satisfying chewiness we’re after. Dutch process cocoa has been treated for acidity reduction which gives it a smoother finish; it’s non-negotiable if you want top-notch results!
- 2 large egg whites, room temperature – Egg whites are key players in creating fluffy brown sugar frosting later on but also play a role in achieving lift within our brownie batter when whipped! Having them at room temperature helps achieve maximum volume when beaten—just trust me on this one!
- 1/2 cup light brown sugar – Brown sugar’s molasses content introduces moisture along with caramel-like notes which makes everything even more delicious! Light brown sugar works wonders here as it complements rather than overpowers other flavors present throughout our cupcake journey.
- 1/4 tsp cream of tartar – This magical ingredient stabilizes whipped egg whites during frosting preparation by preventing them from collapsing prematurely—a tiny pinch goes such a long way towards achieving perfection!
- 1/2 tsp vanilla (for frosting) – Just like in the batter, vanilla enriches flavors throughout our frosting while adding warmth and aroma—the perfect finishing touch!
- Melted semi-sweet chocolate and salted caramel for drizzling (optional) – While optional, these toppings transform each cupcake into an eye-catching masterpiece worthy of any celebration! They provide additional layers of flavor along with visually stunning contrast; who could resist?

Equipment You’ll Need:
Having the right tools at your disposal makes your baking experience smoother and much more enjoyable—not just because they help achieve success but because they add joy to every step along the way! Here’s what you’ll need:
- Mixing bowls – A good set of mixing bowls is essential for combining wet and dry ingredients efficiently without creating messes or complications during prep time.
- Whisk & spatula – These trusty companions will help incorporate air into batters (whisk) as well as scrape down sides to ensure no delicious morsels go uneaten (spatula)!
- Cupcake tin & liners – The perfect vessel for baking these beauties! Use high-quality liners so they peel away easily once cooled—no one wants their masterpiece stuck forever!
- Microwave-safe bowl or double boiler – Either option works wonders when melting chocolate gently; this step prevents scorching while ensuring silky smooth results every time.
- Electric mixer or hand whisk – For whipping those egg whites into fluffy clouds essential for topping off our cupcakes—we want peaks so stiff they could hold their shape firmly under pressure!
With your ingredients gathered and equipment prepped, let’s dive into creating The Ultimate S’mores Brownie Cupcakes together!
Preparing The Ultimate S’mores Brownie Cupcakes
Step 1: Crafting the Graham Cracker Crust
To begin this delightful journey, we must first create the graham cracker crust—this step lays down the groundwork for achieving balanced textures across all layers within our cupcake masterpiece! In your mixing bowl, combine the graham cracker crumbs and granulated sugar thoroughly before pouring in melted unsalted butter. Mix until everything comes together—it should resemble wet sand clumping together when pressed between fingers—and trust me on this: don’t rush this step! Once combined well enough so there aren’t any dry patches remaining (which could lead us astray!), press firmly into each cupcake liner using either your fingers or flat-bottomed cup measuring tool until evenly distributed across bottoms only—not sides yet!
Step 2: Baking That Crust
Now comes one important culinary technique: par-baking! Preheat your oven while allowing those pressed crusts time chill briefly within fridge while oven warms up—it enhances firmness upon removal later after baking occurs. Bake at 350°F (175°C) just long enough (about 8 minutes) until lightly golden-brown edges appear—this imparts lovely flavor development leading us closer toward overall success later down line too! As soon as timer dings promptly remove from oven then set aside cool completely before adding brownie batter filling atop once ready—I know waiting can feel agonizing sometimes but believe me—it’ll be worth every moment invested here!
Step 3: Melting Chocolate Perfection
Let’s move onto crafting that decadent fudge-filled center now! In another microwave-safe bowl or double boiler method melt bittersweet chocolate alongside salted butter gently over simmering water until fully melted down smooth texture forms—you’ll want liquid gold consistency achieved here folks! Stir often during melting process ensuring no scorching occurs which could ruin entire batch altogether—trust me when I say burnt chocolate isn’t anyone’s idea fun times ahead… Once melted let mixture cool slightly before proceeding further so eggs don’t scramble upon incorporation later—we’re aiming towards silky-smooth blend instead remember?
Step 4: Blending Together Fudge Batter
With cooled chocolate mixture ready now it’s time fold all remaining ingredients together gradually starting first by whisking those three room-temperature eggs directly into warm bowl followed immediately after by vanilla extract then both sugars previously measured out—all should blend seamlessly here without lumps appearing whatsoever if done correctly next add sifted flour alongside cocoa powder ensuring thorough incorporation achieved again before final addition whisked egg whites next up—they introduce airy lift throughout entire batch giving structure needed yield perfectly risen bites enjoyed later post-baking session concluded successfully after glorious aroma fills air surrounding kitchen space inviting everyone nearby partake once cooled sufficiently down below desired temperature range…
Stay tuned as we’ll continue crafting these irresistible treats next—including finishing touches that’ll elevate them even further beyond expectations previously imagined…
Step 5: Creating the Irresistible Graham Cracker Crust
Now, let’s dive into the creation of that delightful graham cracker crust that serves as the perfect foundation for your brownie cupcakes. In a medium bowl, combine 1 3/4 cups of graham cracker crumbs with 1/4 cup of granulated sugar. This mixture is not just about sweetness; it adds a wonderful texture and a hint of caramelization when baked. Pour in 7 tablespoons of melted unsalted butter, making sure it’s still warm but not boiling hot, as this helps to blend everything beautifully without cooking the crumbs.
Stir until the mixture resembles wet sand—a little crumbly but holds together when pressed. This is crucial because if you don’t mix it well enough, your crust may crumble instead of staying intact, leading to an unsatisfactory eating experience! Once combined, take a cupcake pan and line it with cupcake liners. You’ll want to press about 2 tablespoons of the crust mixture into each liner firmly—this ensures that your crust is sturdy and won’t fall apart once baked. Use the back of a measuring spoon or even your fingers to compact it down evenly. Trust me on this; you want that satisfying crunch beneath the rich brownies! Once pressed in, set the pan aside while we prepare our brownie batter.
Step 6: Melting Chocolate to Create Fudge Heaven
Moving on to arguably one of the most exciting parts—the brownie batter! In a medium saucepan over low heat, combine 7 ounces of chopped bittersweet chocolate (I highly recommend using 70% cacao for that deep, rich flavor) with 1/2 cup of salted butter. Stir gently as the chocolate melts into a glossy liquid gold. This melting process is essential because it brings out the chocolate’s natural oils, which contribute not just flavor but also moisture to our brownies, resulting in a fudgy texture that simply melts in your mouth.
As you stir, you’ll begin to inhale that intoxicating aroma—it’s utterly heavenly! Once fully melted and combined (aim for a smooth consistency), remove the saucepan from heat and allow it to cool slightly—just enough so that when we add our eggs later, they won’t curdle from the heat. Now sprinkle in 3/4 cup of granulated sugar while the chocolate mixture is still warm; this step is significant because warmth helps dissolve sugar better than cold—resulting in a smoother batter without any gritty texture later on. Stir until fully incorporated, and then let it cool down for about five minutes while we prep for our egg addition.
Step 7: The Art of Incorporating Eggs
Once your chocolate mixture has cooled sufficiently but is still warm to touch (think like a cozy hug rather than ice-cold), it’s time to add 3 medium eggs, ensuring they’re at room temperature for optimal blending. This part can be tricky; if added too hot, you risk scrambling your eggs rather than incorporating them smoothly into your batter—which would be a disaster! Crack each egg directly into your bowl and whisk vigorously until everything is combined into a glossy batter.
Next up is adding 1 1/2 teaspoons of vanilla extract, which adds depth and warmth to our brownies—this is not just an afterthought but an essential ingredient that enhances all those luscious chocolate flavors! After mixing in the vanilla, gradually fold in 1/2 cup plus 2 tablespoons of all-purpose flour along with 1/4 cup of sifted Dutch process cocoa powder. Folding is key here; you want to avoid overmixing since that can lead to tough brownies rather than soft and gooey ones. Stop mixing once no dry flour remains visible—this will ensure you achieve that perfectly fudgy brownie texture.
Step 8: Elevating Your Cupcakes with Egg Whites
Alright, my baking buddy! The next step involves creating an airy lift in our cupcakes using egg whites. In another clean bowl—or if you’re feeling adventurous, simply rinse out the one you’ve used before—whip up 2 large egg whites until frothy using either a hand mixer or stand mixer at medium speed. It’s important they’re at room temperature because warmer eggs whip up better than cold ones; they’ll trap air more effectively, giving our cupcakes an incredible lightness despite their rich filling.
Once they start forming soft peaks (when you lift up your whisk or beaters, peaks should form but droop slightly), gradually add in 1/2 cup of light brown sugar, continuing to whip until stiff peaks form—this means they hold their shape firmly when lifted out with your whisk. The transformation here—the way those fluffy whites change—is nothing short of magical! Gently fold this meringue-like mixture into your brownie batter using a spatula—be mindful not to deflate those precious air bubbles we’ve worked so hard to create! This step gives an extra level of richness while keeping everything light and airy within each cupcake.
Baking Your Perfect The Ultimate S’mores Brownie Cupcakes
At long last—it’s time to bring everything together and bake these beauties! Preheat your oven to 350°F (175°C) while you make sure all your ingredients are ready and waiting patiently for their moment in the spotlight. Now carefully spoon about two-thirds full of brownie batter over your prepared graham cracker crusts in each cupcake liner—you want them generously filled because who doesn’t love an overflowing treat? Use a small offset spatula or spoon back if needed to smooth out any tops.
Place them gently into your preheated oven for around 25 minutes. Here’s what you should watch for: when they’re done baking, they should look puffed up with shiny tops and have slight cracks across their surface—a sign that they’ve risen beautifully while maintaining that fudgy center we adore so much! Don’t be tempted by the urge to open the oven door too soon; letting too much heat escape can lead to uneven baking, so patience here is key! When done baking, allow them to cool in their pan for about ten minutes before transferring them onto wire racks—this cooling process allows them time to set properly while preventing sogginess from trapped steam underneath.
Step 9: Frosting Dreams Come True
Now comes perhaps one of my favorite parts—the frosting! We’re going for a super fluffy brown sugar frosting here that’s every bit as delicious as it sounds! In a mixing bowl (yes, another one!), cream together 1 stick (or 1/2 cup) salted butter until it’s light and fluffy—about two minutes on medium speed will do wonders here! To this buttery base, slowly add in 3 cups powdered sugar, beating on low at first so you don’t end up wearing half of it before increasing speed as it incorporates fully.
Next comes adding 1 teaspoon vanilla extract alongside just enough milk—a tablespoon at a time—to reach desired consistency; aim for something spreadable yet thick enough not to slide right off those cupcakes when you frost them! For added sweetness without overpowering richness (and let’s be honest—we all know how sweet s’mores can get), consider incorporating some light brown sugar during this step—it elevates flavor complexity beautifully!
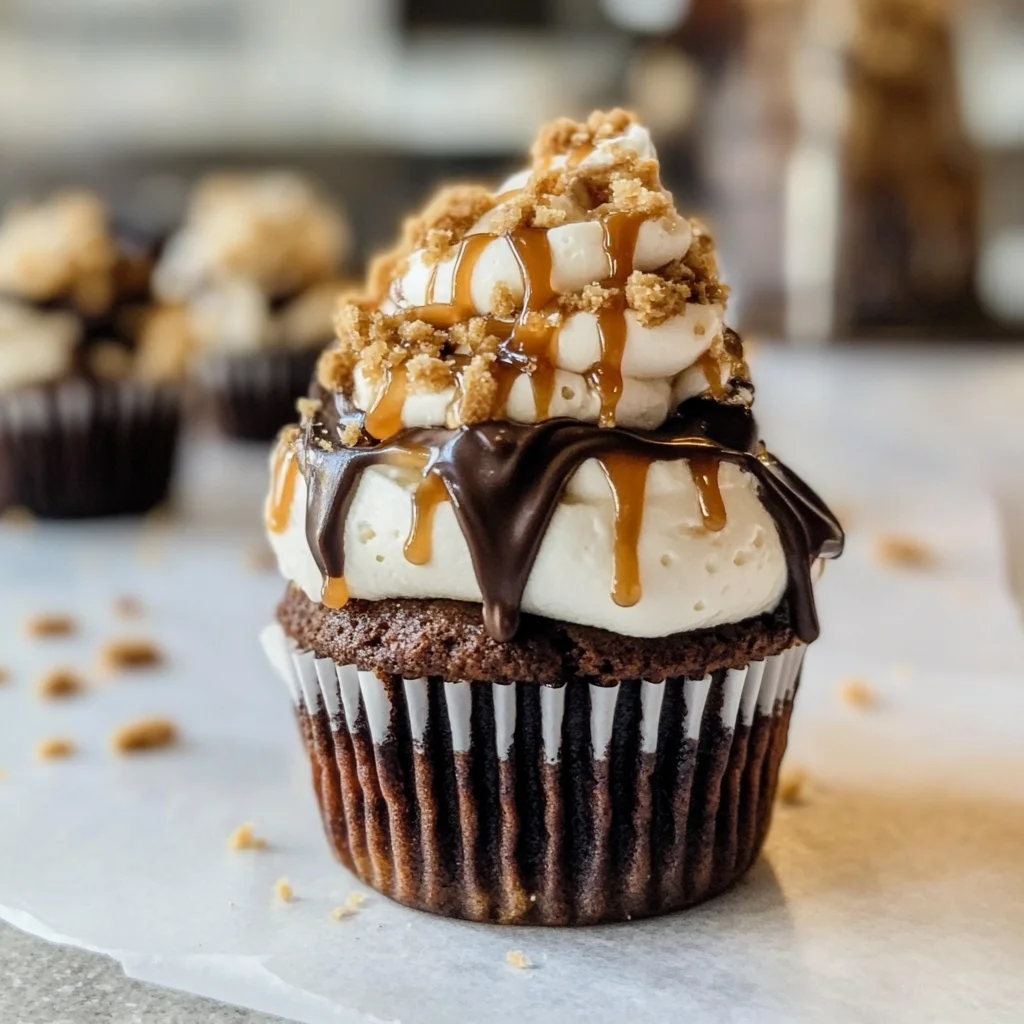
Finally—but certainly not least—you have options for drizzling melted semi-sweet chocolate and/or salted caramel over top before serving if you’re feeling indulgent (and who wouldn’t?). This finishing touch brings everything full circle—the gooeyness blends harmoniously with creamy frosting atop chewy brownie goodness while crispy graham cracker provides contrast—a true symphony of flavors and textures!
And there you have it—the ultimate s’mores brownie cupcakes are ready to impress friends and family alike! I promise these cupcakes will become an instant favorite at gatherings or simply as an indulgent treat after dinner on summer nights spent reminiscing by bonfire light. Enjoy every last bite—you’ve earned it!
Storage and Enjoyment Tips for Your The Ultimate S’mores Brownie Cupcakes
Now that you’ve crafted these irresistible cupcakes, it’s time to bask in the joy of enjoying them! The aroma wafting through your kitchen as they bake is just a prelude to the flavor explosion waiting for you. But let’s be honest, sometimes we do have leftovers (though I promise you, it’s hard to resist devouring them all in one sitting!). So, how do we keep that delightful texture and gooey goodness intact? Let’s dive into the art of storing and savoring these treats so you can relish every last bite!
Storing Leftover The Ultimate S’mores Brownie Cupcakes
To ensure your Ultimate S’mores Brownie Cupcakes maintain their decadent charm, store them in an airtight container at room temperature. This keeps the cupcakes moist while preventing any unwanted air from drying them out. Ideally, they’ll stay fresh for about 3 days, but I promise you, they’re so good that they might not last that long! For a little extra moisture retention, place a slice of bread inside the container—this little trick works wonders! Even after a day or two, you’ll find that these cupcakes still deliver that wonderfully fudgy texture and rich flavor. If you do find yourself with some leftovers (a feat in itself!), consider warming them gently in the microwave for about 10-15 seconds before serving; this will revive their gooey center and make each bite feel like it just came out of the oven!
Freezing The Ultimate S’mores Brownie Cupcakes for Later
If you’re planning ahead or simply want to save some of this chocolatey bliss for later, freezing is an excellent option! To freeze your cupcakes, allow them to cool completely before wrapping each one tightly in plastic wrap, followed by aluminum foil—or simply place them in a freezer-safe bag. They’ll be perfectly fine frozen for up to three months. When you’re ready to indulge again, just take them out and let them thaw at room temperature or pop them in a warm oven for a few minutes to bring back that fresh-baked taste. Trust me on this: having a stash of these delightful cupcakes tucked away is like having secret joy waiting for you on a rainy day!
The Ultimate S’mores Brownie Cupcakes
Indulge in The Ultimate S’mores Brownie Cupcakes—a delightful fusion of classic s’mores and rich brownie decadence. These decadent cupcakes feature a crispy graham cracker crust, a fudgy chocolate center, and a cloud-like brown sugar frosting that will transport you to summer nights under the stars. Each bite is a celebration of flavors and textures, making them perfect for any occasion—from backyard barbecues to cozy family gatherings. Whether you’re a seasoned baker or just starting out, this easy-to-follow recipe will have everyone clamoring for seconds!
- Prep Time: 20 minutes
- Cook Time: 35 minutes
- Total Time: 55 minutes
- Yield: Approximately 12 servings 1x
- Category: Dessert
- Method: Baking
- Cuisine: American
Ingredients
- 1 3/4 cups graham cracker crumbs
- 1/4 cup granulated sugar
- 7 tablespoons unsalted butter, melted
- 1/2 cup salted butter, softened
- 7 ounces bittersweet chocolate, chopped
- 3/4 cup granulated sugar
- 3 medium eggs, room temperature
- 1 1/2 teaspoons vanilla extract
- 1/2 cup plus 2 tablespoons all-purpose flour
- 1/4 cup Dutch process cocoa powder, sifted
- 2 large egg whites, room temperature
- 1/2 cup light brown sugar
Instructions
- Preheat your oven to 350°F (175°C) and line a cupcake tin with liners.
- In a bowl, combine graham cracker crumbs and granulated sugar. Stir in melted unsalted butter until the mixture resembles wet sand. Press into the bottom of each cupcake liner to form the crust.
- Par-bake the crusts for about 8 minutes until lightly golden. Set aside to cool.
- Melt bittersweet chocolate and salted butter together in a double boiler or microwave until smooth; let it cool slightly.
- Whisk in granulated sugar, followed by eggs and vanilla extract until well combined.
- Fold in flour and cocoa powder until just incorporated; then gently fold in whipped egg whites.
- Spoon brownie batter over cooled crusts, filling each liner about two-thirds full.
- Bake for approximately 25 minutes or until tops are shiny with slight cracks.
- Let cupcakes cool before frosting with brown sugar frosting.
Nutrition
- Serving Size: 1 cupcake (75g)
- Calories: 280
- Sugar: 22g
- Sodium: 160mg
- Fat: 14g
- Saturated Fat: 8g
- Unsaturated Fat: 5g
- Trans Fat: 0g
- Carbohydrates: 36g
- Fiber: 2g
- Protein: 3g
- Cholesterol: 45mg