Peanut Butter and Jelly Bars
There’s something truly magical about the Peanut Butter and Jelly Bars that brings a sense of nostalgia and comfort with every bite. It’s not just a dessert; it’s a bridge to our childhood, where the simple combination of creamy peanut butter and sweet jam wrapped in soft bread created perfect moments of joy. As I reminisce about those carefree days, I can’t help but feel a warm flutter in my heart, knowing that this recipe transforms that cherished memory into a delightful treat everyone can enjoy today. Imagine the aroma wafting through your kitchen as these bars bake, filling your home with an utterly intoxicating scent that beckons loved ones to gather ’round. Each bite is a symphony of flavors—the rich nuttiness of peanut butter harmonizing beautifully with the bright sweetness of strawberry jam—making these Peanut Butter and Jelly Bars an experience worth savoring.
What makes these bars even more special is how they embody both tradition and innovation. While they evoke memories of school lunches and family picnics, their unique texture and delightful presentation elevate them to something extraordinary. This recipe is perfect for any occasion, whether it’s a cozy family gathering, a backyard barbecue, or simply an afternoon snack that makes you feel like a kid again. I promise you, once you take that first bite, you’ll be transported back to simpler times filled with laughter and love.
Peanut Butter and Jelly Bars: A Nostalgic Treat Reinvented
Let me take you on this delicious journey to create your very own Peanut Butter and Jelly Bars! Trust me when I say that these bars are incredibly easy to whip up and will quickly become a family favorite. You might find yourself making them on repeat because they’re not just snacks—they’re bites of love wrapped in nostalgia.
Ingredients:
As we embark on this culinary adventure together, let’s talk about the ingredients that will come together to create these scrumptious bars. Each element plays a vital role in achieving that perfect balance of flavor and texture.
- 1 cup (2 sticks or 226g) unsalted butter, softened. This is crucial for creaming properly and creating that light, airy texture we’re aiming for in our Peanut Butter and Jelly Bars. If your butter is too cold, it won’t cream effectively; if it’s melted, your bars will spread too much during baking. The quality of butter matters here—European-style butter with higher fat content will give you even richer results.
- 1 1/2 cup sugar. Sugar does more than just sweeten; it also contributes to the structure of our bars by helping them rise beautifully as they bake. It creates that coveted golden-brown crust while keeping the interior delightfully moist. Be sure to use granulated sugar for the best results—this is non-negotiable!
- 1 teaspoon pure vanilla extract. Ahh, vanilla! This liquid gold adds depth and warmth to our Peanut Butter and Jelly Bars; it enhances all the other flavors beautifully without overpowering them. Always choose pure vanilla extract over imitation for its superior quality—you’ll notice the difference in taste.
- 2 large eggs (room temperature). Eggs are essential not only for binding all our ingredients together but also for providing moisture and richness to our bars. Using room temperature eggs helps them incorporate more easily into the batter; cold eggs can lead to clumps in your mixture, which we definitely want to avoid!
- 2 cups creamy peanut butter. Here lies the star ingredient! Creamy peanut butter provides both flavor and texture; it lends that luscious mouthfeel while being nutty enough to shine through every bite. Opt for natural peanut butter without added sugars or oils for a purer taste—your taste buds will thank you!
- 3 cups all-purpose flour. Flour gives structure to our bars while allowing them to hold together perfectly when cut into squares. Make sure you spoon the flour into your measuring cup instead of scooping directly from the bag; this prevents packing it down too tightly which could result in dense bars.
- 1 teaspoon baking powder. This little powerhouse helps our bars rise beautifully during baking, creating an airy texture that’s sure to please everyone who takes a bite! It’s important not to skip this step as baking powder interacts with moisture in the dough to create carbon dioxide bubbles—leading us to those lovely light bars we crave.
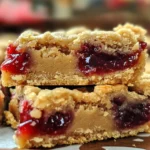
- 2 cups strawberry jam. The jewel-toned jam is what makes these bars sing! Bursting with fruity sweetness, it contrasts perfectly with the richness of peanut butter while adding moisture too. Feel free to use any flavor jam you adore—raspberry or grape could be wonderful alternatives—but strawberry remains my personal favorite for its classic charm.
Equipment You’ll Need:
Having the right tools makes your cooking experience smoother and more enjoyable—think of them as essential partners in creating something wonderful! While they may not be ingredients, they are crucial for ensuring success in every step of this recipe.
- 9×13-inch baking dish – This size is absolutely ideal for our Peanut Butter and Jelly Bars as it allows enough space for spreading out the dough evenly without overcrowding or burning edges during baking.
- Parchment paper – Lining your baking dish with parchment paper ensures easy removal after baking while preventing sticking—a small yet crucial step that keeps your beautiful creation intact when it’s time to serve!
- Stand mixer (or handheld mixer) – Using a stand mixer simplifies the creaming process significantly, allowing you to achieve that light fluffy texture effortlessly by doing all the hard work for you! If you don’t have one handy, a handheld mixer works just fine too—you’ve got options!
- Medium mixing bowl – Perfect for whisking together dry ingredients like flour and baking powder before incorporating them into your wet mixture—this helps ensure even distribution throughout your dough.
Now that we’ve gathered everything we need let’s dive into preparing those delightful Peanut Butter and Jelly Bars!
Step 1: Preheat Your Oven & Prepare Your Baking Dish
First things first: preheat your oven to 350°F (175°C). This step is crucial because starting with a hot oven ensures even cooking right from the get-go! While that’s warming up, line your 9×13 inch baking dish with parchment paper so it’s ready once we’ve made our batter—a little prep now goes a long way later on when it comes time for slicing those glorious bars!
Step 2: Cream Together Your Butters & Sugar
In your stand mixer fitted with a paddle attachment—or using good old-fashioned elbow grease if you’re going handheld—add in softened unsalted butter along with creamy peanut butter and granulated sugar (remember how important quality sugar is!). Start mixing on low speed until everything begins coming together into one cohesive mixture before increasing speed gradually until light and fluffy—this should take about 3 minutes! This process known as creaming incorporates air into your fats which results in tender bars full of delightful texture later on; trust me—you want this step done right!
Step 3: Add Eggs One at A Time
Once you’ve achieved that heavenly fluffy mix (which smells divine already!), it’s time to add those room-temperature eggs one at a time directly into the bowl while continuing mixing at medium speed until they’re fully combined after each addition—it’s like watching magic happen! Don’t rush this step; taking time ensures each egg gets thoroughly integrated before moving onto adding vanilla extract—that extra layer of flavor will elevate things even further!
Step 4: Whisk Dry Ingredients Together
Grab yourself a medium mixing bowl now because we’ll be blending together our flour & baking powder next! Whisking these dry ingredients beforehand allows for even distribution throughout without clumps forming within our batter later down the road—trust me when I say this will lead us towards ultimate success! Once combined smoothly (it should resemble flour clouds), set aside while we await final incorporation into our wet mixture—it’s almost time!
Stay tuned as we continue diving deeper into preparing these delectable Peanut Butter and Jelly Bars together!
Baking Your Perfect Peanut Butter and Jelly Bars
Step 5: Mixing the Dry Ingredients with Precision
Now that you’ve got your creamy peanut butter and sugary butter mixture delightfully fluffy, it’s time to bring in the dry elements! In a medium mixing bowl, whisk together 3 cups of all-purpose flour and 1 teaspoon of baking powder. This step is absolutely paramount because it ensures that your bars rise beautifully and have that light, crumbly texture we all adore. The baking powder acts as a leavening agent, creating tiny air pockets in the dough which will expand when they hit the heat of the oven. I always recommend using a whisk here instead of a spoon because it aerates the flour, helping to prevent any lumps. You want these bars to be soft and tender, not dense or chewy.
Once your dry ingredients are well combined, gradually add this mixture into your peanut butter batter. Start by mixing on low speed so that flour doesn’t cloud your kitchen! Increase the speed gently as you incorporate the flour until you see no streaks left—just a beautifully cohesive dough. Trust me on this, don’t rush this step; allowing for proper incorporation ensures even distribution of flavors throughout your bars. A perfect blend means every single bite will deliver that heavenly peanut butter goodness paired with sweet strawberry jam.
Step 6: Establishing the Foundation
With our delightful dough at the ready, it’s time to establish our foundation for these Peanut Butter and Jelly Bars! Take about two-thirds of your dough—don’t worry if it seems like you’re reserving too much; this is crucial for both structure and flavor balance—and evenly spread it across the bottom of a lined 9×13-inch baking dish. The parchment paper not only helps with an easy release but also makes cleaning up afterward feel like a breeze—believe me, we all appreciate fewer dishes!
Using your hands or an offset spatula, gently press down on the dough to create an even layer without any gaps. It should feel slightly firm but still soft enough to mold easily—think of it as forming a cozy blanket for our jam! This base layer is crucial since it provides the delicious canvas on which our jam will sit. Make sure it’s packed well but not overly compressed; we want a nice texture that holds together while allowing that rich peanut butter flavor to shine through.
Step 7: Spreading That Liquid Gold
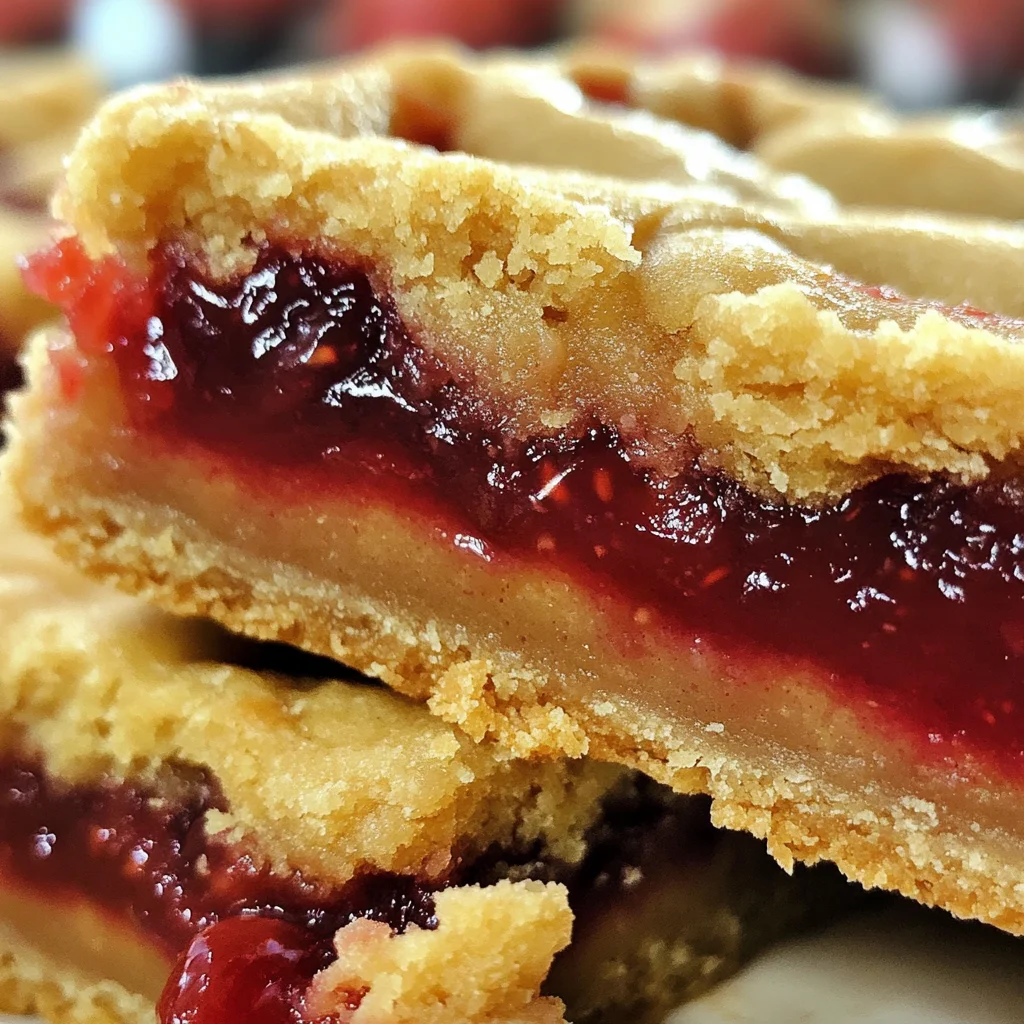
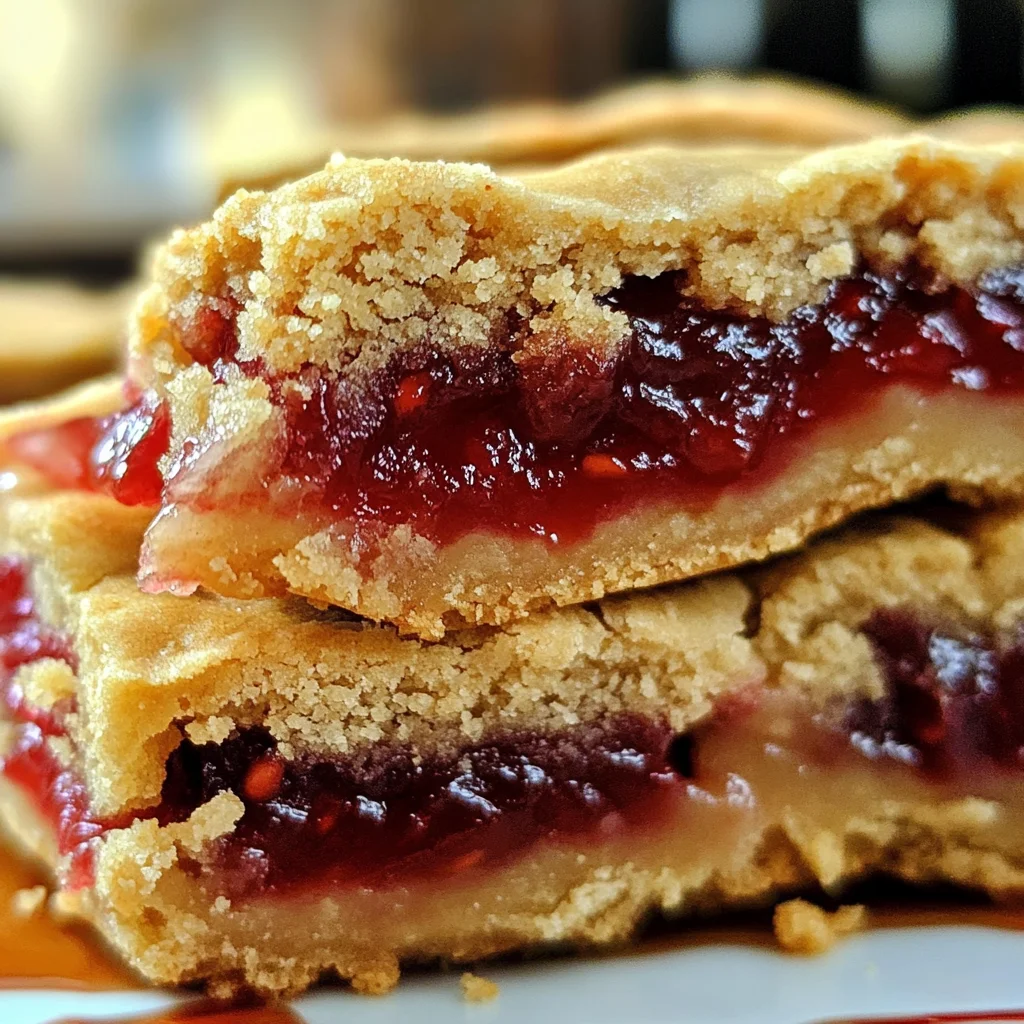
Ah, now comes one of my favorite moments—the joyous task of spreading 2 cups of strawberry jam over our lovingly prepared base layer! This isn’t just any ordinary jam; it’s like painting a masterpiece with vibrant hues and flavors. Use a spoon or spatula to dollop generous portions across the dough first before smoothing it out to cover every inch without going all the way to the edges. Why? Because as it bakes, that jam will bubble and spread slightly, creating those delightful pockets of sweetness nestled within each bar.
If you prefer other flavors like raspberry or grape jelly instead of strawberry, feel free to make this recipe your own! The key is choosing something you love because that taste will permeate every bite. As you spread the jam, take care not to disturb too much of the base layer underneath; we want them both to coexist harmoniously in their warm embrace during baking. Picture this moment as layering flavors—each component plays its part in crafting something truly extraordinary!
Step 8: Crumbling Perfection
Now we return to our reserved third of dough—the crowning glory! With clean hands or a fork, crumble the remaining dough over that luscious layer of strawberry jam as if you’re sprinkling fairy dust over your creation. This crumbling technique is essential because it allows for those glorious textures: some bites will be chewy from the peanut butter while others will be pleasantly crunchy from baked bits of dough poking through.
Aim for an even distribution here; no need for perfection—as they bake together in harmony, they’ll form beautiful peaks and valleys that give each bar its unique character! As you sprinkle away, keep in mind how enticing those golden-brown bits will look when they emerge from the oven—a perfect contrast against the ruby red jam underneath. Bake these beauties in your preheated oven at 350°F (175°C) for about 30-35 minutes, or until they turn lightly golden brown on top and start bubbling at the edges. You’ll know they’re done when you can see just a hint of browning around those crumbles—this visual cue is what transforms simple ingredients into something utterly intoxicating!
Conclusion:
As we wrap up our journey through this scrumptious recipe for Peanut Butter and Jelly Bars, I can’t help but feel a surge of excitement over how easy it is to bring such joy into your kitchen. From that first silky blend of creamy peanut butter with softened butter to those final golden-brown crumbles on top—every step is filled with anticipation and warmth. What truly makes this recipe shine is its harmonious balance of flavors; the nutty richness of peanut butter combined with the sweet tang of strawberry jam creates an utterly intoxicating experience that transports you back to simpler days when PB&J sandwiches ruled lunchboxes everywhere.
Why should you dive right into making these bars? Well, aside from being absolutely delicious, this recipe invites fun into your kitchen—it’s perfect for a baking afternoon with kids or as a simple yet rewarding solo project after a long day. Whether you’re whipping these up for an after-school snack or bringing them along to share at family gatherings, there’s something incredibly satisfying about pulling these bars from the oven right when everyone is gathering around. The golden crust beckons like a warm hug on a chilly day!
Imagine savoring one with a steaming cup of herbal tea during those cozy evenings at home; it’s sheer bliss! Or perhaps paired with some vanilla ice cream for an indulgent dessert after dinner—the creamy contrast against the chewy bar creates fireworks on your palate! For an afternoon pick-me-up while working from home, enjoy one next to your favorite coffee—it will be like taking a mini-vacation right at your desk.
Feeling adventurous? This recipe is wonderfully adaptable! If you want to switch things up, consider using raspberry jam instead of strawberry for an exciting twist that brings its own burst of flavor. Or what about adding some chopped nuts for extra crunch? Coconut flakes mixed into the dough could also elevate it into an entirely different realm of deliciousness! Each variation offers its unique charm while keeping that comforting essence we all love about these bars. So go ahead—try this recipe today, share your experience with friends and family, and don’t forget to tag me in your creations! Let’s spread the joy together because every bite deserves celebration!
Peanut Butter and Jelly Bars
Indulge in delightful Peanut Butter and Jelly Bars, a nostalgic treat that combines the creamy goodness of peanut butter with the sweetness of fruity jam. These bars are not just a simple dessert; they are a heartwarming reminder of childhood lunches and family picnics. With their chewy texture and rich flavor profile, these Peanut Butter and Jelly Bars are perfect for any occasion—be it an afternoon snack, a family gathering, or a sweet treat to share with friends. Easy to make and utterly delicious, you’ll find yourself reaching for these bars time and again.
- Prep Time: 15 minutes
- Cook Time: 35 minutes
- Total Time: 50 minutes
- Yield: Approximately 24 servings 1x
- Category: Dessert
- Method: Baking
- Cuisine: American
Ingredients
- 1 cup unsalted butter, softened
- 1 ½ cups granulated sugar
- 1 teaspoon pure vanilla extract
- 2 large eggs (room temperature)
- 2 cups creamy peanut butter
- 3 cups all-purpose flour
- 1 teaspoon baking powder
- 2 cups strawberry jam
Instructions
- Preheat your oven to 350°F (175°C) and line a 9×13-inch baking dish with parchment paper.
- In a stand mixer, cream together the softened butter, peanut butter, and sugar until light and fluffy.
- Add in the eggs one at a time, mixing well after each addition before adding vanilla extract.
- In a separate bowl, whisk together flour and baking powder, then gradually mix into the wet ingredients until fully combined.
- Press two-thirds of the dough into the prepared baking dish as the base layer.
- Spread the strawberry jam evenly over the dough without reaching the edges.
- Crumble the remaining dough over the jam layer.
- Bake for 30-35 minutes until golden brown on top.
- Allow to cool for at least 20 minutes before slicing into squares.
Nutrition
- Serving Size: 1 serving
- Calories: 210
- Sugar: 12g
- Sodium: 120mg
- Fat: 10g
- Saturated Fat: 4g
- Unsaturated Fat: 6g
- Trans Fat: 0g
- Carbohydrates: 28g
- Fiber: 1g
- Protein: 4g
- Cholesterol: 30mg