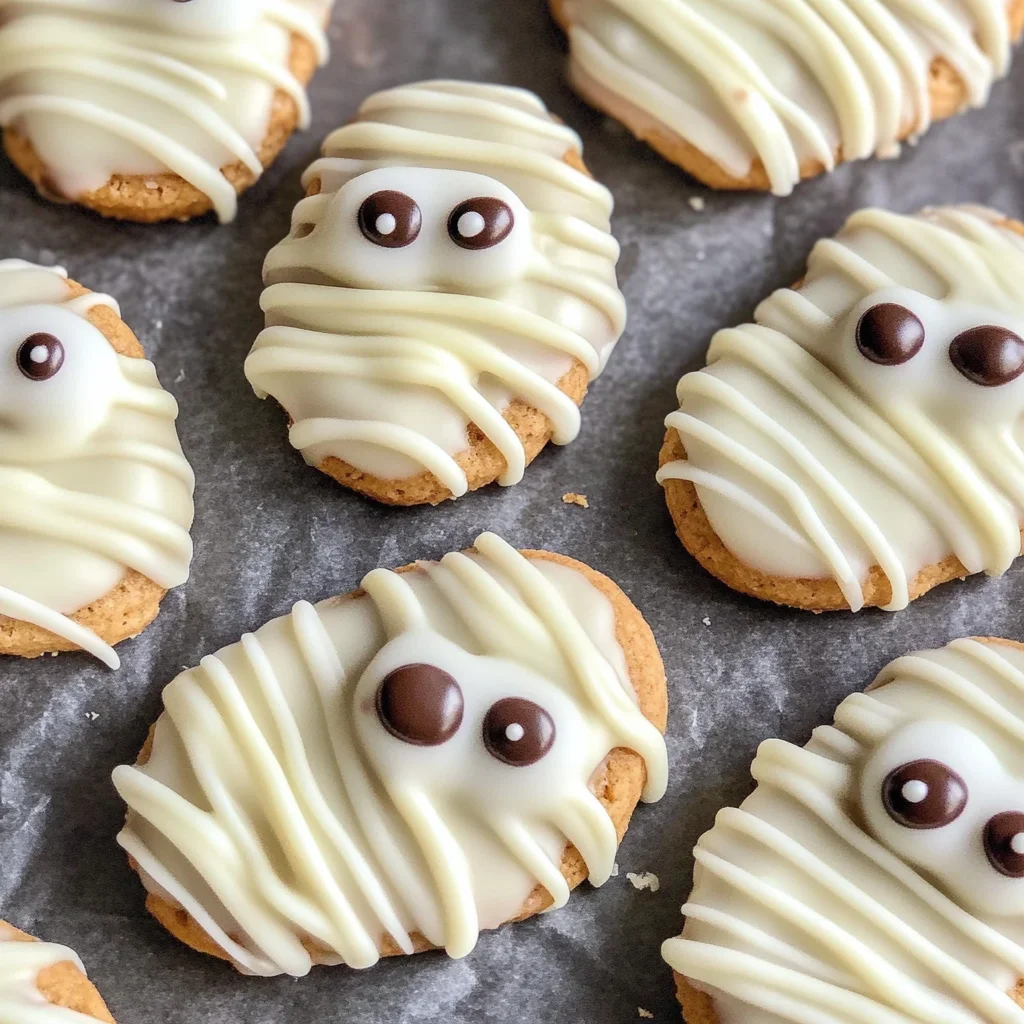
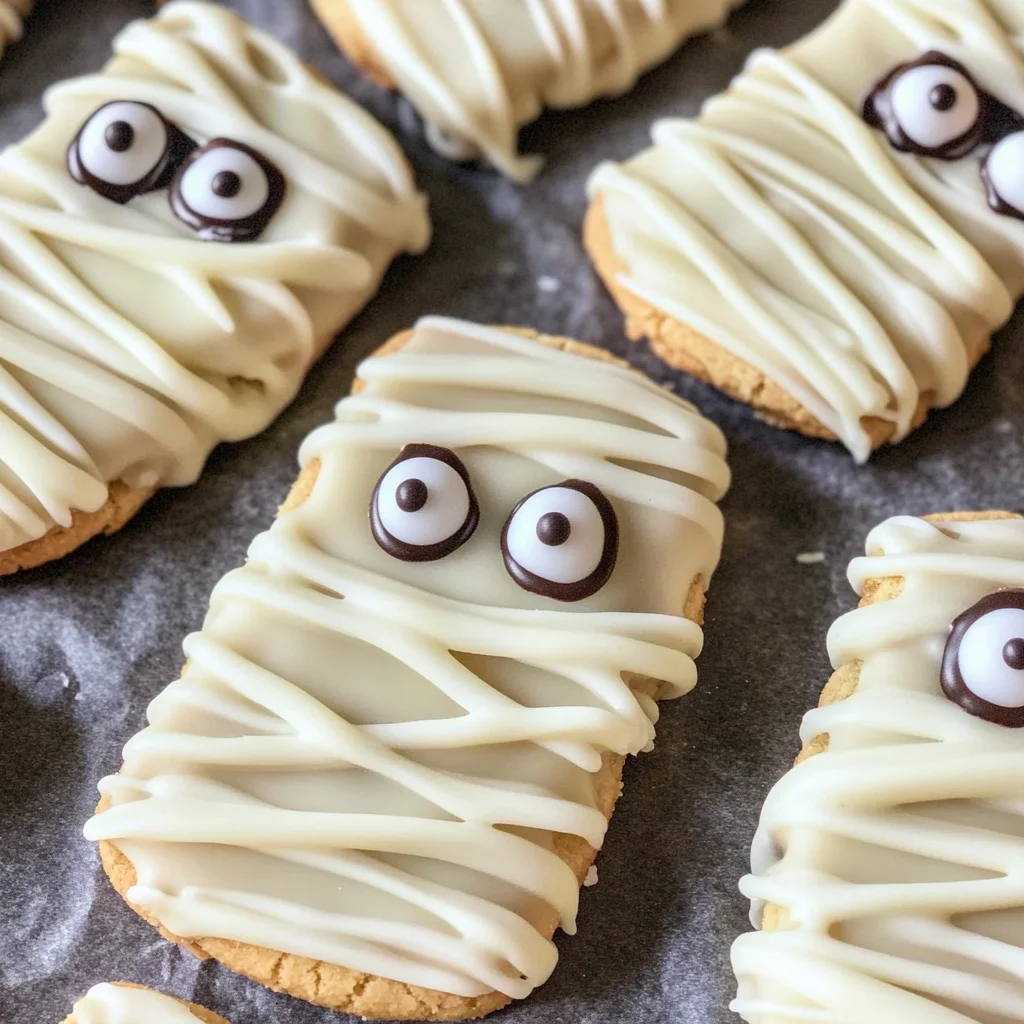
Nutter Butter Mummies
If you’re looking for a fun and adorable treat that’s perfect for Halloween, then you’ve stumbled upon the right place! Nutter Butter Mummies are not only super cute, but they are also incredibly easy to make. This delightful recipe is a favorite in my household, especially when we want to whip up something festive without spending hours in the kitchen. Whether it’s for a family gathering, a school party, or just a cozy night at home, these little mummies will bring smiles all around!
What makes these Nutter Butter Mummies even more special is their versatility. You can easily customize them by adding sticks to turn them into treats on a stick! Plus, kids love helping out in the kitchen with this one—who wouldn’t want to decorate their very own mummy? Let’s dive into why you’ll love this recipe.
Why You’ll Love This Recipe
- Super Simple: With just a few ingredients and quick steps, you can have these mummies ready in no time.
- Family-Friendly Fun: Kids and adults alike will enjoy decorating and indulging in these spooky treats.
- Versatile Treat: Perfect for Halloween parties or just as an after-school snack; they fit any occasion!
- Make-Ahead Option: You can prepare these ahead of time and store them until you’re ready to impress your guests.
- Deliciously Decadent: The combination of creamy white chocolate and crunchy cookies makes every bite delightful.
Ingredients You’ll Need
Let’s gather some simple and wholesome ingredients to make our Nutter Butter Mummies. These are easy-to-find items that make crafting this sweet treat a breeze!
- 8 Nutter Butter Cookies
- 1 (12 oz) bag White Chocolate Chips
- 16 Candy Eyes
Variations
One of the best parts about making Nutter Butter Mummies is how flexible this recipe can be! Here are some fun ideas to mix things up:
- Change the Chocolate: Use milk chocolate or dark chocolate instead of white for a different flavor profile.
- Add Sprinkles: Decorate your mummies with colorful sprinkles for an extra festive touch.
- Swap the Eyes: Use mini chocolate chips or colored candy pieces instead of candy eyes for a unique look.
- Include Flavoring: Add a dash of vanilla extract to the melted chocolate for an extra layer of flavor.
How to Make Nutter Butter Mummies
Step 1: Prepare Your Workspace
First things first, lay down some parchment paper on your countertop. This will keep your mummies from sticking and make cleanup a breeze later on!
Step 2: Melt the Chocolate
In a small microwave-safe bowl, melt your white chocolate chips. Heat them in short bursts of about 30 seconds, stirring in between until smooth. This step is key because melted chocolate is what brings our mummies to life!
Step 3: Coat the Cookies
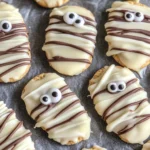
Now it’s time for the fun part! Dunk each Nutter Butter cookie into the melted chocolate, letting any excess drip off. Carefully place it on the parchment paper and add two candy eyes while the chocolate is still warm. This will ensure they stick nicely as it hardens.
Step 4: Create the Mummy Wraps
Once your first layer has hardened, melt any leftover chocolate again. Drizzle it over each cookie in zig-zag patterns to create that classic mummy look. Don’t worry about perfection—each one will have its own charm!
And there you have it! Your delicious Nutter Butter Mummies are ready to be enjoyed. These treats are sure to be a hit at any gathering or even as a delightful surprise at home. Happy munching!
Pro Tips for Making Nutter Butter Mummies
Creating these delightful Nutter Butter Mummies is a fun activity, and with a few pro tips, you can make them even more enchanting!
- Use Quality White Chocolate: Opt for high-quality white chocolate chips as they melt better and provide a smoother coating. This will enhance both the texture and flavor of your mummies.
- Chill Your Cookies: If you have time, place the Nutter Butter cookies in the refrigerator for about 15 minutes before dipping them. Chilled cookies hold their shape better and are easier to work with when adding the chocolate coating.
- Don’t Rush the Drizzle: Allow the first layer of chocolate to fully harden before drizzling on more melted chocolate. This ensures that your mummy’s “wrappings” look neat and stay in place.
- Experiment with Different Eyes: While candy eyes are adorable, feel free to get creative! Use mini chocolate chips or colored sprinkles for a fun twist on your mummies’ appearance.
- Make It a Fun Activity: Involve kids or friends in the decorating process! It’s a great way to bond while unleashing creativity and making festive treats together.
How to Serve Nutter Butter Mummies
Nutter Butter Mummies are not just delicious; they also make a spooky yet charming addition to any Halloween gathering. Present them creatively for an extra wow factor!
Garnishes
- Crushed Graham Crackers: Sprinkle some crushed graham crackers around your mummies on the serving platter for a sandy effect, reminiscent of tombstones.
- Chocolate Shavings: Add a sprinkle of dark chocolate shavings over the top for an elegant touch that contrasts beautifully with the white chocolate.
Side Dishes
- Pumpkin Spice Popcorn: Lightly sweetened popcorn tossed with pumpkin spice creates a crunchy snack that complements the creamy texture of your mummies.
- Fruit Medley: A colorful fruit salad featuring apples, grapes, and mandarin oranges adds freshness and balances out the sweetness of your dessert.
- Veggie Platter with Hummus: Crisp vegetables like carrots, celery, and bell peppers served with hummus offer a healthy option that keeps things light amid all the sweets.
Embrace your creativity when serving up these delightful Nutter Butter Mummies! They’re sure to be a hit among both kids and adults alike during Halloween festivities.
Make Ahead and Storage
These delightful Nutter Butter Mummies are perfect for meal prep, making them an easy treat to whip up ahead of time! Whether for a spooky gathering or just a fun dessert at home, you can store them in various ways to keep their charm intact.
Storing Leftovers
- Store any leftover Nutter Butter Mummies in an airtight container.
- Keep them in a cool, dry place; they can last about 3-5 days.
- If the weather is warm, consider refrigerating them to maintain their freshness.
Freezing
- For longer storage, you can freeze the mummies!
- Place the cookies in a single layer on a baking sheet to freeze for 1-2 hours.
- Once frozen, transfer them to a freezer-safe bag or container. They can be stored for up to 3 months.
Reheating
- There’s no need to reheat these mummies; they’re best enjoyed at room temperature straight from the fridge or freezer!
- If desired, let them thaw for about 15-20 minutes before serving for optimal taste and texture.
FAQs
Here are some common questions about Nutter Butter Mummies that might help clarify your recipe experience!
Can I make Nutter Butter Mummies ahead of time?
Absolutely! You can prepare Nutter Butter Mummies a day or two in advance. Just store them properly to keep them fresh and ready to enjoy!
How do I store leftover Nutter Butter Mummies?
Store leftover Nutter Butter Mummies in an airtight container at room temperature for up to 5 days or refrigerate them for extra freshness!
Can I use different types of chocolate for my Nutter Butter Mummies?
Yes! While white chocolate is traditional, feel free to experiment with milk or dark chocolate. Just ensure any chocolate you use melts smoothly.
Are there any nut-free alternatives for this recipe?
If you’re looking for nut-free options, consider using cookie brands that are specifically labeled as nut-free. Always check labels carefully!
Final Thoughts
I hope you have as much fun making these adorable Nutter Butter Mummies as I did! They’re not only simple but also bring a playful touch to any Halloween celebration or gathering. Enjoy crafting these sweet treats and remember that each mummy you create is unique—just like you! Happy baking!
Nutter Butter Mummies
Indulge in the festive spirit of Halloween with these delightful Nutter Butter Mummies! These adorable treats are not only incredibly easy to make, but they also bring a touch of whimsy to any celebration. With just a handful of ingredients, you can transform simple cookies into charming mummies that are perfect for parties or family gatherings. Kids will love participating in the decoration process, making this a fun activity for all ages. Whether you keep them as is or get creative with different toppings and variations, these Nutter Butter Mummies are sure to be a hit!
- Prep Time: 15 minutes
- Cook Time: 5 minutes
- Total Time: 20 minutes
- Yield: 8 servings 1x
- Category: Dessert
- Method: No-Bake
- Cuisine: American
Ingredients
- 8 Nutter Butter Cookies
- 1 (12 oz) bag White Chocolate Chips
- 16 Candy Eyes
Instructions
- Prepare your workspace by laying parchment paper on your countertop.
- Melt white chocolate chips in a microwave-safe bowl in short bursts (about 30 seconds), stirring until smooth.
- Dunk each Nutter Butter cookie into the melted chocolate, letting excess drip off before placing it on parchment paper.
- While the chocolate is still warm, add two candy eyes to each cookie.
- Once the first layer hardens, drizzle more melted chocolate over each cookie in zig-zag patterns to create mummy wraps.
Nutrition
- Serving Size: 1 serving
- Calories: 160
- Sugar: 14g
- Sodium: 30mg
- Fat: 8g
- Saturated Fat: 5g
- Unsaturated Fat: 3g
- Trans Fat: 0g
- Carbohydrates: 20g
- Fiber: 1g
- Protein: 2g
- Cholesterol: 0mg