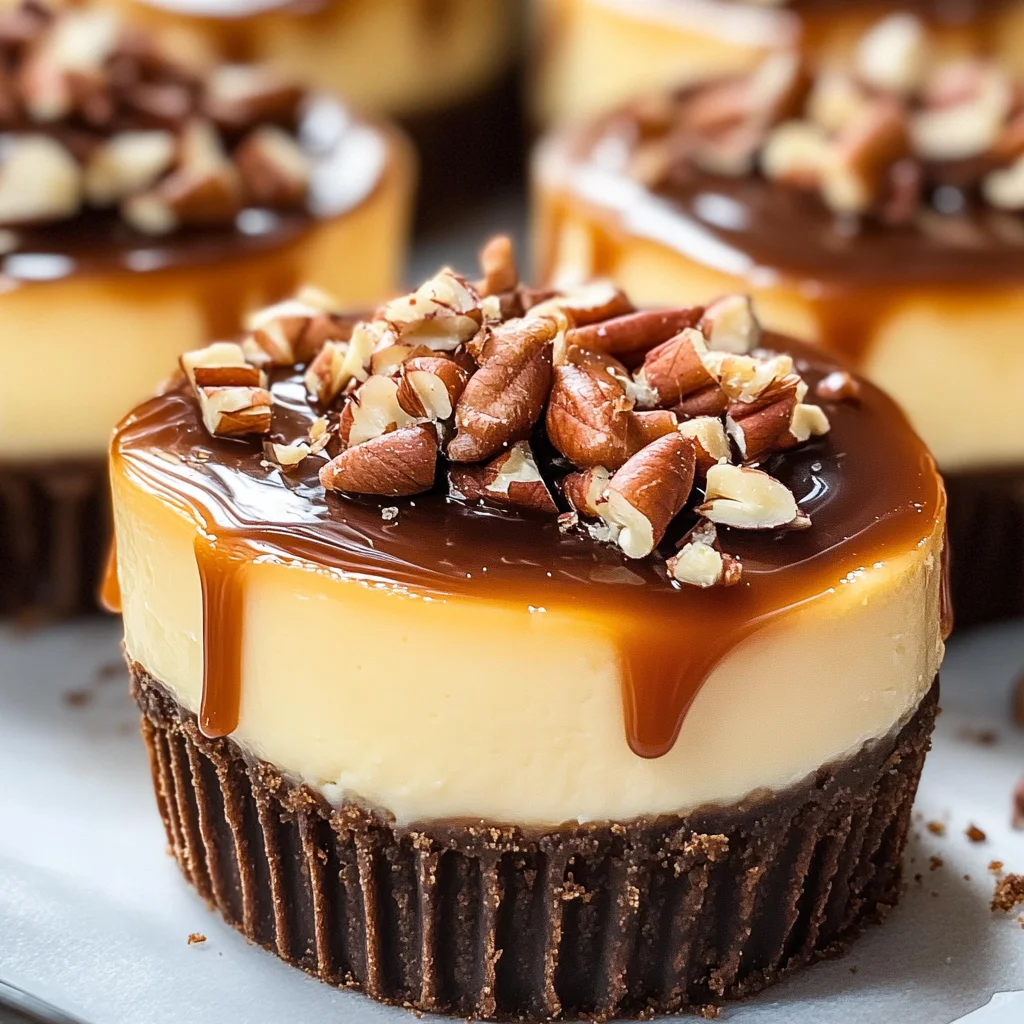
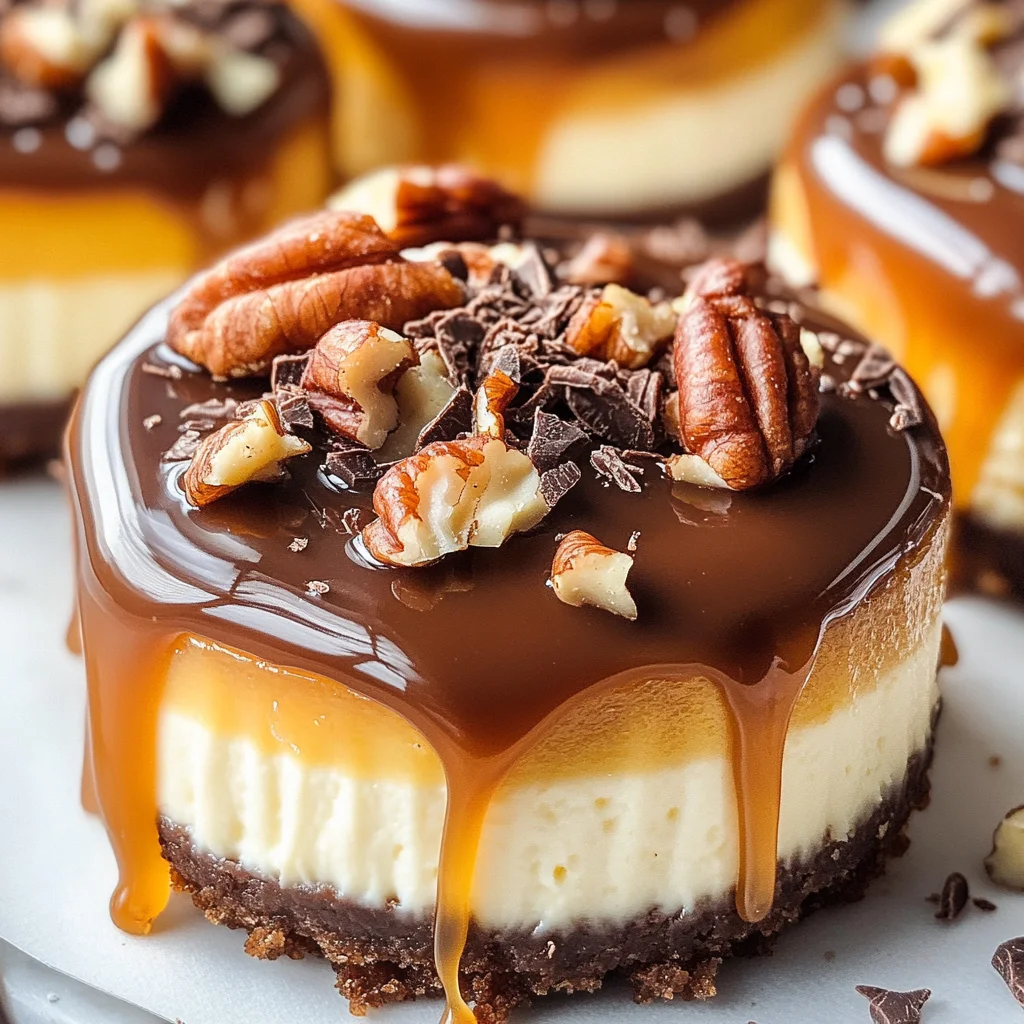
Mini Turtle Cheesecakes
There’s something profoundly magical about food that transcends mere sustenance; it’s an experience, a celebration of flavors, and a bridge connecting generations. When I think about my cherished memories in the kitchen, I can’t help but smile at the joyful chaos that surrounds the making of Mini Turtle Cheesecakes. These delightful little treats are more than just a dessert; they are a symphony of textures and flavors that dance joyfully across your palate. Picture this: creamy cheesecake nestled on a buttery graham cracker crust, drizzled with luscious caramel and crowned with rich chocolate ganache, all topped off with crunchy pecans. It’s not just a treat; it’s an invitation to indulge in life’s sweetest moments.
I promise you, each bite of these mini turtle cheesecakes tells a story—one that weaves together creamy decadence and the comforting crunch of nuts. The allure lies in their harmonious blend of sweet and salty notes, creating a balance that is simply irresistible. What makes these cheesecakes special is not just their taste but the joy they bring to any occasion—be it a casual family gathering or a festive celebration. They evoke warmth and nostalgia while offering a contemporary twist, making them the perfect dessert for everyone to enjoy. So let’s embark on this culinary adventure together; I assure you, it’s going to be extraordinary!
Mini Turtle Cheesecakes: A Sweet Symphony of Flavors
Welcome to the delightful world of mini turtle cheesecakes! This recipe is one I’ve cherished for years, often pulling it out when I want to create something truly unforgettable but still crave simplicity in preparation. With every step, you’ll find yourself falling deeper in love with the process—a bit of melting chocolate here, a dollop of caramel there—that ultimately culminates in these utterly intoxicating little delights. So roll up your sleeves and get ready to discover how simple ingredients can come together to create something truly magnificent.
Ingredients:
As we delve into this adventure of creating mini turtle cheesecakes, let’s take a moment to appreciate each ingredient’s role in crafting these heavenly treats. Each element plays its part beautifully, contributing not only flavor but also texture and experience.
- 1 cup (113g) graham cracker crumbs: Ah, the graham cracker crumb! This is the foundation upon which our mini turtle cheesecakes stand proudly. It lends that delightful crunch that contrasts perfectly with the creamy filling. When choosing your graham crackers, opt for those made from whole grains if possible—they add an extra depth of flavor and richness that’s hard to resist. If you’re feeling adventurous or need a gluten-free alternative, crushed almonds or oats work wonders too!
- 4 Tbsp (57g) unsalted butter (melted, 1/2 stick): Butter—the glorious golden liquid gold—is what binds our crust together while infusing it with richness. It’s absolutely paramount that this butter is melted; otherwise, it won’t incorporate properly into the crumbs. You can use high-quality European-style butter for an even richer taste—trust me on this one! The warmth from the melted butter helps meld those crumbs into a cohesive mixture that’ll bake up perfectly crisp.
- 16 oz (452g) full-fat cream cheese (two 8 oz packages, softened to room temperature): Here’s where we get that luxurious creaminess! Full-fat cream cheese is non-negotiable if we want that velvety texture we crave in cheesecakes. Make sure it’s softened—this allows for easy blending with sugar and eggs without lumps. If you’re looking for alternatives due to dietary preferences or lactose intolerance, consider using vegan cream cheese options available at many supermarkets.
- ½ cup (99g) granulated sugar: Sugar does more than merely sweeten; it helps achieve that beautifully light and airy texture through creaming with our cream cheese. This step is crucial as it incorporates air into our filling—so don’t rush this part! You could substitute coconut sugar or other sweeteners if you’re looking for lower-glycemic options; however, keep in mind they may alter the final taste slightly.
- 1 tsp vanilla extract: Vanilla extract adds an aromatic quality that elevates our cheesecake from ordinary to extraordinary! It complements both the chocolate and caramel beautifully while enhancing all other flavors present in your dessert. Always opt for pure vanilla extract over imitation if you can—it makes such a difference!
- 2 large eggs: Eggs are vital for structure—they help bind everything together while providing moisture and richness. Room temperature eggs blend more easily into your batter compared to cold ones straight from the fridge; so set them out ahead of time! If you’re avoiding eggs altogether, consider using flaxseed meal mixed with water as an egg substitute—it works surprisingly well in cheesecakes.
- Jarred caramel sauce: While homemade caramel has its charm (and believe me, I adore it), jarred caramel sauce offers convenience without sacrificing flavor when you’re pressed for time! It adds sweetness and gooeyness that perfectly complements the cheesecake’s creaminess. If you’re feeling adventurous or want control over ingredients, making your own is quite rewarding too!
- Chocolate ganache (½ cup semi-sweet chocolate chips & ¼ cup heavy whipped cream): Ganache brings decadence galore! The harmony created by melting semi-sweet chocolate chips with heavy whipped cream results in an incredibly silky topping that’s simply divine when drizzled over our cheesecakes. Use high-quality chocolate here—for me personally, Ghirardelli never disappoints!
- Chopped nuts (I used pecans): Nuts add both crunch and flavor—their earthy notes pair wonderfully with sweet elements like caramel and chocolate while providing texture contrast against the smooth cheesecake base. Pecans are my favorite due to their rich buttery quality; however, feel free to swap them out for walnuts or even almonds depending on your preference.
Equipment You’ll Need:
Before we dive into preparing our mini turtle cheesecakes, let’s ensure you have all the right tools at hand because having good equipment makes all the difference in achieving success in baking! Each piece plays an integral role in bringing our delicious vision to life.
- 12-cup muffin tin: This will serve as your anchor point for shaping those adorable mini cheesecakes! Opting for silicone muffin tins can make removing them easier once baked—plus they come out looking fabulous without needing liners.
- Mixing bowls: A sturdy mixing bowl set is essential here—one large enough for combining our filling ingredients seamlessly while allowing room for stirring without spills!
- Electric mixer: Whether handheld or standing mixer works well here—the key is achieving fluffy consistency when creaming together those essential ingredients like cream cheese and sugar.
- Rubber spatula: You’ll want one handy for scraping down sides during mixing—it ensures nothing gets left behind so every bit incorporates evenly into your batter.
- Measuring cups & spoons: Precision matters when baking! Having both sets readily available means you’ll nail those measurements every time without second guessing yourself.
Now that we’re equipped with knowledge about ingredients as well as tools necessary let’s move onto creating these delightful little desserts!
Preparing the Mini Turtle Cheesecakes
Step 1: Crafting Your Graham Cracker Crust
To begin our delightful journey toward crafting mini turtle cheesecakes, let’s first whip up that irresistible graham cracker crust! Start by preheating your oven to 325°F (160°C)—this prepares our baking environment perfectly before we dive into mixing ingredients together later on. In a medium-sized mixing bowl, combine your graham cracker crumbs with melted unsalted butter until it’s well blended; it should resemble wet sand when done right! Take care not to rush this step—ensuring every crumb gets coated evenly will yield a crust that’s delightfully crisp yet tender once baked.
Once combined thoroughly—don’t hold back on getting those hands dirty if needed—press this mixture firmly into each cavity of your prepared muffin tin; aim for even distribution across bottoms while also pushing slightly up sides so they hold shape well during baking! Once accomplished successfully (you’ve got this!), pop this crust-filled tin into your preheated oven and bake for 8–10 minutes until lightly golden brown around edges—not too dark though as we want them delicate yet sturdy enough to support delicious layers ahead!
Step 2: Preparing The Creamy Filling
While waiting patiently during crust-baking time (perhaps sneak some tastes!), let’s shift gears toward creating our luscious cheesecake filling next! In another mixing bowl fitted onto your electric mixer base—combine softened full-fat cream cheese along with granulated sugar at medium speed until smoothly blended without any lumps peeking through sight—a solid minute should suffice here. This process known as creaming is vital as it introduces air pockets within batter which leads us straight toward lightness once baked later on!
After achieving that smooth consistency effortlessly—add vanilla extract followed by room-temperature eggs one at time allowing each egg fully integrates before adding next—that’ll ensure maximum fluffiness throughout end product ensuring no rubbery texture emerges post-baking either! Mix until everything blends harmoniously together then gently fold through some jarred caramel sauce giving hint sweetness before pouring filling over cooled graham cracker crusts already waiting patiently below within muffin tin cavities ready embracing creamy goodness above them now!
Step 3: Baking Your Cheesecake Gems
Now comes one crucial step—we’re heading towards baking our assembled beauties now nestled snugly within muffin tins filled generously awaiting their turn inside hot oven previously set earlier on! Bake these mini turtles at same temperature established earlier around 325°F (160°C) anywhere between 18–20 minutes till edges appear firm yet center remains slightly jiggly resembling soft pudding consistency—it’ll firm up beautifully once cooled afterwards trust me on this matter entirely too important not skip attention given here!
Once timer beeps signaling completion remove carefully from oven letting cool naturally upon countertop allowing flavors meld beautifully alongside textures develop further while transitioning through cooling phase prior serving anyone willing partake upon indulging afterward within first bites taken eagerly awaiting response upon tasting them freshly made themselves…I know excitement builds anticipation immensely—I promise fully worth wait ahead!
Step 4: Chilling For Perfection
With patience comes great rewards—after letting cooled perhaps hour additionally place entire muffin tray containing now-chilled treasures inside refrigerator allowing further cooling time ideally about four hours minimum before serving guests—or yourself honestly who wouldn’t want enjoy slice after slicing indulging quietly forming smiles across faces everywhere gathered around celebrations? Chilling serves two purposes primarily first ensuring flavors marry harmoniously second guaranteeing perfect sliceability once ready ready presentation onto plates eventually desired outcome achieved entirely folks—it cannot be overstated enough how important chilling proves pivotal towards success achieved ultimately leading enjoyment shared amongst loved ones gathered round table simply celebrating life itself through desserts made lovingly…so go ahead fill stomachs hearts alike inviting warmth shared tenure spent alongside one another truly extraordinary times ahead await just waiting unfold magically before eyes witnessing beauty unfold right here today…
Baking Your Perfect Mini Turtle Cheesecakes
Step 5: Blending the Creamy Cheesecake Filling
Now that your crust is beautifully prepped and waiting, it’s time to dive into that luscious cheesecake filling! In a large mixing bowl, grab your softened cream cheese—this is crucial because if it’s too cold, you won’t get that dreamy texture we’re aiming for. Using an electric mixer set on medium speed, beat the cream cheese until it’s luxuriously smooth and creamy, about 2-3 minutes. This step is all about aeration; introducing air into the mixture will give your cheesecakes that light yet rich consistency that makes every bite feel like a heavenly cloud. Once the cream cheese resembles thick frosting with no lumps in sight, gradually add in the granulated sugar and continue mixing until fully incorporated.
But hold on! You’ll want to scrape down the sides of your bowl with a spatula every so often. This little detail ensures that every bit of sugar gets mixed in evenly, helping to create a uniform sweetness throughout. Next comes the vanilla extract—just one teaspoon can transform this ordinary mixture into something extraordinary, imparting a depth of flavor that pairs beautifully with the chocolate and caramel to come. After you’ve added the vanilla, it’s time to crack in those two large eggs, one at a time. Mixing them just until combined is key here; overmixing can introduce too much air, which might lead to cracks in your finished cheesecakes. Trust me on this—you want these beauties to be as perfect as possible!
Step 6: Pouring and Baking
With your filling now perfectly blended, gently pour it over each of your pre-baked crusts in their respective mini cheesecake tins. I recommend using a ladle or measuring cup for this step—it allows for greater control and helps prevent any overflow. Fill each tin just about three-quarters full; this gives them room to rise slightly without spilling over. The visual cue here is simple: you should see that delightful contrast of golden crust at the bottom with a creamy white cheesecake filling above.
Now let’s talk baking! Preheat your oven to 325°F (163°C) if you haven’t already done so—this temperature is absolutely paramount for creating that silky texture within these mini turtle cheesecakes. Place your filled tins onto a baking sheet; this makes it easier to transfer them in and out of the oven without spills or accidents. Bake them for about 20 minutes, but don’t just set a timer and walk away! Keep an eye on them toward the end of baking—a perfectly baked cheesecake will be set around the edges while still slightly wobbly in the center when you give them a gentle shake. This slight jiggle means they will firm up as they cool, resulting in that velvety finish we’re after.
Step 7: The Cooling Process
As soon as those cheesecakes are done baking, remove them from the oven and let them cool at room temperature for about 10-15 minutes before transferring them to the fridge. Now here’s where patience becomes essential—the cooling process is not just about letting them chill; it’s also about allowing those flavors to meld together beautifully and ensuring they achieve their ideal texture. You may be tempted to dive right in—believe me, I understand! But if you skip this step or rush it, you could end up with cheesecakes that are grainy or overly dense.
Once they’ve cooled slightly on the counter, cover each mini cheesecake gently with plastic wrap or aluminum foil (make sure not to touch the tops!) and pop them into the fridge for at least four hours—or better yet, overnight if you have time! This chilling period works wonders; it lets everything settle down comfortably while enhancing those incredible flavors we’ve worked hard to build. Just imagine how satisfying it will be when you finally take that first bite!
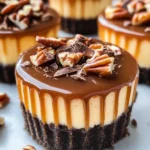
Step 8: Adding Your Decadent Topping
After all that waiting (I promise it’ll be worth it!), it’s time for one of my favorite parts—the toppings! In a small saucepan over low heat or using a microwave-safe bowl, prepare your chocolate ganache by combining half a cup of semi-sweet chocolate chips with a quarter cup of heavy whipped cream. Stir gently until everything melts into a smooth pool of liquid gold; this ganache will be both rich and glossy, adding an irresistible allure to your mini turtle cheesecakes.
Now comes another moment where patience pays off—instead of pouring hot ganache directly onto chilled cheesecakes (which could lead to melting), let it cool slightly until it thickens just enough to hold its shape upon drizzling—about 5-10 minutes should do nicely. Meanwhile, grab that jarred caramel sauce and some chopped nuts—pecans work wonderfully for crunch! Drizzle some caramel over each chilled cheesecake followed by a generous spoonful of chocolate ganache—just picture how utterly intoxicating they’ll look! Finish off with sprinkling those chopped nuts right on top because who can resist that wonderful contrast between creamy cheesecake and crunchy nuts?
Conclusion:
As we reach the end of our delightful journey through this recipe, I can’t help but feel a sense of joy bubbling within me. The process of creating these Mini Turtle Cheesecakes is not just about mixing ingredients; it’s about weaving together flavors that dance on your palate—chocolate’s deep richness meeting the sweetness of caramel and the nutty crunch from pecans creates a symphony of textures that’s truly extraordinary. I hope my enthusiasm has sparked something within you as well; there’s nothing quite like sharing such a beloved family recipe!
This recipe stands out as an absolute must-try not only because of its decadent taste but also due to the joy it brings when making it together with loved ones. Whether you’re hosting a gathering or simply looking for a comforting dessert after dinner, these cheesecakes shine brightly on any occasion. Picture pulling them from the oven, their golden tops glistening under soft lighting—a moment filled with anticipation as everyone gathers around the table, eager to dig in.
Imagine savoring one with a warm cup of coffee on a cozy afternoon or sharing them at parties where friends gather—their eyes lighting up with delight as they take that first bite. For an even more indulgent experience, consider topping them with fresh whipped cream or serving alongside vanilla bean ice cream—each combination elevating this dessert into something magical!
Feeling adventurous? This recipe is wonderfully adaptable! You could easily swap out pecans for walnuts or almonds if that’s what you have on hand—or mix things up by adding different flavored extracts like almond or coconut into your cheesecake batter for exciting new twists! You could even transform them into pumpkin mini cheesecakes during fall by adding pumpkin puree and warming spices—it’s all possible! So go ahead, dive into this adventure yourself! Try making these Mini Turtle Cheesecakes, share your experiences, and connect with fellow friends who love baking just as much as we do!
Mini Turtle Cheesecakes
Indulge in the rich and creamy delight of Mini Turtle Cheesecakes! These bite-sized treats are a perfect blend of velvety cheesecake, buttery graham cracker crust, and decadent chocolate ganache, all drizzled with sweet caramel and topped with crunchy pecans. Not only are they a visual treat, but each mini cheesecake also offers an irresistible combination of flavors and textures that will please any dessert lover. Perfect for gatherings or as a sweet escape after dinner, these cheesecakes are easy to make and sure to impress. Let’s dive into this delightful recipe!
- Prep Time: 20 minutes
- Cook Time: 30 minutes
- Total Time: 50 minutes
- Yield: Makes approximately 12 mini cheesecakes 1x
- Category: Dessert
- Method: Baking
- Cuisine: American
Ingredients
- 1 cup graham cracker crumbs
- 4 Tbsp unsalted butter (melted)
- 16 oz full-fat cream cheese (softened)
- ½ cup granulated sugar
- 1 tsp vanilla extract
- 2 large eggs
- Jarred caramel sauce
- Chocolate ganache (½ cup semi-sweet chocolate chips & ¼ cup heavy whipped cream)
- Chopped nuts (pecans)
Instructions
- Preheat oven to 325°F (160°C). In a bowl, mix graham cracker crumbs with melted butter until well combined. Press mixture into the bottom of a muffin tin to form crusts.
- Bake crusts for 8–10 minutes until golden brown. Allow cooling.
- In a mixing bowl, beat softened cream cheese and sugar until smooth. Add vanilla extract and eggs one at a time, blending well after each addition.
- Pour filling over cooled crusts in muffin tin and bake for 18–20 minutes until edges are set but centers remain slightly jiggly.
- Cool at room temperature for about 10 minutes before refrigerating for at least four hours.
- Prepare chocolate ganache by melting chocolate chips with heavy cream until smooth. Drizzle over chilled cheesecakes topped with caramel sauce and chopped pecans before serving.
Nutrition
- Serving Size: 1 mini cheesecake (75g)
- Calories: 320
- Sugar: 20g
- Sodium: 180mg
- Fat: 22g
- Saturated Fat: 11g
- Unsaturated Fat: 9g
- Trans Fat: 0g
- Carbohydrates: 30g
- Fiber: 1g
- Protein: 5g
- Cholesterol: 60mg