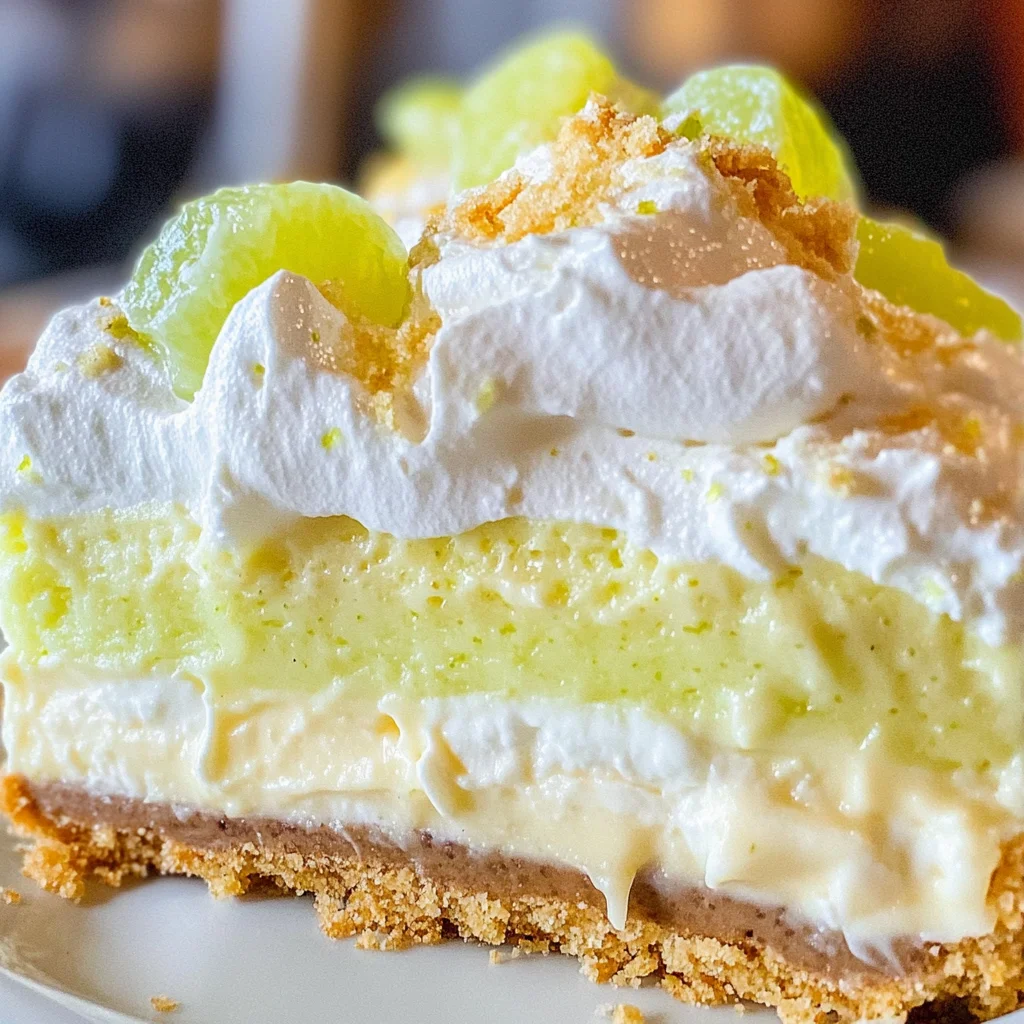
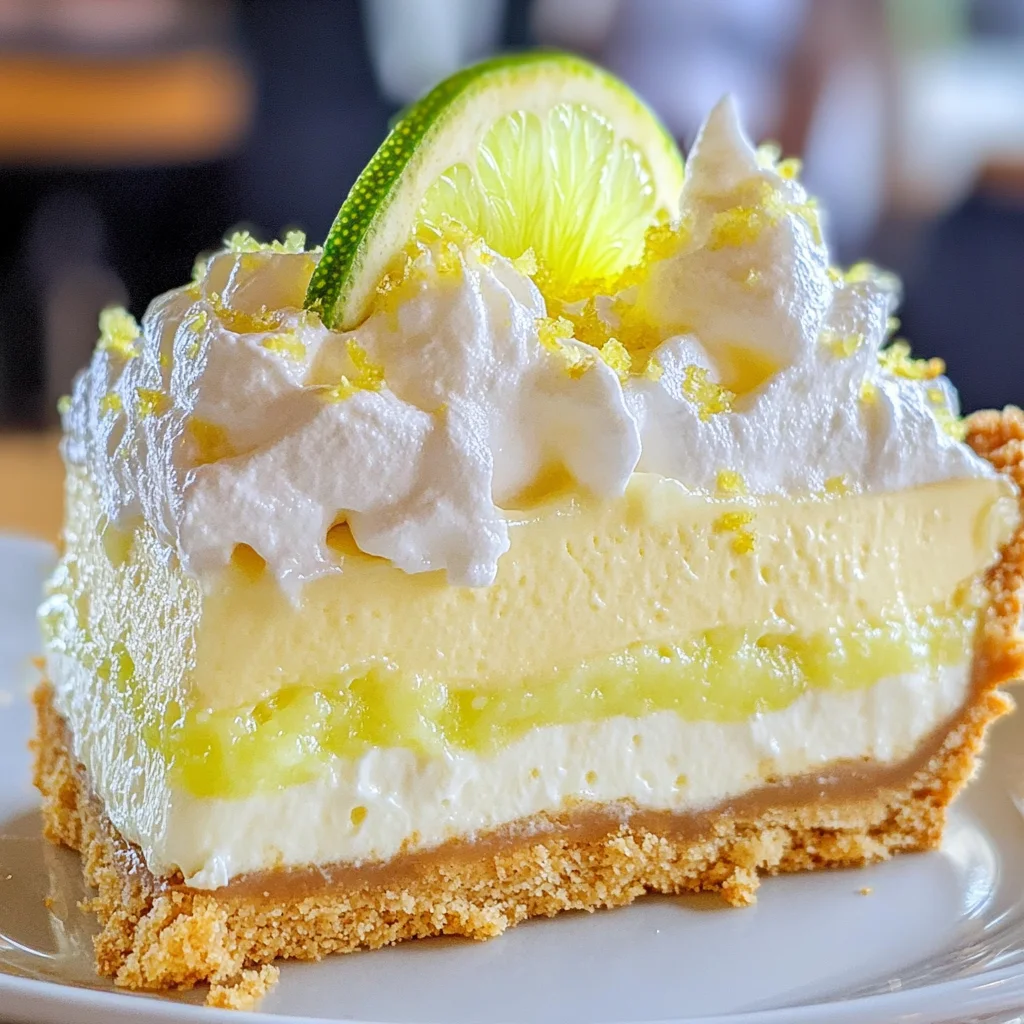
Key Lime Pie Lush
There’s something truly magical about desserts that can transport you to a sun-drenched beach with just one bite, and this Key Lime Pie Lush is exactly that kind of treat. Imagine the first taste: a delightful balance of tartness from the key lime, complemented by the creaminess of luscious layers that seem to melt in your mouth. It’s more than just food; it’s an experience—a celebration of summer, a perfect way to cool down during those warm afternoons, and a dish that brings family and friends together. I promise you, this isn’t just another dessert; it’s a symphony of flavors layered into five incredible strata, each bringing its own personality to the table. With each forkful, you’ll find yourself captivated by its refreshing essence and utterly intoxicating sweetness.
As I think back on my own kitchen adventures, I can’t help but smile at the memories I’ve made while whipping up this delightful Key Lime Pie Lush. The contrast between the crunchy Golden Oreos and smooth cream cheese filling creates not just a treat for your taste buds but also a feast for your soul. Whether you’re hosting friends for an afternoon gathering or simply treating yourself after a long day, this dessert is sure to impress. It encapsulates everything I adore about cooking: simplicity paired with elegance, and a touch of nostalgia that makes every bite feel like home.
Key Lime Pie Lush: A Refreshing Summer Delight
This Key Lime Pie Lush is not just easy to make; it’s also incredibly versatile! You can serve it chilled for a refreshing dessert or freeze it for a delightful frozen treat on hot days. The layers are visually stunning, making it an ideal centerpiece for any gathering. Let’s dive into this culinary adventure together!
Ingredients:
As we embark on creating this delectable dessert, let me take you through the ingredients that will make our Key Lime Pie Lush sing with flavor and texture.
- 20 ounces double stuffed Golden Oreos (family-sized package). These delicious cookies serve as the foundation of our lush dessert, providing that essential crunch which contrasts beautifully with the creamy layers above. Their sweet, buttery flavor pairs perfectly with the tanginess of key lime, creating an irresistible combination. While you could use regular Oreos or other chocolate sandwich cookies in a pinch, trust me when I say nothing beats the rich cream filling of double stuffed Golden Oreos for added decadence.
- ⅓ cup unsalted butter (melted). This ingredient is crucial as it binds our cookie crust together while adding richness and depth to the overall flavor profile. When melted butter combines with crushed Oreos, it transforms them into a cohesive base that holds up beautifully under all those luscious layers above. For best results, ensure your butter is unsalted; we want to control the saltiness ourselves to achieve that perfect balance with the sweet components.
- 16 ounces cream cheese (softened). Softening the cream cheese ensures we can blend it smoothly into our mixture without any lumps—this step is absolutely paramount! Cream cheese lends its rich texture and slightly tangy flavor which complements the sweetness of our other ingredients beautifully. Make sure it’s at room temperature before using so it combines effortlessly; nothing ruins a creamy dessert faster than cold lumps!
- 6.8 ounces instant vanilla pudding mix (2 packages of 3.4 ounces each). This magical powder not only enhances sweetness but also thickens our lush layers without requiring any baking time! The instant vanilla pudding sets up quickly when mixed with cold ingredients and provides a wonderfully creamy texture that’s utterly satisfying against the backdrop of zesty lime.
- 5 1/2 cups heavy whipping cream (divided). Heavy whipping cream is our secret weapon here—it’s what gives this dessert its luxurious mouthfeel and airy lightness! By whipping it until soft peaks form, we create fluffy clouds of cream that elevate each layer to new heights. Divide this ingredient wisely: some will be folded into our layers while others will be used as topping—each plays an essential role in achieving that perfect texture throughout.
- 1 cup key lime juice (fresh or bottled). The star of our show! Whether you opt for freshly squeezed or high-quality bottled juice doesn’t matter much; both will impart that signature tartness we crave in key lime desserts! Just imagine how bright and refreshing this lush will taste with that vibrant acidity cutting through all that richness—absolutely divine!
- ½ cup powdered sugar. This ingredient adds just enough sweetness to balance out the tangy key lime juice while keeping everything silky smooth—no graininess allowed here! Powdered sugar dissolves seamlessly into mixtures unlike granulated sugar, making it indispensable for achieving that dreamy consistency we’re after in our layers.
- Zest of 1 lime. Don’t underestimate the importance of zest! This is where you’ll capture all those lovely aromatic oils hiding in the skin of citrus fruits—it’s what brings forth intense freshness and elevates your dish from ordinary to extraordinary! Just take care not to zest too deeply; you want only the green outer layer for maximum flavor without any bitterness from the white pith underneath.
Equipment You’ll Need:
Before we dive headfirst into making our Key Lime Pie Lush, let’s gather some essential tools that will make your baking journey smoother and more enjoyable! Having these right equipment on hand ensures you can focus entirely on creating something wonderful without unnecessary stress or hiccups along the way.
- 9×13-inch baking dish – This size is perfect for layering all those delicious components effectively while allowing ample space for generous servings later on. A glass dish allows you to see those beautiful layers building up as well!
- Mixing bowls – A good set of mixing bowls in various sizes is essential for combining ingredients efficiently without any spills or messes distracting us from our mission at hand!
- Electric mixer – Whether handheld or stand-alone models work equally well here; an electric mixer makes whipping cream effortless compared to doing so by hand—it saves time AND muscle fatigue!
- Rubber spatula – Trust me when I say having one handy helps scrape down sides easily while folding mixtures gently together without deflating precious air bubbles—vital when working with whipped cream!
- Measuring cups & spoons – Precision matters greatly in baking so have reliable measuring tools ready so every element gets included accurately!
Now that we’ve gathered everything necessary let’s take those first steps toward crafting this refreshing masterpiece—the Key Lime Pie Lush awaits us!
Step 1: Prepare Your Cookie Crust
To begin crafting your luscious creation, start by preheating your oven to 350°F (175°C). While it’s heating up, take those Golden Oreos and crush them finely using either a food processor or by placing them in a zip-top bag and rolling over them with a rolling pin—whichever method sparks joy for you! You want them crumbled well enough so they hold together nicely once combined with melted butter yet still retain some texture within their crumbly embrace.
Once you’ve achieved fine crumbs reminiscent of sand on a tropical beach, transfer them into your mixing bowl along with melted unsalted butter—this fusion transforms mere cookie crumbs into something special! Mix until every crumb glistens like liquid gold from being coated evenly—this is crucial because uneven distribution may result in some dry patches later on instead of cohesive crust perfection.
Next comes my favorite part: pressing this glorious mixture firmly into an even layer across your prepared baking dish using either clean hands or back-of-the-spatula technique until tightly packed down throughout every corner—you want firm support beneath all those luscious toppings above! Bake in preheated oven until fragrant (about 10 minutes) then remove it promptly allowing cooling time before layering begins.
Step 2: Create Your Cream Cheese Mixture
While your cookie crust cools tantalizingly next door awaiting its magnificent toppings above let’s turn attention towards crafting our creamy center layer filled with velvety goodness! Grab another mixing bowl—the larger one if possible—and place softened cream cheese inside first before whipping until smooth—a process generally taking around 2 minutes at medium speed should suffice here—but don’t rush this step since achieving complete smoothness is paramount if we want no lumps ruining mouthfeel later on!
Now sprinkle in instant vanilla pudding mix followed closely by key lime juice alongside powdered sugar then continue beating until fully incorporated—you’ll notice everything turning fluffy almost magically before your eyes revealing promises ahead—a sign indicating freshness waiting beneath its surface! Lastly fold half (approximately 2 ¾ cups) whipped heavy cream gently throughout mixture ensuring no air escapes during integration—a technique known as ‘folding’ which captures air bubbles whilst blending smoothly together resulting in lighter textures overall throughout final product!
Step 3: Layering Begins!
With both cookie crust cooled off completely along with luscious filling poised nearby let’s begin assembling these divine layers before temptation gets too overwhelming! Start by spooning half prepared cream cheese mixture onto cooled crust spreading gently across evenly—from edge-to-edge ensuring nothing left behind as we build flavors upon one another harmoniously merging them further down below too!
Next comes another portion whipped heavy cream atop first layer—as third component adds tantalizing lightness contrasting beautifully against richness previously introduced—we’re talking about true indulgence present within these heavenly bites ahead folks! Repeat same steps again adding remaining cream cheese blend over previous whipped layer followed lastly by final dollop remaining whipped topping finishing things off gracefully while creating enticing visual appeal simultaneously—it’s absolutely paramount everyone sees how stunningly gorgeous this dessert truly is!
Step 4: Chill Out Time
Now comes perhaps one of my favorite parts—the waiting game known as chilling time which allows flavors meld together creating magic within each bite once served afterward! Cover assembled masterpiece tightly using plastic wrap then place carefully inside refrigerator allowing minimum four hours although overnight works even better if patience permits—it intensifies richness beyond compare trust me here folks!
During chill time don’t forget about garnishing possibilities such as extra dollops whipped topping adorned fresh zest lime sprinkles right atop giving final touch visual allure bringing everything full circle together beautifully amid soothing aroma wafting through kitchen air reminding us good things come patiently waited upon…
Stay tuned—we’ll continue layering excitement further next round looking forward towards indulging soon enough ladies & gents…
Step 5: Whipping Up the Creamy Layer
Now that you have your luscious crust ready to go, it’s time to create that exquisitely creamy layer that will truly make your Key Lime Pie Lush sing. Start by grabbing a large mixing bowl and your softened cream cheese; it’s crucial that the cream cheese is at room temperature so it blends seamlessly, achieving that velvety texture we’re aiming for. Using an electric mixer, beat the cream cheese on medium speed until it turns light and fluffy—this should take about 2-3 minutes. You want to incorporate air into the mixture because this will give your dessert a delightful lightness, creating a perfect contrast to the dense crust below.
Next, slowly add in your powdered sugar and fold in the instant vanilla pudding mix. I love using instant pudding mix here not just for its sweetness but because it adds an incredible thickness that helps stabilize this creamy layer without needing any complicated techniques. Mix until everything is well combined—keep an eye out for any lumps. If you notice any stubborn bits of cream cheese clinging on, don’t be shy! Just keep mixing until you achieve that smooth consistency. This step is absolutely paramount as it sets the stage for the next layer of flavor—this mixture will become airy and luscious, forming a beautiful foundation for the tangy key lime flavor to come.
Step 6: The Zesty Key Lime Infusion
Once you’ve created that dreamy cream cheese mixture, it’s time to bring in the star of our show: the key lime juice! Pour in that vibrant cup of key lime juice—you can use fresh or bottled depending on what’s available—but trust me when I say fresh juice offers an unparalleled brightness that’s worth every squeeze. As you incorporate the juice into your creamy mixture, continue mixing on low speed; this allows the flavors to meld beautifully without losing all that wonderful air you’ve whipped into the cream cheese.
Now comes a crucial moment: adding heavy whipping cream. Measure out about 2 cups from your total of 5 and pour them directly into your mixture. Using a spatula, gently fold in the whipping cream rather than stirring vigorously; this technique preserves that precious airiness we’ve worked so hard to achieve! As you fold, watch as everything transforms into a thick and luxurious filling that’s almost cloud-like in texture. The combination of rich creaminess with tart key lime is truly intoxicating—it’s like sunshine captured in dessert form!
Step 7: Layering Like a Pro
Now that we have our creamy concoction ready, let’s start building our Key Lime Pie Lush! Grab your prepared crust from earlier and spoon half of your creamy key lime filling on top of it. Use an offset spatula or the back of a spoon to spread it evenly across the crust, coaxing it into all corners so each bite will be just as delicious as the last. This layering technique not only makes for stunning presentation but ensures every slice has balance—the crunch from the crust and smoothness from the filling working harmoniously together.
Once you’ve got that first layer down, repeat with another generous scooping of your remaining whipping cream mixture over this first layer. It’s important not to rush through this part; take your time spreading it out evenly so you’ll have those beautiful defined layers when you cut into it later. After both layers are complete, cover with plastic wrap and place it in the fridge for at least two hours—or better yet, overnight if you can resist! Trust me on this: allowing those flavors to meld together overnight transforms this dessert from delicious to utterly extraordinary.
Step 8: Chilling Out – The Waiting Game
Ahh, patience… while I know it’s hard when you’re surrounded by such tantalizing aromas wafting through your kitchen, chilling is non-negotiable when making desserts like our Key Lime Pie Lush! During this time in the fridge (or freezer if you’re feeling adventurous), magic happens: those layers set beautifully, allowing all those incredible flavors to mingle and deepen. The waiting game also allows any residual moisture from the whipped cream to be absorbed by the graham cracker crust—this ensures you won’t end up with a soggy bottom later.
If you’re opting for freezing instead—and honestly, why wouldn’t you?—just remember to allow extra time for defrosting before serving. A fully frozen lush can be quite firm but once thawed just enough to slice easily without turning mushy—it’s pure bliss! Make sure you’re checking after about two hours if you’re refrigerating; if it’s still too soft after five hours or more (if chilled), then hold off slicing until firm but not rock-solid frozen; otherwise, you’ll miss out on that divine layering experience!
Final Touches – Garnishing Your Masterpiece
Step 9: The Exquisite Finish
With patience comes reward! Now that your Key Lime Pie Lush has set perfectly in its chilled state (congratulations!), it’s time for those final touches before presenting it to your friends or family—or perhaps just enjoying alone because who are we kidding? Start by carefully removing it from its pan (if using a springform pan) or lifting out slices if using a glass dish. Each piece should reveal those stunning layers we’ve painstakingly crafted—golden crusts followed by zesty green filling topped with fluffy clouds of whipped goodness!
For garnishing, consider adding fresh whipped cream swirls atop each slice along with some additional lime zest sprinkled lightly over top; visually striking and equally delicious! You might even want a few thin slices of lime as decoration alongside each slice—it adds such a vibrant pop of color against all that creamy white goodness. Don’t forget—a sprinkle of graham cracker crumbs can bring back memories of traditional key lime pie while enhancing texture too!
As you serve up these lovely portions of Key Lime Pie Lush, take a moment to soak in all those happy faces around you as they dive into their servings. Each bite is bound to evoke memories of warm summer days filled with laughter and sunshine; trust me when I say there’s simply nothing more profound than sharing joy through food! Enjoy every moment—and don’t forget to save some for yourself!
Storage and Enjoyment Tips for Your Key Lime Pie Lush
Now that your Key Lime Pie Lush is beautifully assembled and ready to make its grand debut, you might be wondering how to savor every last bite. This dessert is not just a treat for the moment; it’s also designed to keep your taste buds dancing long after your first serving. Whether you’re planning ahead for a gathering or simply looking to indulge over the next few days, there are some wonderful storage tips that will help maintain that refreshing flavor and delightful creaminess. Trust me when I say, keeping this treat fresh is easy and will only enhance your enjoyment!
Storing Leftover Key Lime Pie Lush
To store any leftovers (if you can resist finishing it all in one go!), transfer your Key Lime Pie Lush into an airtight container. This is crucial as it keeps the luscious layers intact while preventing any unwanted flavors from seeping in. You can pop it right into the refrigerator where it will stay fresh for about 3 to 5 days, although I promise you, it’s so delicious that it likely won’t last that long! To maintain quality, consider placing a piece of parchment paper between the dessert and the lid; this little trick helps avoid any condensation that might alter its creamy texture. After a day or two in the fridge, you may notice that the flavors have mingled even more beautifully—those tangy notes of lime blending seamlessly with the sweetness of the cream cheese and pudding. When ready to serve again, simply scoop out a portion and enjoy it chilled; no need to reheat this beauty!
Freezing Key Lime Pie Lush for Later
If you find yourself with an enticing surplus—or if you’re just planning ahead for those hot summer days—freezing your Key Lime Pie Lush is a fantastic option! To freeze it properly, slice it into individual portions before wrapping each piece tightly in plastic wrap and then placing them in a freezer-safe container. This clever method ensures that each slice maintains its delectable charm without freezer burn invading its luscious layers. When done right, your Key Lime Pie Lush can stay frozen for up to three months! Whenever you’re ready for a sweet escape, just take out a slice and let it thaw in the fridge for a few hours or on the counter for about 30 minutes—this way, you’ll rediscover that symphony of flavors as if it were freshly made. The convenience of having such a delightful dessert at your fingertips makes every moment feel like a celebration!
Key Lime Pie Lush
Indulge in our Key Lime Pie Lush—a delightful 5-layer dessert that’s both tart and sweet! Perfect for gatherings or quiet evenings; try making it today!
- Prep Time: 30 minutes
- Cook Time: 10 minutes
- Total Time: 40 minutes
- Yield: Approximately 12 servings 1x
- Category: Dessert
- Method: Baking
- Cuisine: American
Ingredients
- 20 ounces double stuffed Golden Oreos
- ⅓ cup unsalted butter (melted)
- 16 ounces cream cheese (softened)
- 6.8 ounces instant vanilla pudding mix
- 5 ½ cups heavy whipping cream (divided)
- 1 cup key lime juice
- ½ cup powdered sugar
- Zest of 1 lime
Instructions
- Preheat oven to 350°F (175°C). Crush Golden Oreos in a food processor or zip-top bag until fine. Mix crumbs with melted butter and press into a greased 9×13-inch baking dish. Bake for about 10 minutes and let cool.
- In a large bowl, beat softened cream cheese until smooth. Add powdered sugar, instant vanilla pudding mix, and key lime juice; blend until fluffy.
- Fold in half of the whipped cream (about 2 ¾ cups) into the cream cheese mixture until well combined.
- Spread half of the cream cheese mixture over the cooled crust, followed by half of the remaining whipped cream. Repeat layers ending with whipped cream on top.
- Cover tightly and refrigerate for at least four hours or overnight for best results.
Nutrition
- Serving Size: 1 slice (100g)
- Calories: 360
- Sugar: 25g
- Sodium: 220mg
- Fat: 24g
- Saturated Fat: 15g
- Unsaturated Fat: 8g
- Trans Fat: 0g
- Carbohydrates: 33g
- Fiber: 1g
- Protein: 4g
- Cholesterol: 72mg