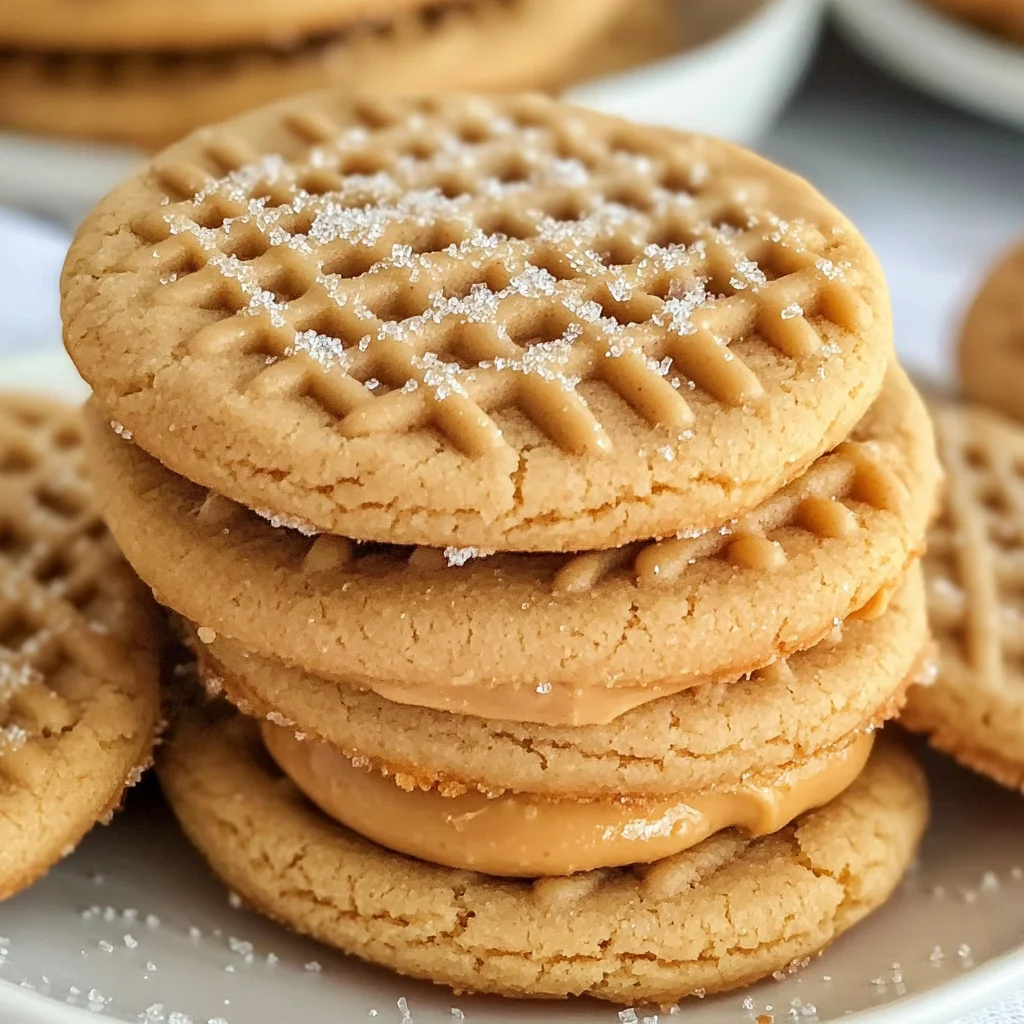
Homemade Copycat Nutter Butters
There’s something wonderfully nostalgic about sinking your teeth into a homemade cookie, isn’t there? It transports you back to simpler times, perhaps to a sun-drenched kitchen filled with laughter and the warm scent of baked goods wafting through the air. Today, I’m excited to share with you a recipe that perfectly encapsulates that feeling: Homemade Copycat Nutter Butters. These delightful treats are more than just cookies; they’re a hug in dessert form, an indulgence that combines soft, chewy peanut butter cookies with a rich and creamy filling. The moment you take your first bite, you’ll be swept away by the symphony of flavors—sweet, salty, and utterly satisfying. Trust me when I say, this is not just cooking; it’s a cherished experience waiting to unfold in your kitchen.
As we embark on this culinary journey together, let’s tap into the magic of making these iconic cookies from scratch. This recipe is not merely about following steps—it’s about creating something special and sharing it with those you love. The process of mixing ingredients, watching them transform in the oven, and finally assembling the sandwiches brings a unique joy that only homemade treats can offer. Whether it’s for an afternoon snack or a sweet touch for your next gathering, these Homemade Copycat Nutter Butters will undoubtedly evoke smiles and fond memories. So roll up your sleeves and let’s dive into this delicious adventure!
Ingredients:
Before we gather our ingredients, let’s take a moment to appreciate each one’s role in crafting these delightful cookies. Each ingredient not only contributes its unique flavor but also works in harmony to create that perfect texture we all crave in a cookie sandwich.
- 1/2 cup (113g) unsalted butter, softened. This ingredient is crucial for achieving that light and fluffy consistency we desire in our cookies. Softened butter emulsifies beautifully with sugar during the creaming process, creating tiny air pockets that help our cookies rise as they bake. If you’re grabbing butter from your fridge, just remember: it should be at room temperature so it’s easy to cream without melting! For those looking to substitute or keep things dairy-free, try using vegan butter; just make sure it’s also softened for best results.
- 1/2 cup (128g) creamy peanut butter. Ah, peanut butter—this is where the magic truly begins! It adds not only flavor but also moisture to our cookie dough. Make sure to choose a high-quality creamy peanut butter without added sugars or oils; this ensures that pure peanut flavor shines through without any distractions. Plus, if you’re feeling adventurous or have allergies in mind, feel free to swap out creamy for crunchy peanut butter for added texture!
- 1/2 cup (100g) granulated sugar (plus extra for topping). This white sugar creates the perfect balance of sweetness while helping our cookies achieve that lovely golden color as they bake—a true visual treat! The granulated sugar dissolves easily during the creaming stage and contributes to the overall structure of the cookie. Don’t skip sprinkling some extra on top before baking—it adds an inviting crunch that elevates each bite.
- 1/2 cup (100g) brown sugar. Not only does brown sugar enhance sweetness but also brings complexity with its subtle molasses notes. This ingredient is key for moisture retention too—resulting in soft and chewy cookies rather than dry ones! When buying brown sugar, look for one that’s packed tightly in its measuring cup; this ensures you’re getting the right amount needed for optimal texture.
- 1 large egg. Eggs serve as a binding agent here—they hold everything together beautifully while adding richness to our dough. When choosing eggs, look for fresh options; they should have bright yolks and no unpleasant odor when cracked open! For egg-free alternatives, consider using a flaxseed egg made by mixing one tablespoon of ground flaxseed with three tablespoons of water.
- 1 teaspoon vanilla extract. A dash of vanilla is like adding a warm hug to our cookie dough—a non-negotiable ingredient that enhances every other flavor present! Opt for pure vanilla extract instead of imitation if possible; it makes all the difference in creating an aromatic depth that envelopes your senses as you enjoy these cookies.
- 1 1/4 cups (156g) all-purpose flour. Flour is what gives our cookies their structure—the backbone we lean on during this baking adventure! For best results, use freshly opened flour because older flour can lose its potency over time and affect texture negatively. Feel free to substitute half with whole wheat flour if you’re looking for something heartier while still keeping that classic taste.
- 3/4 teaspoon baking soda. Baking soda is our leavening agent here—the little magic worker that helps create lift within our cookies! Always check the expiration date on your baking soda before use; old baking soda won’t provide adequate rise and could lead to denser cookies than desired.
- 1/4 teaspoon salt. Salt isn’t just an afterthought; it amplifies flavors beautifully and balances sweetness! A pinch can elevate even simple recipes into extraordinary experiences—so don’t skip out on this essential ingredient!
For the filling:
– 1/2 cup (128g) creamy peanut butter (for filling). You guessed it! We’re doubling down on that peanut buttery goodness here because who doesn’t want more? Same quality tips apply—choose creamy over chunky unless you want added texture surprises!
- 1/4 cup (56g) unsalted butter, softened (for filling). Just like with our cookie base, this will help create creaminess in our filling while ensuring easy spreading between cookie halves.
- 1 cup (120g) powdered sugar. Powdered sugar lends sweetness plus helps us achieve that smooth consistency needed for luscious filling—it melts seamlessly into the mixture! Sifting before adding can avoid lumps if desired but isn’t strictly necessary if you’re whisking well.
- 1 teaspoon vanilla extract (for filling). Once again reinforcing flavor with pure vanilla—because why stop now?
- 1–2 tablespoons milk (as needed for texture). Milk adds moisture and helps achieve desired creaminess levels within our filling—it’s perfectly fine-tune-able depending on how thick or thin you want it!

Equipment You’ll Need:
Having the right tools makes all the difference when embarking on any culinary endeavor—especially when crafting something as delightful as Homemade Copycat Nutter Butters! While they might not be ingredients themselves, these essential pieces will ensure your experience flows smoothly from start to finish.
- Mixing bowl – A good-sized mixing bowl is crucial since we’ll be combining multiple ingredients together at once! Opting for glass or stainless steel allows even heat distribution during mixing without retaining odors or stains over time.
- Electric mixer or whisk – While elbow grease can certainly work wonders if you prefer doing things by hand—the electric mixer saves time while ensuring thorough incorporation between ingredients during creaming stages especially!
- Baking sheet lined with parchment paper – Lining your baking sheet prevents sticking whilst allowing even browning throughout each batch—plus cleanup becomes a breeze afterward!
- Fork – Not just any fork will do here; we’ll use it creatively to create those classic crosshatch patterns atop each oval-shaped cookie prior to baking!
Now that we’ve gathered all necessary components both edible & tool-wise let’s jump straight into preparing these delicious Homemade Copycat Nutter Butters together!
Step 1: Preheat & Prepare
First things first: preheat your oven to 350°F (175°C). This step may seem minor but trust me—it sets us up perfectly so those cookies bake evenly from start until finish without any surprises later down line! While waiting patiently for oven warmth envelops kitchen air like love itself—we’ll line our trusty baking sheet(s) with parchment paper ensuring nothing sticks once those beauties come out hot & fresh post-bake!
Step 2: Creaming Time
In a large mixing bowl—grab either your electric mixer or trusty whisk—and combine softened butter along with creamy peanut butter until light & fluffy—a process known as creaming. Why is this important? Because incorporating air into fats creates an airy structure essential for soft-textured treats rather than dense bricks masquerading as desserts! Keep blending until everything feels cohesive yet airy around edges—a mere minute should suffice here depending upon equipment used; don’t rush through though—patience yields rewards worth every second spent stirring lovingly away!
Step 3: Adding Sweetness
Once you’ve achieved fluffiness beyond compare—add granulated sugar followed closely by brown sugar into mixture gradually blending well after each addition until fully incorporated & mixture appears homogenous once again! Both types of sugars play pivotal roles: granulated provides quick sweetness whereas brown introduces moisture ensuring softness remains intact long after cooling takes place later down line too!
Step 4: Egg-citing Addition
Next comes my favorite part—the addition of one large egg along with glorious aroma-inducing vanilla extract goes right into mix readying everything beautifully toward final dough formation ahead… It’s essential here not only because eggs bind ingredients together but also contribute richness vital toward achieving end goal textured perfection throughout baked creations ahead too… Blend thoroughly until all traces disappear leaving behind nothing but smoothness layered beneath surface glistening enticingly back at ya!
Continue writing more detailed steps until completion…
Step 5: Crafting the Perfect Cookie Shapes
Once you’ve mixed your dough to a delightful, cohesive consistency, it’s time to shape these little morsels of joy! Start by rolling the dough into small balls, about one inch in diameter. Trust me when I say that this step is crucial; the size will influence not just how they bake but also how they’re enjoyed. Forming these balls helps create a uniform baking experience, ensuring that each cookie is perfectly chewy on the inside while golden brown on the outside. You want them to be just the right size for sandwiching, after all—big enough to feel indulgent but small enough to savor without overwhelming yourself.
Next, gently shape each ball into an oval. This gives them that classic Nutter Butter look and enhances their appeal. Using a fork, press down lightly on each oval to create a beautiful crosshatch pattern—this isn’t just for aesthetics; it also allows for even baking and helps the cookies hold together better. Don’t rush this step! Take your time to enjoy the process; it’s therapeutic and adds an extra layer of love to your cookies. Before popping them in the oven, sprinkle a bit of granulated sugar on top of each cookie; this provides a delightful crunch and enhances that nostalgic sweetness we all adore.
Step 6: Baking Your Little Treasures
Now comes the moment we’ve all been waiting for: baking! Preheat your oven to a cozy 350°F (175°C) and line your baking sheet with parchment paper—this is non-negotiable, as it prevents sticking and ensures easy cleanup later. Once your oven has reached the perfect temperature, place your shaped cookies on the prepared baking sheet, leaving some space between them because they will spread just a tad while they bake. You should bake them for about 8 to 10 minutes until they are lightly golden around the edges but still soft in the center.
As you watch through your oven door, keep an eye out for those lovely golden edges—that’s your cue that they’re ready! The aroma wafting through your kitchen will be utterly intoxicating; it’s one of those moments that makes you appreciate every bit of effort you put into this recipe. However, don’t be tempted to overbake! These cookies continue to firm up as they cool on the tray, so it’s essential to catch them before they become too hard. When you take them out of the oven, let them cool on the baking sheet for a few minutes before transferring them to a wire rack—this will help maintain their soft texture.
Step 7: Whipping Up That Irresistible Filling
While your cookies are cooling down and filling your home with sweet nostalgia, it’s time to prepare that dreamy peanut butter filling that will transform these cookies into true masterpieces. In a clean bowl (make sure there’s no leftover cookie dough—cross-contamination can lead to flavor mishaps!), beat together half a cup of creamy peanut butter with a quarter cup of softened unsalted butter until it’s smooth and creamy. This step is vital because mixing these two ingredients well creates a luscious texture that binds everything together beautifully.
Once combined, gradually add in one cup of powdered sugar along with another teaspoon of vanilla extract for added depth of flavor—trust me on this; it elevates everything! Mix until you achieve that velvety creaminess that makes this filling utterly extraordinary. If you find it too thick (which can happen depending on how soft or cold your butter was), simply add in milk one tablespoon at a time until you reach that perfect spreadable consistency—somewhere between thick frosting and pancake batter. It should be rich yet light enough to pipe onto those cookies without overwhelming them.
Step 8: The Grand Assembly
Now comes my favorite part—the grand assembly! Once your cookies have completely cooled (and I mean completely—you don’t want melted filling!), it’s time to bring together these lovely halves into delightful sandwiches. Turn half of your cooled cookies so their flat sides face up; this is where you’ll spread or pipe in all that glorious peanut butter filling. If you’re feeling adventurous or want an extra touch of finesse, use a piping bag fitted with a star nozzle for an elegant presentation—it looks impressive and tastes even better!
Spread or pipe about one tablespoon of filling onto each cookie, ensuring it’s generous but not overflowing (we don’t want any messy disasters). Then take another cookie and gently press it down onto the filling until it just meets the edges—don’t squish too hard; we want our homemade copycat Nutter Butters to keep their shape! This final touch transforms simple cookies into something evocative of childhood afternoons spent snacking with friends or family—a treat that’s not just food but memories wrapped in nostalgia.
Conclusion:
As we wrap up this delightful journey through creating Homemade Copycat Nutter Butters, I hope you feel as inspired and excited as I do about these sweet treasures! There’s something utterly enchanting about biting into one of these soft cookies filled with rich peanut butter goodness. From that first creamy filling to the delightful crunch of each cookie exterior, every element harmonizes beautifully—a true symphony of flavors that captures childhood memories while also creating new ones.
This recipe is more than just a treat; it’s an experience waiting to unfold in your kitchen! It’s accessible enough for novice bakers yet offers layers of joy that seasoned pros will appreciate too. Imagine pulling these beauties from your oven and being greeted by their intoxicating aroma wafting through your home—it’s pure magic! These cookies shine at every occasion—from cozy family gatherings to casual coffee dates with friends or even as a sweet surprise for loved ones just because.
When it comes to serving suggestions, picture this: imagine savoring one with a steaming cup of coffee or hot chocolate on a chilly afternoon; it’s comfort food at its finest! Or perhaps enjoying one while lounging on the couch during movie night—there’s nothing quite like pairing nostalgia with movie magic! If you’re feeling adventurous, why not try pairing these delightful cookies with ice cream for an indulgent dessert experience? The possibilities are endless!
Feeling adventurous? This recipe is wonderfully adaptable too! You could swap out creamy peanut butter for crunchy if that’s more your style or add some chocolate chips into the dough for an extra layer of decadence—my mouth waters just thinking about it! Don’t hesitate to customize these cookie sandwiches with different fillings too; almond butter or even flavored cream cheese could provide exciting twists on this classic treat. So go ahead—try out this recipe, share your own variations, and connect with me over our shared love of cooking. I can’t wait to hear about all your delicious creations!
Homemade Copycat Nutter Butters
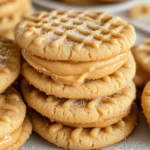
Indulge in the delightful nostalgia of Homemade Copycat Nutter Butters, where soft, chewy peanut butter cookies meet a rich and creamy filling. These treats are more than just cookies; they embody warmth and comfort with every bite. Perfect for sharing with friends and family or relishing during a quiet afternoon, these cookie sandwiches will evoke joyful memories and create new ones in your kitchen. With simple ingredients and easy steps, you’ll find that crafting these beloved snacks is not only satisfying but also a fun culinary adventure.
- Prep Time: 20 minutes
- Cook Time: 10 minutes
- Total Time: 30 minutes
- Yield: Approximately 12 cookie sandwiches 1x
- Category: Dessert
- Method: Baking
- Cuisine: American
Ingredients
- 1/2 cup unsalted butter, softened
- 1/2 cup creamy peanut butter (for cookies)
- 1/2 cup granulated sugar
- 1/2 cup brown sugar
- 1 large egg
- 1 teaspoon vanilla extract
- 1 1/4 cups all-purpose flour
- 3/4 teaspoon baking soda
- 1/4 teaspoon salt
- 1/2 cup creamy peanut butter (for filling)
- 1/4 cup unsalted butter, softened (for filling)
- 1 cup powdered sugar
- 1 teaspoon vanilla extract (for filling)
- Milk (as needed for texture)
Instructions
- Preheat your oven to 350°F (175°C) and line a baking sheet with parchment paper.
- In a mixing bowl, cream together softened butter and peanut butter until light and fluffy.
- Gradually add granulated sugar and brown sugar; mix until well combined.
- Beat in the egg and vanilla extract until smooth.
- Stir in flour, baking soda, and salt until just combined.
- Roll dough into small balls, shape into ovals, and use a fork to create crosshatch patterns.
- Bake for 8-10 minutes or until golden around the edges; let cool on the baking sheet briefly before transferring to a wire rack.
- For the filling, beat together peanut butter and softened butter until creamy. Gradually add powdered sugar and vanilla extract; mix until smooth. Adjust consistency with milk as needed.
- Once cookies are completely cooled, spread or pipe filling onto one cookie half before sandwiching with another.
Nutrition
- Serving Size: 1 cookie sandwich (44g)
- Calories: 200
- Sugar: 11g
- Sodium: 105mg
- Fat: 10g
- Saturated Fat: 3g
- Unsaturated Fat: 6g
- Trans Fat: 0g
- Carbohydrates: 25g
- Fiber: 1g
- Protein: 5g
- Cholesterol: 15mg