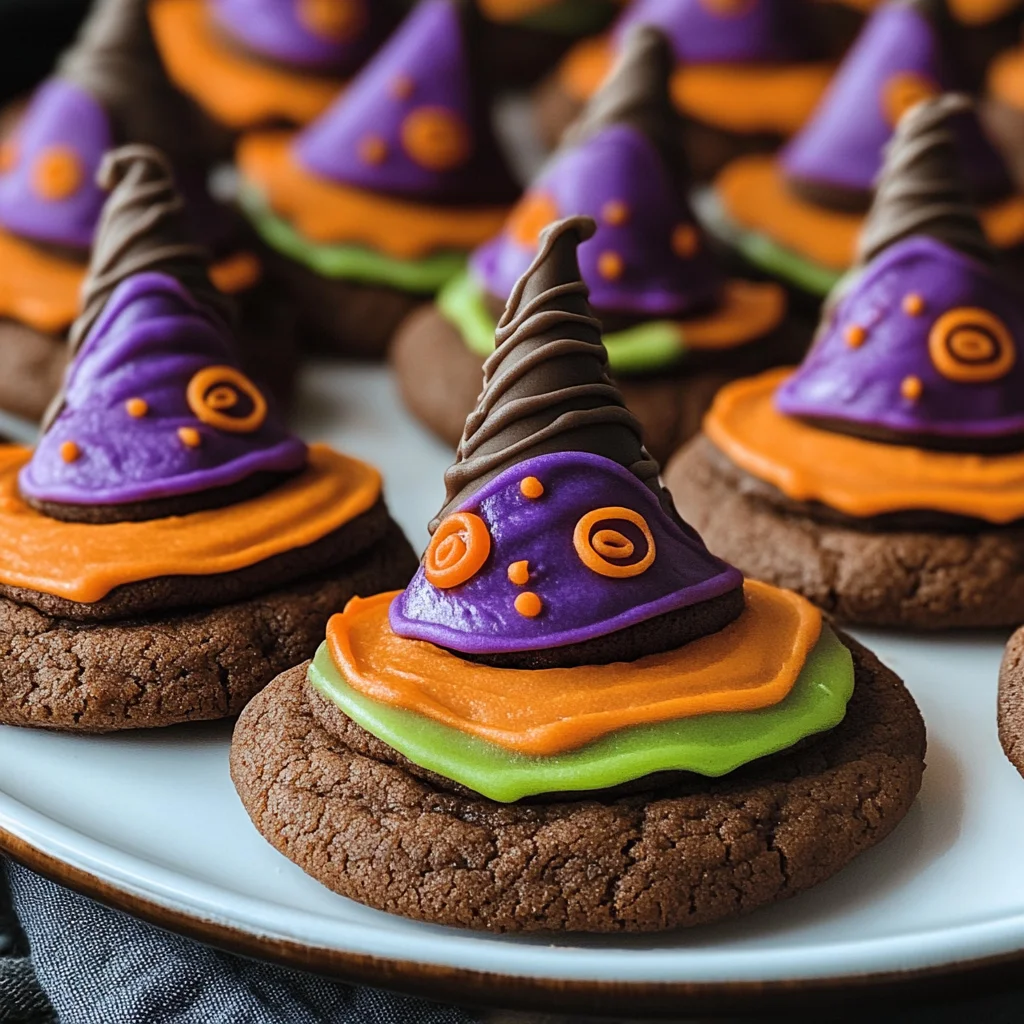
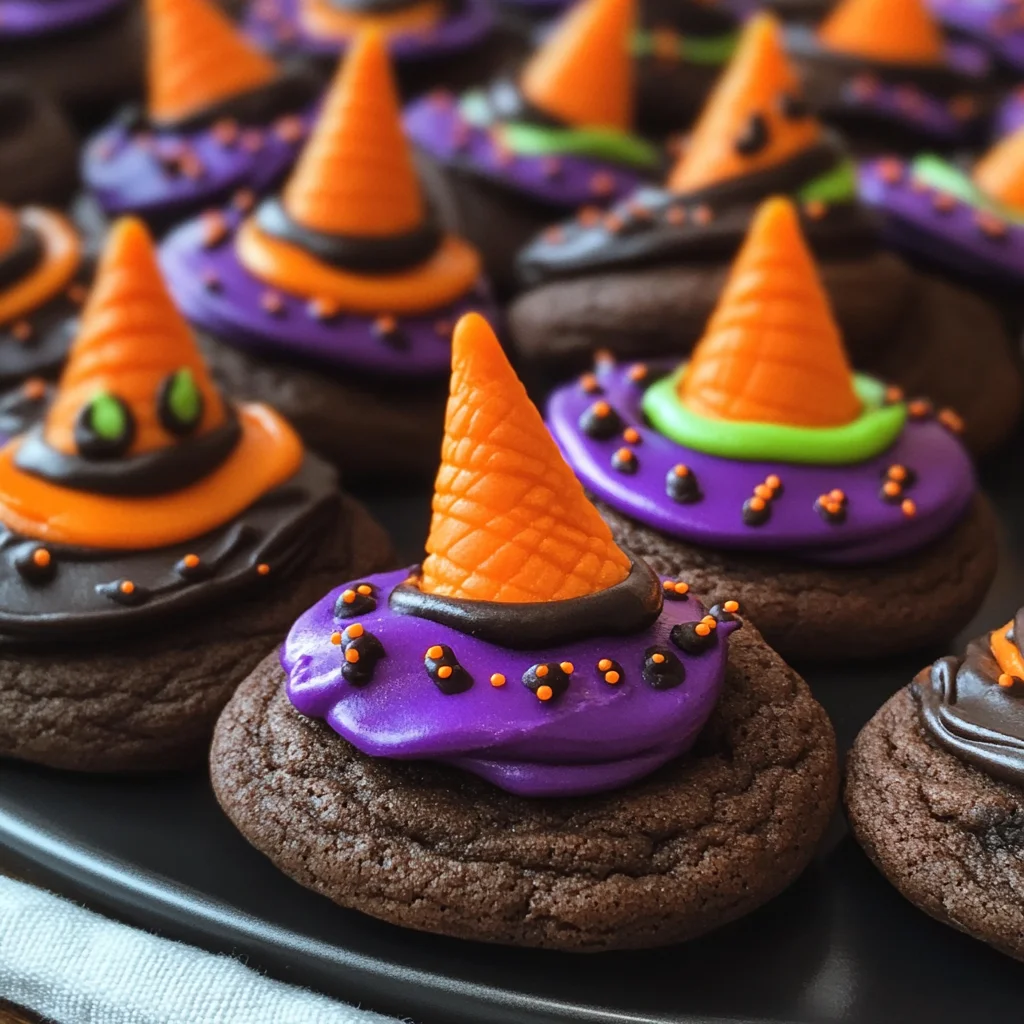
Halloween Witch Hat Cookies
If you’re looking for a fun and festive treat to celebrate Halloween, then look no further! These Halloween Witch Hat Cookies are sure to be a hit at any party or family gathering. They’re not just adorable; they’re also simple enough for kids to help with, making them the perfect project for a cozy afternoon. Plus, they bring a delightful chocolaty flavor that everyone will love!
Every time I whip up these cookies, I feel the excitement in the air as we transform basic ingredients into something magical. With their whimsical designs and delicious taste, these cookies truly capture the spirit of Halloween and are bound to impress your guests—especially the little ghouls and goblins!
Why You’ll Love This Recipe
- Easy to Make: With a quick prep time, these cookies come together without fuss.
- Family-Friendly Fun: Kids will love helping decorate these charming witch hats.
- Customizable Colors: Use different icing colors to match your Halloween theme!
- Deliciously Chocolaty: The rich chocolate flavor will satisfy any sweet tooth.
- Perfect for Parties: These cookies are not only cute but also make fantastic treats for gatherings.
Ingredients You’ll Need
Let’s gather our simple, wholesome ingredients! This recipe calls for some fun cake and cookie elements that make the process enjoyable. Here’s what you’ll need to create these delightful Halloween Witch Hat Cookies:
- Favorite Cake Mix or try Wilton’s Chocolate Cake Recipe
- Store Bought Chocolate Cookies or try This Recipe from Wilton
- Lemon Yellow Icing Color
- Black Color Mist Food Coloring Spray
- Rose Icing Colors Pink Food Coloring
- Violet Icing Color, Gel Food Coloring
- Golden Yellow Icing Color
- Orange Icing Color
- Sugar Cones
- Creamy White Decorator Icing, 4 lb. Tub
Variations
The beauty of these Halloween Witch Hat Cookies is their flexibility! Feel free to get creative with colors and flavors. Here are some fun ideas:
- Change Up the Cake Flavor: Use vanilla or red velvet cake mix instead of chocolate for a unique twist.
- Experiment with Cookie Types: Swap out chocolate cookies for vanilla or peanut butter cookies.
- Add Sprinkles: Top the icing with colorful sprinkles for extra flair and texture!
- Try Different Shapes: Instead of cones, use cupcakes as bases for an alternate witch hat design.
How to Make Halloween Witch Hat Cookies
Step 1: Prepare & Bake the Cones
First things first! Prepare your cake batter according to your chosen recipe. Place your Cupcake Cones Baking Rack on a cookie sheet and insert the sugar cones into it. Fill each cone with about 2 tablespoons of cake batter. This step is essential because it forms the base of your witch hats! Bake according to the recipe instructions, then allow them to cool completely.
Step 2: Spray the Cones
Once your cones have cooled, it’s time for some spooky magic! If needed, carefully trim any excess cake that has risen above the top of the cone using a knife. Place them wide side down on parchment paper and spray them with Black Color Mist food coloring. Let them dry for about 10 to 15 minutes—this gives them that eerie witchy look!
Step 3: Tint the Icing & Prepare the Bags
Now comes one of my favorite parts—coloring our icing! Tint 1 cup of creamy white decorator icing orange and another cup purple by mixing violet and rose icing colors together. Prepare two decorating bags fitted with tip 2B filled with each colored icing. At this point, tint ¼ cup of creamy white decorator icing yellow by mixing golden yellow and lemon yellow colors; place it in another bag with tip 3 attached. The vibrant colors will add so much fun to your witch hats!
Step 4: Assemble the Witch Hats
Let’s put everything together! Using your orange icing, pipe a small amount in the center of each cookie and place a cone on top. With tip facing outwards, pipe a band around half of the cones using orange icing—smooth it out with a spatula if needed. Repeat this process using purple icing on the other half of cookies and cones. After setting them aside for about 15 to 20 minutes, take your yellow-tinted icing bag with tip 3 attached and pipe a buckle around each band on the hats. Allow them another set time of about 15 to 20 minutes before indulging—your delicious creation is now complete!
Enjoy these cute and tasty Halloween Witch Hat Cookies as you gather around telling ghost stories or watching spooky movies!
Pro Tips for Making Halloween Witch Hat Cookies
Making Halloween Witch Hat Cookies should be a delightful and creative experience, so here are some pro tips to ensure your treats turn out spook-tacular!
- Choose the Right Cake Mix: Using a cake mix that you love will enhance the flavor of your cookies. A rich chocolate cake mix pairs beautifully with the chocolate cookies for that extra chocolaty goodness.
- Be Generous with Icing: Don’t hold back when applying icing! A good amount of icing not only helps the cones stick but also adds an irresistible sweetness that balances the flavors perfectly.
- Allow Time to Set: Patience is key! Letting the icing set properly prevents any mishaps when stacking your witch hats, ensuring they stay stable for your guests to enjoy.
- Experiment with Colors: Feel free to mix and match icing colors! This allows you to create a variety of witch hats, making your cookie display colorful and fun—perfect for a Halloween party!
- Have Fun Decorating: Encourage creativity! Let kids add their personal touches with extra sprinkles or edible glitter. This makes the baking process more enjoyable and memorable.
How to Serve Halloween Witch Hat Cookies
These charming Halloween Witch Hat Cookies are sure to be the star of any dessert table. Here’s how to present them in a way that will wow your guests!
Garnishes
- Edible Glitter: A sprinkle of edible glitter can add a magical touch, making your cookies shimmer under the party lights.
- Candy Corn: Scatter some candy corn around the plate for an extra festive look. Their bright colors contrast beautifully against the dark cookies.
- Chocolate Sprinkles: Add a dash of chocolate sprinkles on top of the icing for an additional layer of texture and flavor.
Side Dishes
- Pumpkin Spice Cupcakes: These moist cupcakes, topped with cream cheese frosting, offer a delightful seasonal flavor that complements your cookies perfectly.
- Apple Slices with Caramel Dip: Fresh apple slices provide a crisp contrast and a refreshing palate cleanser alongside the sweetness of witch hat cookies.
- Ghostly Meringues: Light and airy meringues shaped like ghosts add whimsy and are easy to make in large batches, perfect for sharing at parties.
- Spooky Fruit Salad: Combine seasonal fruits like oranges, grapes, and bananas into a vibrant fruit salad. You can even use cookie cutters to shape some fruits into spooky shapes!
With these tips and serving suggestions, you’re all set to create an enchanting treat that will delight both kids and adults alike at your Halloween celebration! Enjoy baking and happy haunting!
Make Ahead and Storage
These Halloween Witch Hat Cookies are not only a delightful treat but also perfect for meal prep! You can bake the cookies and prepare the cones in advance, making it easy to assemble them closer to your event. Here’s how you can manage leftovers and keep your spooky delights fresh.
Storing Leftovers
- Store any leftover cookies in an airtight container at room temperature.
- If you want to keep them fresher for longer, consider refrigerating them for up to a week.
- Make sure to separate layers with parchment paper to avoid sticking.
Freezing
- Freeze the assembled cookies by placing them in a single layer on a baking sheet until solid.
- Once frozen, transfer them to a freezer-safe container or bag. They can be stored for up to 3 months.
- Thaw in the refrigerator overnight before serving.
Reheating
- If you prefer your cookies warm, preheat the oven to 350°F (177°C).
- Place the cookies on a baking sheet and heat for about 5-10 minutes until they are warmed through.
- Avoid microwaving as it may make the icing too soft.
FAQs
Have questions about these fun Halloween Witch Hat Cookies? You’re in the right place!
Can I use different cake mixes for Halloween Witch Hat Cookies?
Absolutely! You can use any flavor of cake mix that you enjoy. Chocolate is a classic choice, but vanilla or even red velvet could make for some fun variations!
How do I customize my Halloween Witch Hat Cookies?
Get creative with colors and decorations! Use different icing colors, add sprinkles, or even edible glitter. The witch hats can be as unique as your imagination allows!
How long do Halloween Witch Hat Cookies last?
When stored properly, these cookies can last up to a week at room temperature or even longer if refrigerated. For best results, enjoy them fresh within a few days.
Can I make these cookies without sugar cones?
While sugar cones give that iconic witch hat look, you could try using pointed cupcakes as an alternative if you have trouble finding cones.
Final Thoughts
I hope this recipe for Halloween Witch Hat Cookies brings joy and creativity into your kitchen! They’re not just treats; they’re a fun project that you can enjoy making with family and friends. So gather your ingredients, get those little hands involved, and let your imagination run wild. Enjoy every bite of these enchanting cookies, and happy baking!
Halloween Witch Hat Cookies

Get ready to cast a spell of delight this Halloween with our enchanting Halloween Witch Hat Cookies! These whimsical treats are a perfect blend of fun and flavor, making them an ideal project for families looking to create lasting memories in the kitchen. With rich chocolate cookie bases topped with colorful icing and sugar cones to complete the witch hat look, these cookies will be the highlight of any gathering. Perfect for parties or cozy evenings, they’re simple enough for kids to help decorate, adding extra joy to the baking experience. Bring a little magic into your home and watch as these adorable cookies disappear faster than you can say “Boo!”
- Prep Time: 20 minutes
- Cook Time: 15 minutes
- Total Time: 35 minutes
- Yield: Approximately 12 cookies
- Category: Dessert
- Method: Baking
- Cuisine: American
Ingredients
- Favorite Cake Mix (chocolate, vanilla, or red velvet)
- Store Bought Chocolate Cookies or homemade recipe
- Sugar Cones
- Creamy White Decorator Icing
- Food Coloring (various colors for decoration)
Instructions
- Preheat the oven and prepare cake batter according to your chosen recipe. Fill sugar cones with batter and bake until set. Cool completely.
- Trim excess cake from cones if necessary, then spray with black food coloring for a spooky effect.
- Tint creamy white icing in various colors: orange, purple, and yellow. Prepare icing bags for decorating.
- Pipe orange icing on cookies, place cones on top, and decorate with colored icings to create witch hats.
- Allow icing to set before serving.
Nutrition
- Serving Size: 1 cookie (40g)
- Calories: 190
- Sugar: 12g
- Sodium: 160mg
- Fat: 8g
- Saturated Fat: 3g
- Unsaturated Fat: 4g
- Trans Fat: 0g
- Carbohydrates: 29g
- Fiber: 1g
- Protein: 2g
- Cholesterol: 10mg