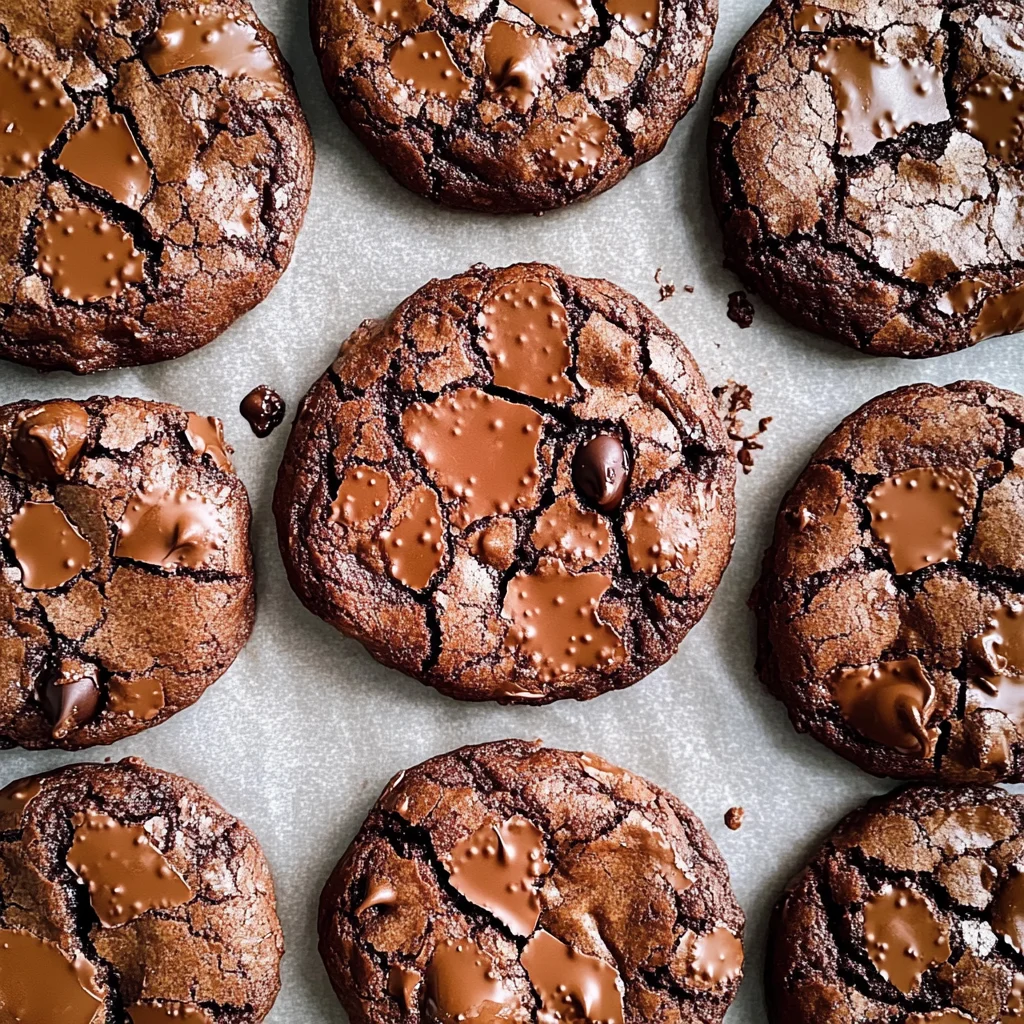
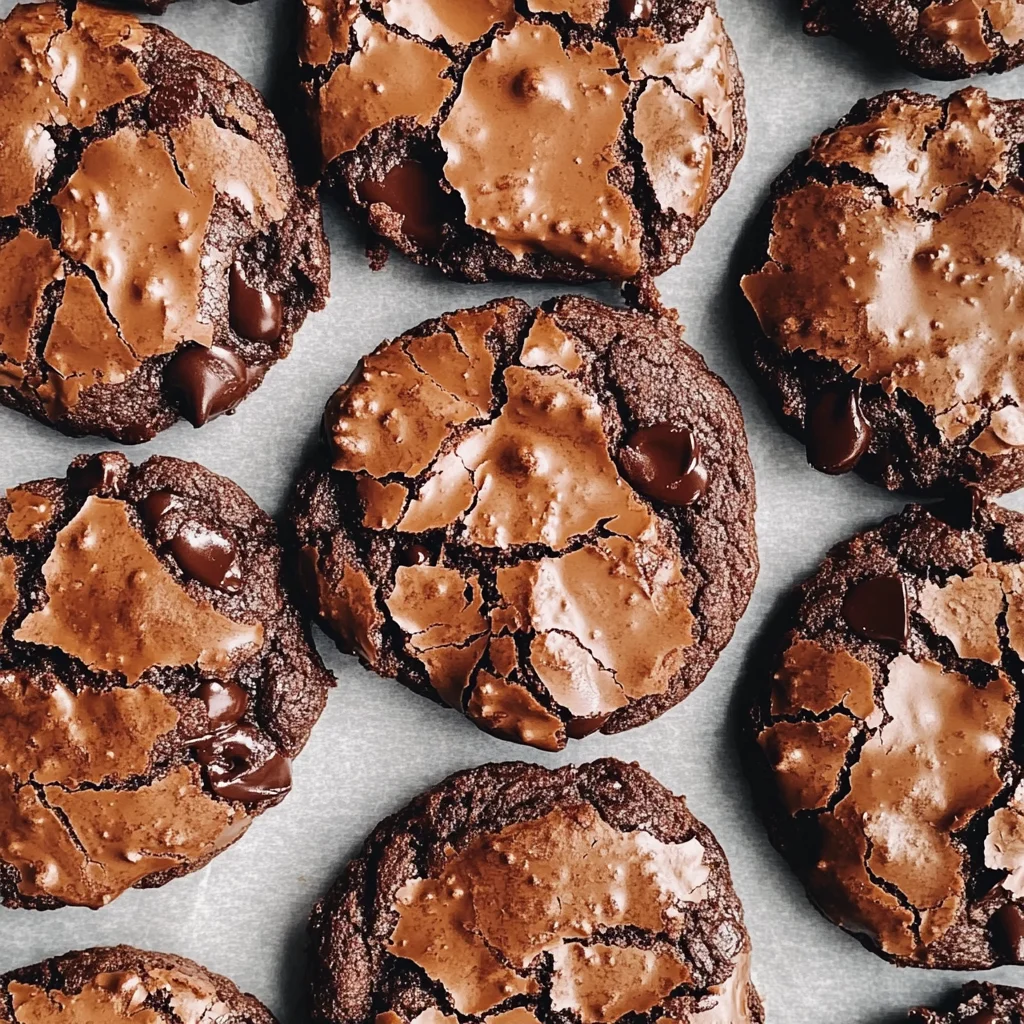
Fudgy Brownie Cookies
Indulging in the rich, chocolatey goodness of fudgy brownie cookies is not just about satisfying a sweet tooth; it’s an experience that transports you to a cozy kitchen filled with warmth and laughter. These cookies are more than mere snacks; they are a bridge between the comforting nostalgia of childhood and the innovative spirit of modern baking. Imagine the moment when you first break into one of these decadent bites—the soft, chewy texture yielding under your fingers, releasing an intoxicating aroma that beckons you to take a bite. The combination of semisweet chocolate chips mingling with cocoa creates a symphony of flavors that envelops your senses, leaving you utterly enchanted. Trust me on this—once you take that first heavenly bite, you’ll understand why these fudgy brownie cookies are destined to become your new favorite treat.
There’s something profoundly satisfying about creating a dessert that brings joy not only to yourself but also to those around you. These fudgy brownie cookies are perfect for any occasion—whether you’re celebrating a birthday, hosting a casual gathering, or simply treating yourself after a long day. The beauty of this recipe lies in its simplicity and the universality of its appeal; everyone loves a good chocolate cookie! And if you’re looking for ways to elevate them further, consider adding your own personal touch with mix-ins like crunchy nuts or swirls of caramel sauce. Each variation adds another layer of richness and personality to an already extraordinary cookie.
Fudgy Brownie Cookies: A Chocolate Lover’s Dream
Welcome to the world of fudgy brownie cookies! This recipe is all about embracing the divine union between brownies and cookies—a match made in dessert heaven. Picture yourself in your kitchen as the enticing aroma fills the air while these beauties bake; it’s pure magic! These cookies promise not just satisfaction but also joy in every bite.
Ingredients:
As we embark on this sweet culinary adventure together, let’s take a moment to appreciate each ingredient that makes these fudgy brownie cookies so special. Understanding what goes into our treats makes us better bakers and enhances our appreciation for these delightful creations!
- 1 cup all-purpose flour. Flour acts as the backbone of our cookies, providing structure and stability. I always recommend using unbleached all-purpose flour because it has a lovely flavor profile that complements our rich chocolate ingredients beautifully. It’s essential to measure correctly—too much flour can lead to dry cookies while too little can make them overly gooey. Spoon it lightly into your measuring cup and level off for best results.
- ½ cup unsweetened cocoa powder. Cocoa powder is where we get that deep, chocolatey essence that’s synonymous with brownies. I promise you, using high-quality cocoa powder will elevate these cookies from ordinary to extraordinary! Look for brands that are rich in flavor and color—this is crucial for achieving those fudgy depths we crave. If you’re feeling adventurous, try swapping in Dutch-processed cocoa for a smoother flavor profile.
- ¾ cup granulated sugar. Granulated sugar plays multiple roles here—it sweetens our dough and contributes to that irresistible crispy edge while maintaining chewiness in the center. It’s fascinating how sugar interacts with other ingredients during baking, creating caramelization that adds complexity to flavor and texture. Choose fine granulated sugar for even incorporation.
- ¾ cup brown sugar. This is where we bring in some moisture and depth! Brown sugar contains molasses which gives our cookies a hint of caramel-like richness as well as extra chewiness—a non-negotiable element for fudginess! Make sure to pack it into your measuring cup firmly so it retains all those lovely flavors.
- ½ cup unsalted butter. Butter is liquid gold in baking—it enriches flavors and creates that luscious texture we adore in fudgy brownie cookies! Using unsalted butter allows you control over the salt levels in your recipe; plus, it helps accentuate the sweetness without overpowering it. Remember, bringing butter to room temperature ensures it creams beautifully with sugars—this step is absolutely paramount!
- 2 large eggs. Eggs are vital for binding everything together while adding moisture and richness as they bake. They help create a lovely rise as well—just think about how fluffy cake batter transforms in the oven! Room temperature eggs incorporate more easily into your mixture; I usually leave them out on my counter for about 30 minutes before starting.
- 1 tsp vanilla extract. Vanilla extract is like the secret ingredient whispering sweet nothings into our cookie dough! It enhances all those chocolatey flavors, making them sing harmoniously together. Opt for pure vanilla extract instead of imitation when possible—trust me; you’ll taste the difference!
- 1 cup semi-sweet chocolate chips. The crowning glory of our recipe! Chocolate chips add pockets of melty goodness throughout each cookie—pure bliss! When selecting chips, look for high-quality semi-sweet varieties—they hold their shape while blending perfectly into warm batter when baked.
Equipment You’ll Need:
Now that we have our ingredients ready, let’s talk tools! Having the right equipment makes cooking smoother and more enjoyable; think of them as essential partners working alongside you in this delicious endeavor.
- Mixing bowls – A good set of mixing bowls allows you flexibility while preparing your ingredients separately before combining them into one glorious mixture. I recommend having at least two sizes: one large bowl for wet ingredients and one medium-sized bowl for dry components.
- Whisk – This handy tool helps incorporate air into your mixtures—a critical step when creating light textures or combining dry ingredients thoroughly without lumps remaining behind!
- Rubber spatula – A rubber spatula is perfect for folding delicate mixtures (like chocolate chips!) gently into batters without deflating anything you’ve worked hard on creating.
- Baking sheets – Sturdy baking sheets provide an even surface on which our cookies will bake beautifully without warping under heat pressure.
- Parchment paper – Lining your baking sheets with parchment paper prevents sticking while making cleanup effortless—a win-win situation if there ever was one!
Preparing the Fudgy Brownie Cookies
Step 1: Preheat Your Oven & Prepare Baking Sheets
Before diving into mixing up this delightful concoction, let’s set ourselves up for success by preheating our oven to 350°F (175°C). This step ensures optimal baking conditions right from the start since having hot air circulating evenly around the dough will help achieve those perfectly soft centers surrounded by crisp edges—exactly what we’re aiming for! While waiting on my oven, I love lining two baking sheets with parchment paper—it creates less mess during cleanup later while ensuring every cookie bakes evenly without sticking!
Step 2: Whisk Together Dry Ingredients
In a large bowl (the bigger, the better!), combine the all-purpose flour, unsweetened cocoa powder, granulated sugar, brown sugar, and salt using your whisk until fully blended—this process helps aerate everything slightly while ensuring no clumps remain hidden away! Why do we blend dry ingredients first? It allows uniform distribution throughout before introducing wet components later on—a crucial step if achieving consistent flavor across every single cookie matters (and trust me: it does!).
Step 3: Melt Butter & Combine with Wet Ingredients
Next up comes one of my favorite steps: melting butter until it’s just melted but not bubbling away like crazy! Use either a microwave-safe bowl or stovetop method depending on preference—both work wonders here! Once melted down smoothly (aiming for liquid form), add room-temperature eggs followed by vanilla extract into this buttery goodness until mixed seamlessly together—that beautiful golden hue tells us we’re heading towards something magical!
Step 4: Combine Wet & Dry Mixtures
Pour this luscious wet mixture directly over those thoughtfully combined dry ingredients—we’re getting close now! Using your rubber spatula or wooden spoon (both work perfectly), gently fold everything together until just combined; avoid overmixing here since doing so could lead us down an unwanted path toward tougher cookie textures instead of delightful fudginess awaiting us ahead! You’ll want some small streaks remaining visible—those will disappear once we add glorious chocolate chips next!
Let’s keep going strong—we’re almost there! Your kitchen must smell amazing already from all this deliciousness unfolding—and I can’t wait until they’re ready hot outta’ the oven soon enough…
The Joy of Mixing It All Together
Step 5: Fold in the Chocolate Chips with Love
Now, this step is where the magic truly begins to unfold! After you’ve combined your wet and dry ingredients, it’s time to gently introduce those luxurious semi-sweet chocolate chips into the mixture. Grab a rubber spatula or a wooden spoon, and with a delicate hand, fold them in until they are evenly distributed throughout the dough. This folding technique is crucial because it ensures that you don’t overmix the batter—overmixing can lead to tough cookies instead of the soft, chewy bites we’re striving for. As you fold, you’ll notice how the rich chocolate chips begin to nestle into the fudgy batter; their glossy sheen is simply irresistible! Trust me on this—taking your time here will reward you with cookies that have pockets of gooey chocolate goodness in every bite.
At this point, you might be tempted to sneak a taste of the dough—go ahead! Just remember that it’s best enjoyed raw when you know there are no eggs involved or when you’re confident about your source. If you’re feeling adventurous, consider adding in some chopped nuts for crunch or even a swirl of creamy peanut butter for an extra layer of flavor. The possibilities are endless! Just make sure not to crowd your cookie dough too much; balance is key here as we want those chocolate chips to shine through.
Step 6: Scoop Like There’s No Tomorrow
Ah, it’s finally time for the fun part—scooping those delectable cookie dough mounds onto your prepared baking sheets! Using a tablespoon-sized scoop (or even just two spoons), carefully drop balls of dough onto the parchment-lined sheets, ensuring they’re spaced out about two inches apart. This spacing is absolutely paramount; while these cookies may not spread out like thin cookies do, giving them room allows for even baking and helps maintain their delightful chewy texture.
As you work through your batches, take a moment to appreciate the visual appeal of these beautiful mounds of chocolatey goodness. Each one should be slightly taller than wide; this height will transform into soft centers as they bake! With each scoop, I promise you’ll feel a rush of excitement imagining how they’ll look once they come out of the oven—golden edges but still wonderfully soft in the middle. Don’t rush this step; allow yourself a moment to savor what’s coming next!
Step 7: Baking Your Perfect Fudgy Brownie Cookies
With your cookie dough arranged lovingly on the baking sheets, it’s time to slide them into the oven and let that warm air work its magic. Preheat your oven to 350°F (175°C) if you haven’t already done so—this temperature is perfect for creating that ideal balance between crispy edges and soft centers. Bake these beauties for about 10-12 minutes; however, keep an eye on them after the first 10 minutes. You’re looking for edges that appear set but with centers that still have that luscious softness to them—it’s all about achieving that perfect fudgy brownie-like texture.
When they’re ready to come out, you’ll notice that tantalizing aroma wafting through your kitchen—the smell is nothing short of intoxicating! It’s hard not to open that oven door prematurely just to peek at these glorious treats. But resist! Instead, let them bake undisturbed until they reach that beautiful state of near-doneness. Remember, they will continue cooking slightly from residual heat once removed from the oven due to their thick nature. If you’re unsure if they’re done, gently press down on one with your finger—the surface should feel mostly firm but still offer some resistance.
Step 8: Cooling Down – The Patience Game
As hard as it may be at this moment filled with anticipation and sweet cravings, allow your fudgy brownie cookies to cool for just a few minutes on their baking sheets before transferring them onto wire racks for complete cooling. This resting period is absolutely essential because it lets them firm up just enough so they won’t crumble when you move them—a little patience here goes a long way! You’ll see them puff up ever so slightly as they cool down; it’s like watching magic happen right before your eyes.
While they cool on their racks, imagine how they’ll melt in your mouth when you finally take that first bite. Allowing these cookies to rest also enhances their flavor profiles—those rich cocoa tones deepen beautifully as they cool together in harmony. I often find myself peeking at my cooling cookies just waiting for that moment when I can take my first glorious bite—it builds excitement and anticipation that’s almost palpable!
Final Touches
Step 9: The Ultimate Taste Test
Finally, we’ve arrived at the moment we’ve all been waiting for—the taste test! Once fully cooled (though I won’t judge if you sneak one while still warm), grab one of those fudgy brownie cookies and take a moment to admire its glossy exterior sprinkled with melted chocolate chips glistening under any available light—it’s pure dessert artistry! Now comes the best part: take a big bite and allow all those flavors and textures to dance together on your palate.
You’ll experience an explosion of rich chocolate flavor enveloping around those chewy brownie-like centers paired with slight crispiness at the edges—it’s simply divine! Trust me when I say these fudgy brownie cookies are not just snacks; they’re little pieces of happiness baked into rounds meant for sharing or savoring during quiet moments alone with a good book or movie.
As you munch away, don’t forget about serving options! Warm cookies paired with vanilla ice cream create an utterly luxurious experience—you can drizzle some homemade chocolate sauce on top too if you’re feeling fancy! So there you have it—the secrets behind crafting perfect fudgy brownie cookies from start to finish. Share them with friends or keep them all for yourself (I won’t tell!). Enjoy every delicious morsel because you’ve earned it!
Storage and Enjoyment Tips for Your Fudgy Brownie Cookies
Now that your fudgy brownie cookies are baked to perfection, it’s time to think about how to store those delightful treats and keep the magic alive for days to come! These little gems are not just a moment of bliss; they can be enjoyed in a multitude of ways, long after they’ve left the oven. The beauty of these cookies lies not only in their warm, chocolatey goodness but also in their ability to retain that heavenly flavor even when stored properly. So grab your favorite container, and let’s dive into how to preserve this chocolate dream!
Storing Leftover Fudgy Brownie Cookies
To ensure your fudgy brownie cookies remain as scrumptious as the moment they were pulled from the oven, I recommend storing them in an airtight container at room temperature. A glass or plastic container with a tight-fitting lid works perfectly—just make sure it seals well to keep out any unwanted air. If you have leftover cookies (which can be rare!), they will stay fresh for about 3-5 days. And here’s a fun tip: if you want to keep them soft and chewy, toss in a slice of bread! This little trick helps maintain moisture, so your cookies don’t dry out too quickly. After storage, you’ll find that these cookies still boast that rich chocolate flavor and wonderfully fudgy texture; they might even taste better on the second day! When you’re ready to indulge again, pop them into the microwave for about 10 seconds for a warm treat or enjoy them straight from the container—either way, trust me, they’ll be absolutely divine.
Freezing Fudgy Brownie Cookies for Later
If you find yourself with an abundance of these heavenly fudgy brownie cookies—or perhaps you just want to plan ahead—freezing is an excellent option! To freeze them properly, allow your cookies to cool completely before placing them in a single layer on a baking sheet. Don’t forget to wrap each cookie individually in plastic wrap or place them in a freezer-safe bag once they’re frozen solid; this prevents freezer burn and keeps their delightful texture intact. They can be stored frozen for up to three months without losing their charm! Whenever you’re ready for a sweet fix, simply take out as many as you’d like and let them thaw at room temperature for about 30 minutes or pop them in the microwave for a quick warm-up. The convenience factor is absolutely fantastic—you can have freshly baked fudgy brownie cookies anytime the craving strikes!
Conclusion:
As we wrap up our journey through crafting these fudgy brownie cookies together, I can’t help but feel giddy with excitement! This recipe isn’t just about baking—it’s about creating moments filled with joy and sweetness that linger long after the last crumb has been devoured. The rich combination of cocoa powder and semi-sweet chocolate chips creates an utterly intoxicating experience that dances on your taste buds while delivering that profoundly satisfying melt-in-your-mouth texture everyone craves. With each bite, you’re taken on a delightful ride where each flavor harmonizes beautifully, making it clear why this recipe deserves a cherished spot in your dessert repertoire.
I wholeheartedly believe that these fudgy brownie cookies are an absolute must-try—not only because of their deliciousness but because of the pure joy they bring during their creation. Picture yourself mixing together those simple ingredients and watching as they transform into decadent little bites of happiness. Whether it’s a cozy night at home or a gathering with friends and family, pulling these beauties from the oven will fill your kitchen with an incredible aroma that beckons everyone near. Just imagine the smiles on your loved ones’ faces as they take that first bite!
For serving suggestions, think beyond just enjoying one cookie alone. Imagine savoring one alongside a steaming cup of coffee or tea—an afternoon pick-me-up that feels indulgent yet comforting all at once. For an even more decadent experience, serve these fudgy brownies warm with a scoop of vanilla ice cream melting into every crevice; it’s pure bliss! You could even get creative by pairing them with fresh berries or drizzling some caramel sauce over the top—there’s no limit to how you can elevate this treat!
Feeling adventurous? This recipe is wonderfully adaptable! You could add chopped nuts for that extra crunch or even stir in some creamy peanut butter chips instead of chocolate chips for a unique twist—the possibilities are excitingly endless! I invite you to try out different variations and make this recipe uniquely yours; after all, cooking should be an expression of who you are! I would love to hear about your experiences; please share your creations with me as we celebrate the joy of baking together!
Fudgy Brownie Cookies

Indulge in the rich, chocolatey delight of fudgy brownie cookies—where the best features of brownies and cookies come together in perfect harmony. These decadent treats boast a soft, chewy center and a slightly crisp edge, each bite offering an irresistible burst of chocolate flavor that transports you to dessert paradise. Perfect for any occasion, from casual gatherings to cozy nights at home, these fudgy brownie cookies are sure to impress friends and family alike. Customize them with your favorite mix-ins or enjoy them as is; either way, this easy recipe is destined to become a staple in your baking repertoire.
- Prep Time: 15 minutes
- Cook Time: 12 minutes
- Total Time: 27 minutes
- Yield: About 24 servings 1x
- Category: Dessert
- Method: Baking
- Cuisine: American
Ingredients
- 1 cup all-purpose flour
- ½ cup unsweetened cocoa powder
- ¾ cup granulated sugar
- ¾ cup brown sugar
- ½ cup unsalted butter (softened)
- 2 large eggs (room temperature)
- 1 tsp vanilla extract
- 1 cup semi-sweet chocolate chips
Instructions
- Preheat your oven to 350°F (175°C) and line two baking sheets with parchment paper.
- In a large bowl, whisk together the all-purpose flour, cocoa powder, granulated sugar, brown sugar, and salt until blended.
- Melt the butter and combine it with the eggs and vanilla extract in another bowl until smooth.
- Pour the wet mixture into the dry ingredients and fold gently until just combined.
- Fold in the chocolate chips carefully until evenly distributed.
- Use a tablespoon-sized scoop to drop dough onto prepared baking sheets, spacing them about two inches apart.
- Bake for 10-12 minutes until edges are set but centers remain soft.
- Allow cooling on the baking sheet for a few minutes before transferring to wire racks.
Nutrition
- Serving Size: 1 serving
- Calories: 150
- Sugar: 13g
- Sodium: 80mg
- Fat: 7g
- Saturated Fat: 4g
- Unsaturated Fat: 3g
- Trans Fat: 0g
- Carbohydrates: 20g
- Fiber: 1g
- Protein: 2g
- Cholesterol: 20mg