Easter Poke Cake
There’s something utterly enchanting about the arrival of Easter, isn’t there? It’s that beautiful moment in spring when everything bursts into life, and we gather with loved ones to celebrate renewal, joy, and togetherness. For me, Easter is not just a day; it’s an experience steeped in tradition and warmth. And at the heart of this celebration lies my beloved Easter Poke Cake—a creation that transcends mere dessert. This cake is not just a visual delight with its pastel colors and cheerful sprinkles; it’s a symphony of flavors that dances on your palate and brings smiles all around the table. Imagine cutting into a slice and revealing layers of moist cake infused with creamy vanilla pudding, topped with fluffy whipped cream that feels like clouds in your mouth. It’s truly extraordinary.
As you embark on making this Easter Poke Cake, I want you to feel the excitement that comes with creating something special. This cake has been a staple in my family for years, bridging generations while simultaneously allowing us to innovate and personalize it every year. The vibrant colors reflect the joyous spirit of Easter, reminding us all of renewal and hope. This isn’t just about eating cake; it’s about sharing love through food—an invitation to gather, laugh, and create memories that linger long after the last crumb is gone. Trust me when I say this recipe will become a cherished part of your own celebrations!
Easter Poke Cake: A Colorful Delight for Your Celebration
This delightful Easter Poke Cake is so much more than just a dessert; it’s an experience waiting to unfold! With a moist white cake base that’s bursting with flavor from vanilla pudding and topped off with luscious whipped cream, it promises to be the showstopper at any gathering. The beauty lies in its simplicity—despite its stunning appearance and complex flavor profile, you’ll find it incredibly easy to whip up. So roll up your sleeves; let’s make some magic!

Ingredients:
As we start our culinary journey together, let’s talk about each ingredient that will bring our Easter Poke Cake to life. Each one plays a vital role in crafting this masterpiece.
- 15.25 ounces white cake mix: This is where we lay the foundation for our cake! The convenience of using a pre-packaged white cake mix saves time without sacrificing quality—perfect for busy bakers or those new to baking. It creates a light and fluffy texture that acts as a blank canvas for all the delicious flavors we’re layering in later. When choosing your mix, look for one without artificial additives; organic options often yield better results.
- 3 egg whites: These little wonders are essential for creating the perfect rise in our cake batter. Using only egg whites contributes to a lighter texture compared to whole eggs while still providing those necessary proteins that help bind everything together beautifully. Make sure they’re at room temperature before adding them; this helps achieve maximum volume when whisking.
- ½ cup vegetable oil: This liquid gold keeps our cake moist and tender—absolutely paramount! Oil adds richness without weighing down the batter like butter can do sometimes. It’s also important because it helps maintain freshness longer once baked. If you’re looking for alternatives, light olive oil can work too but avoid extra virgin as it may impart unwanted flavors.
- ½ cup Greek yogurt: I’ve always been captivated by how Greek yogurt enhances both flavor and texture! It provides moisture while adding a slight tanginess that balances out sweetness perfectly. Plus, using yogurt means we’re incorporating some healthy probiotics into our treat—who doesn’t love sneaking in some health benefits? If you don’t have Greek yogurt on hand, regular plain yogurt works well too.
- ¾ cup whole milk: Whole milk is key here as it enriches the batter further while contributing fat content required for tenderness. Using whole milk rather than skim or low-fat ensures that your cake stays moist throughout its lifespan—not drying out after a day or two like some cakes tend to do.
- Pink, yellow, and blue gel food coloring: These bright hues are what elevate our cake from simple to spectacular! Gel food coloring is preferred because it gives vibrant color without altering consistency—it’s absolutely non-negotiable if you want those pastel shades to pop! Just remember to add gradually; you can always deepen the color but can’t lighten it back if you overdo it.
- 5.1 ounces instant vanilla pudding mix: Now here’s where we infuse pure bliss into every bite! Instant pudding mix thickens quickly upon mixing with milk and adds not only sweetness but also an incredibly creamy texture that envelops our cake layers beautifully. Feel free to experiment with different flavors if you’re feeling adventurous—chocolate or butterscotch could be fabulous alternatives!
- 2 ¾ cups whole milk (for pudding): This additional milk plays its part when preparing our pudding layer—it must be whole milk again for optimal richness! Don’t rush this step; allow it adequate time to thicken properly so each slice of poke cake is generously filled.
- 2 cups heavy cream: Ah yes—the crown jewel of our topping! Heavy cream whips up into fluffy peaks that create an ethereal lightness atop our decadent layers below! Always use cold equipment when whipping cream; this allows air incorporation which leads us to those irresistibly fluffy clouds we crave!
- 3 Tablespoons granulated sugar: Sugar isn’t merely sweetening here—it stabilizes our whipped cream too! It helps maintain structure during whipping while balancing any bitterness from other ingredients like Greek yogurt or coconut later on.
- 1 cup sweetened shredded coconut: Coconut adds an amazing texture contrast along with tropical notes reminiscent of sunny days ahead! Opt for unsweetened if you prefer less sweetness overall or want more control over final flavors.
- Easter sprinkles and/or candy (optional topping): Finally—the fun finishing touch! Sprinkles add whimsy and festivity that make this dessert scream celebration! Use whatever catches your eye—think mini chocolate eggs or pastel confetti sprinkles—the sky’s the limit!
Equipment You’ll Need:
Having the right tools makes all the difference between baking being a chore or an absolute joy! With these essential partners by your side, you’ll navigate through creating your Easter Poke Cake smoothly:
- Mixing bowls (various sizes): These are crucial as they hold everything together beautifully during mixing phases—investing in sturdy bowls makes life easier since they won’t warp under pressure or heat!
- Electric mixer (handheld or stand): An electric mixer isn’t just convenient; it’s absolutely vital for achieving fluffy textures in batters quickly without tiring out those arm muscles! Whipping cream achieves peak perfection faster than manual methods ever could as well.
- Rubber spatula: This handy tool helps fold ingredients gently so we maintain air within mixtures—a must-have when combining delicate whipped cream into denser components like pudding!
- Cake pan (9×13 inch): A larger rectangular pan allows us ample space for spreading batter evenly ensuring uniform baking throughout without excess crust forming on edges—nobody wants burnt bites!
- Measuring cups & spoons: Precision matters immensely in baking; reliable measuring tools ensure proportions stay accurate translating directly into delicious outcomes each time!
Now that we’ve gathered all our ingredients and gear together let’s dive into making this delightful masterpiece!
Preparing the Easter Poke Cake
Step 1: Mixing Up Magic
To start off on the right foot, preheat your oven to 350°F (175°C). While that’s warming up—which usually takes about 10 minutes—you can begin mixing together your dry ingredients first by whisking together the white cake mix along with your egg whites until thoroughly combined in one bowl; visually you should see no lumps remaining at all as you stir away! Next up comes incorporating vegetable oil alongside Greek yogurt followed by pouring in whole milk gradually while still mixing until everything looks velvety smooth—that’s what you’re aiming for here—a luscious batter ready for its transformation into something spectacular.
Step 2: Adding Vibrant Colors
Now here comes one of my favorite parts—adding color! Divide equal portions of batter into separate bowls depending on how many colors you’d like (I recommend three). Start small with gel food coloring—just drop one tiny dot at first then mix vigorously until desired shades appear fully incorporated throughout each batch—you’ll witness pure magic unfolding before your eyes as each hue materializes beautifully! Once done coloring them individually take turns pouring these vibrant mixes back together inside prepared baking pan creating swirling patterns if desired—it’s an artistic endeavor worth savoring before sliding straight onto oven rack where they’ll bake away into edible masterpieces over approximately 25 minutes or until toothpick inserted comes out clean—a tell-tale sign they’re ready!
Step 3: Time To Chill
Once baked perfectly golden brown remove from oven allowing cakes cool completely within their pans set atop wire racks nearby—this cooling phase typically requires about half an hour total so patience here pays off significantly later on when slicing pieces cleanly instead of crumbly chaos erupting everywhere instead! After cooling down sufficiently flip cakes carefully onto another platter ensuring no breakage occurs during transition process—it happens sometimes but don’t fret too much if minor mishaps arise—they’ll be covered shortly anyways once assembled later…
Step 4: Creating Our Creamy Filling
With those beautiful layers now cooled down enough let’s prepare filling next by whisking together instant vanilla pudding mix combined harmoniously alongside remaining measured milk within another mixing bowl till fully blended without lumps rearing their ugly heads-up—it shouldn’t take longer than five minutes total usually unless using stubborn brands tends towards clumping stubbornly against standards achieved beforehand then simply continue stirring until smooth consistency emerges forth triumphantly instead leaving behind any frustrations experienced earlier altogether transforming quickly thereafter into creamy goodness inviting everyone around eagerly anticipating indulgence soon approaching amidst festivities ahead beckoning them closer towards final product unveiling shortly thereafter!
[Continue writing additional steps…]
Step 5: Creating Your Colorful Cake Layers
Now that we have our batter ready to go, it’s time for the fun part—creating those vibrant layers that will make your Easter Poke Cake truly shine. Preheat your oven to 350°F (175°C) and prepare three round cake pans by lightly greasing them with a bit of oil or cooking spray and then dusting them with flour. This is crucial because it helps our cakes release effortlessly from the pans once they’re baked, ensuring a perfect presentation.
Next, divide your white cake batter evenly into three bowls; you want each layer to represent a delightful pastel hue. This is where the magic happens! Add a few drops of pink gel food coloring to one bowl, yellow to another, and blue to the last. Remember, gel coloring is concentrated, so start with just a small amount—you can always add more if you desire a deeper shade. Use a spatula or a whisk to gently fold in the colors until they’re evenly distributed throughout the batter. The sight of these vibrant shades swirling together is simply intoxicating and prepares you for the feast ahead! Pour each colored batter into its respective cake pan, smoothing the tops gently with a spatula. Bake in your preheated oven for about 25-30 minutes or until a toothpick inserted into the center comes out clean or with just a few moist crumbs clinging to it. Trust me on this: allowing your cakes to cool completely in their pans before unmolding them will help maintain their structure and prevent any crumbly disasters.
Step 6: Preparing the Vanilla Pudding Filling
While those beautiful layers are baking away, let’s turn our attention to the luscious vanilla pudding that will bring our Easter Poke Cake to life! In a medium mixing bowl, combine the instant vanilla pudding mix with 2¾ cups of whole milk. It’s essential to use whole milk here; its creamy richness ensures that your pudding sets up beautifully while adding that extra level of indulgence we all crave in dessert. Whisk vigorously for about two minutes until the mixture thickens up and takes on that velvety texture we all adore. I promise you, this step is non-negotiable—the thickness of your pudding will create those tantalizing pockets of flavor in your cake.
Once thickened, cover your bowl with plastic wrap directly on the surface of the pudding; this prevents any film from forming as it chills in the fridge. Allow it to rest in there for at least 10-15 minutes while your cakes finish baking and cooling down. This resting period not only enhances flavors but also gives you some precious moments to tidy up your kitchen or plan how you’ll decorate this masterpiece later on!
Step 7: Poking Holes and Filling Up
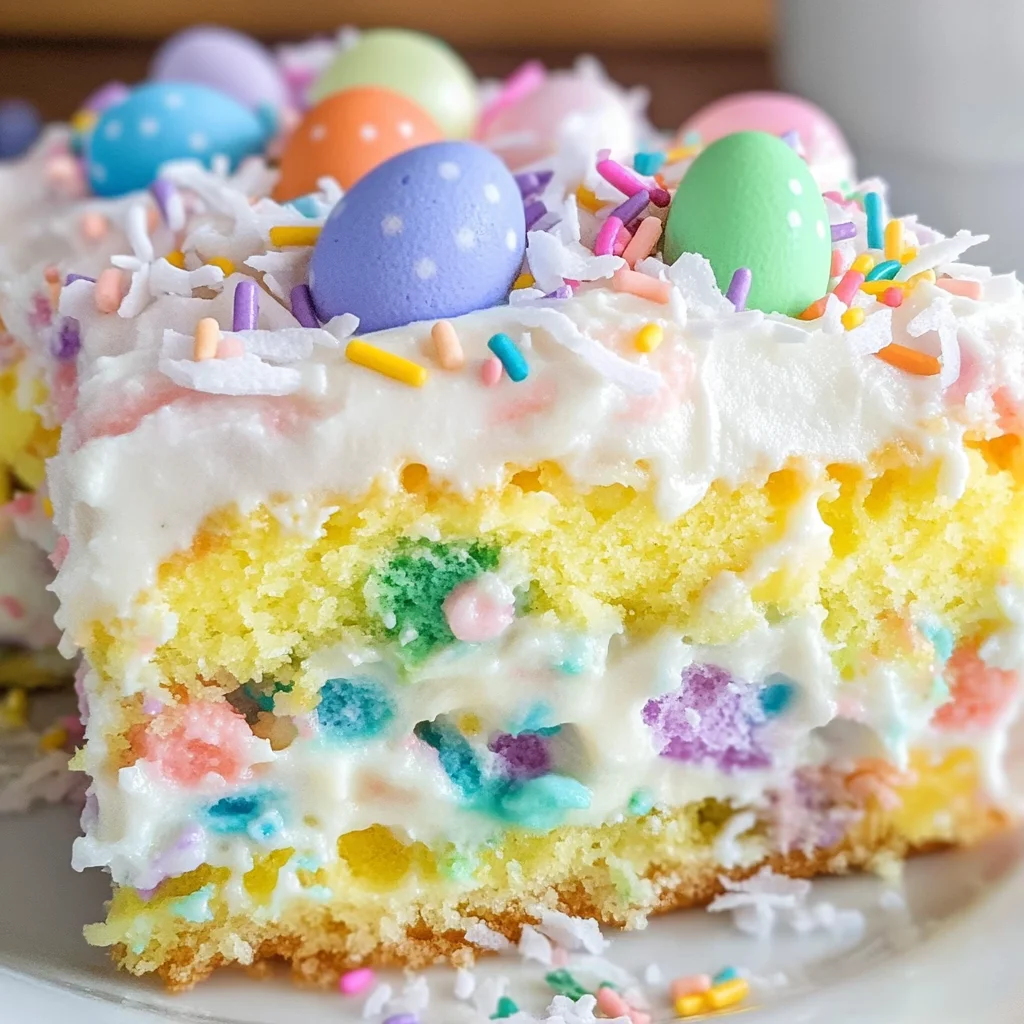
With both layers baked and cooled completely—and let me emphasize how important it is that they cool here, as warm cakes can lead to soggy layers—we’re now ready for one of my favorite parts: poking holes into our lovely pastel cakes! Using a skewer or chopstick (whatever you have handy), gently poke holes all over each layer of cake about an inch apart; be sure not to poke all the way through to the bottom—just deep enough so that some of that irresistible vanilla pudding can seep inside and work its magic.
Now comes an incredibly satisfying moment: take your chilled vanilla pudding and spread it generously across each layer, allowing it to fill those little holes like liquid gold! You might find yourself wanting to taste some—go ahead; I won’t judge! Spread it evenly using an offset spatula for smoothness, which not only makes it easier for layering but also gives us an utterly irresistible texture when we take our first bites later on. Once filled, cover each layer with plastic wrap again and pop them back into the fridge for at least 30 minutes; this allows everything to settle beautifully together—a crucial step if you’re dreaming about slice after slice without making a mess.
Step 8: Whipping Up Dreamy Cream Topping
While our cake layers are chilling out peacefully with their creamy filling, let’s prepare that gorgeous whipped cream topping that’s going to crown our Easter Poke Cake like royalty! Start by chilling a large mixing bowl and beaters in your freezer for about 10-15 minutes; trust me on this—it makes all the difference in achieving fluffy peaks when whipping cream! Once chilled, pour in 2 cups of heavy cream along with three tablespoons of granulated sugar; this adds just enough sweetness without overpowering that fresh cream flavor—absolutely paramount for balancing out all those sweet layers below.
Using an electric mixer on medium speed, whip until soft peaks form—this means when you lift up the beaters, they should leave trails but still droop slightly at the tips. Now here’s where patience comes into play: don’t rush this step! Continue beating until stiff peaks form; if you over-whip (and believe me—I’ve made this mistake more times than I’d like to admit), you’ll end up with butter instead! Aim for a light-as-a-cloud consistency that holds its shape beautifully when dolloped onto your layered cake later on.
Final Touches Before Serving Your Easter Poke Cake
Step 9: Assembling Your Beautiful Creation
Once everything is prepped—the cakes chilled with their luscious filling and whipped cream at peak perfection—it’s time for assembly! Place one layer of cake on your serving plate or pedestal stand (a beautiful display elevates any dessert!). Spread about one-third of your whipped cream topping over this first layer using an offset spatula or even just a regular spatula if that’s what you’ve got—make sure it’s even so every guest gets treated equally when served!
Carefully place the second layer on top and repeat: more whipped cream goodness spread across its surface before topping it off with that final pastel layer—a sight so beautiful it might make you tear up just looking at it! Once stacked high like this, lavishly frost the entire cake with whatever remains of your whipped cream—don’t hold back here; make sure every inch is covered because we want every bite drenched in creamy delight!
Now comes another delightful moment—top off your creation with sweetened shredded coconut if you’re feeling adventurous (it mimics fluffy clouds!) followed by colorful Easter sprinkles or mini eggs scattered artfully across the top as if nature itself adorned them there just for us! This visual treat reflects not only festive cheer but also invites everyone around you closer as they admire what you’ve created!
Step 10: Chill Again & Serve!
Finally, it’s time for one last chill! Cover your assembled Easter Poke Cake lightly with plastic wrap (to avoid squishing those decorations) and return it back into the fridge for at least an hour—or longer if you can resist diving right in! This final chill allows all those incredible flavors meld together beautifully while firming up our whipped cream topping; trust me—your patience will reward you abundantly when slicing into perfectly layered pieces later!
When you’re ready to serve this masterpiece at your gathering, take a moment before cutting into it—you want everyone around you savoring anticipation as much as they will savor each bite afterward. The first slice will reveal those stunning layers filled with vibrant colors peeking through glistening pools of creamy vanilla pudding—a celebration both visually and taste-wise!
And there you have it—your very own Easter Poke Cake that brings joy not only through its delicious flavors but also by creating cherished memories around shared meals together. So gather friends and family close because nothing quite says “celebration” like homemade desserts made from love—and I promise you’ll leave everyone asking for seconds…and maybe even thirds! Happy baking!
Storage and Enjoyment Tips for Your Easter Poke Cake
Now that your beautiful Easter Poke Cake is ready to impress, let’s talk about how to enjoy every last crumb! This cake is not just a feast for the eyes with its vibrant colors and festive toppings; it’s also incredibly satisfying to bite into the moist layers filled with creamy vanilla pudding. When you bring this delightful creation to the table, I promise you, everyone will be reaching for seconds (or thirds!). But what if there are leftovers? Fear not, this cake is just as wonderful the next day, and I’ve got all the tips you need to keep it fresh and fabulous.
Storing Leftover Easter Poke Cake
To ensure your Easter Poke Cake stays as delectable as the day it was made, storing it properly is absolutely paramount. I recommend placing any leftover cake in an airtight container; this will help maintain its moisture and prevent it from absorbing any unwanted fridge odors. If you don’t have a suitable container, a layer of plastic wrap directly on the surface can work wonders too. Stored this way, your cake will remain delightful for about 3-5 days in the refrigerator. Now, here’s a little pro tip: if you want to keep your cake extra fluffy, consider placing a slice of bread in the container alongside it. The bread helps retain moisture, making each bite feel like a little piece of heaven. After a day or two in storage, you might notice the flavors deepening beautifully; each mouthful becomes even more rewarding with that luscious pudding filling mingling with the sponge. When it’s time to serve again, simply cut yourself a slice straight from the fridge or let it sit at room temperature for a bit—both ways deliver joy!
Freezing Easter Poke Cake for Later
Feeling like planning ahead? Freezing portions of your Easter Poke Cake is an excellent option that adds convenience to your baking endeavors! To freeze your masterpiece effectively, slice it into individual portions and wrap each piece tightly in plastic wrap before placing them in a freezer-safe bag or container. This method not only keeps them fresh but also makes it easy to grab just what you need later on. Properly stored this way, your cake can last up to three months in the freezer without losing its charm. When you’re ready to indulge again, simply transfer a slice to the fridge overnight or let it thaw at room temperature for about an hour before devouring. Trust me on this—there’s nothing quite like unwrapping a frozen piece of cake and being greeted by that familiar aroma of vanilla and sweet cream! It’s convenience wrapped in happiness.
With these storage tips under your belt, I hope you feel empowered to enjoy every moment with your Easter Poke Cake—whether it’s savoring it fresh out of the oven or delighting in leftovers!
Easter Poke Cake

Easter Poke Cake is a vibrant and delightful dessert that beautifully captures the spirit of spring celebrations. This cake features moist layers infused with creamy vanilla pudding, topped with fluffy whipped cream and adorned with colorful sprinkles. Perfect for family gatherings or holiday festivities, it’s easy to make and sure to impress everyone at your table. The combination of lively pastel colors and rich flavors creates a memorable experience for both kids and adults alike. Whether you’re enjoying a slice after lunch or bringing it to a potluck, this Easter Poke Cake is destined to become a cherished tradition in your home.
- Prep Time: 30 minutes
- Cook Time: 25 minutes
- Total Time: 55 minutes
- Yield: Serves approximately 12 people 1x
- Category: Dessert
- Method: Baking
- Cuisine: American
Ingredients
- 15.25 ounces white cake mix
- 3 egg whites
- ½ cup vegetable oil
- ½ cup Greek yogurt
- ¾ cup whole milk
- Pink, yellow, and blue gel food coloring
- 5.1 ounces instant vanilla pudding mix
- 2¾ cups whole milk (for pudding)
- 2 cups heavy cream
- 3 tablespoons granulated sugar
- 1 cup sweetened shredded coconut
- Easter sprinkles/candy for decoration (optional)
Instructions
- Preheat oven to 350°F (175°C). Mix white cake mix and egg whites in a bowl until combined.
- Add vegetable oil, Greek yogurt, and milk gradually while mixing until smooth.
- Divide batter into three bowls; color each with gel food coloring as desired.
- Pour colorful batters into a greased 9×13 inch pan. Bake for 25 minutes or until a toothpick comes out clean.
- Cool cakes completely on wire racks before unmolding.
- Prepare vanilla pudding by whisking instant pudding mix with whole milk until thickened; refrigerate for about 10 minutes.
- Poke holes in cooled cakes; fill with chilled vanilla pudding.
- Whip heavy cream with sugar until stiff peaks form, then frost the top of the layered cake.
- Decorate with shredded coconut and sprinkles if desired.
Nutrition
- Serving Size: 1 serving
- Calories: 300
- Sugar: 24g
- Sodium: 180mg
- Fat: 16g
- Saturated Fat: 10g
- Unsaturated Fat: 5g
- Trans Fat: 0g
- Carbohydrates: 36g
- Fiber: <1g
- Protein: 4g
- Cholesterol: 30mg