Deviled Eggs Recipe
There’s something truly magical about gathering around a table filled with food that sparks joy and nostalgia, isn’t there? Deviled eggs, with their creamy texture and delightful blend of flavors, are more than just an appetizer; they’re a celebration of togetherness and tradition. I can still remember the first time I tasted them at my grandmother’s house. The moment I took a bite, I was transported to a world of savory goodness, where each creamy bite was sprinkled with just the right amount of paprika. It was as if each egg half was whispering secrets of family gatherings past, inviting everyone to share in the experience. This Deviled Eggs Recipe is not just about cooking—it’s about creating memories and sharing love through food.
When it comes to deviled eggs, they hold a special place in American cuisine, often gracing our tables during holidays, picnics, and friendly gatherings. Their rich history traces back to ancient Rome, where similar recipes were enjoyed as appetizers. Fast forward to today, and these little delights have evolved into countless variations—each one vying for its spot in your heart (and stomach). What makes this version stand out is its perfect balance of creaminess from the mayonnaise and the subtle sweetness from the pickle relish. Trust me when I say that every gathering will be brightened by these vibrant bites. So let’s dive into this culinary adventure together!
Deviled Eggs Recipe: A Creamy Delight That Tells a Story
Welcome to the world of deviled eggs! This recipe is one that I’ve cherished for years because it not only brings smiles but also sparks conversation. Whether you’re preparing for a festive holiday gathering or simply want to elevate your weeknight meals with something special, these deviled eggs are always a hit.
Ingredients:
As we embark on this culinary journey, let’s gather our ingredients with love and intention. Each component plays a vital role in creating those perfectly delectable deviled eggs that everyone will rave about.
- 12 large eggs. The star of our show! When selecting eggs, look for those that feel heavy for their size—this usually indicates freshness. Fresh eggs will peel more easily after boiling; trust me on this one! Using large eggs gives you ample yolk to create that creamy filling we all adore.
- 4 1/2 tablespoons mayonnaise (use less if you like them less creamy). This ingredient is crucial for achieving that luscious filling texture. Mayonnaise adds richness while binding all the flavors together; it’s like liquid gold! If you prefer a lighter touch, feel free to adjust the amount based on your taste.
- 1 tablespoon prepared yellow mustard. This bright condiment adds tanginess to our filling—think of it as the zing that elevates all other flavors! Yellow mustard is familiar and comforting; it’s what many people grew up with in their family recipes.
- 2 teaspoons Dijon mustard. Now we’re bringing in some sophistication! Dijon offers a subtle complexity that complements the yellow mustard beautifully. Its slightly spicy undertones will dance on your palate, enhancing the overall flavor profile without overpowering it.
- 4 tablespoons sweet or dill pickle relish, drained. Here’s where things get interesting! Relish introduces a delightful sweetness (or tanginess if you choose dill) that contrasts beautifully against the creaminess of the yolk mixture. Make sure to drain it well so your filling doesn’t become watery—nobody wants soggy deviled eggs!
- Salt. A little pinch goes a long way in amplifying all those wonderful flavors we’re layering together in our filling! Salt is essential—it accentuates sweetness and balances out acidity.
- Pepper. Freshly cracked black pepper adds warmth and depth; it’s like adding an extra layer of flavor without being too bold. Just a sprinkle makes all the difference!
- Paprika. This isn’t just for aesthetics; paprika introduces a smokiness that beautifully rounds out our dish while giving it that classic look we all recognize and love.
Equipment You’ll Need:
Having the right tools can make all the difference when you’re preparing delicious meals—like these deviled eggs! It’s important to have reliable equipment on hand as they act like trusted partners throughout your cooking journey.
- Large pot – A sturdy pot is non-negotiable here since we’ll be boiling our precious eggs! Look for one deep enough to hold 12 large eggs comfortably without crowding them—this ensures even cooking and prevents cracking.
- Slotted spoon – This handy tool is essential when you’re transferring your boiled eggs into ice water after cooking—you want to do this quickly so they cool down fast! Plus, it keeps things clean and simple while preventing any potential splashes.
- Cutting board & sharp knife – Your trusty cutting board provides stability while slicing those hard-boiled eggs in half smoothly without damaging them. A sharp knife ensures clean cuts—which are aesthetically pleasing when plating!
- Mixing bowl – You’ll need a good-sized bowl for mixing your yolk filling ingredients together thoroughly without any mess spilling over the sides—trust me on this!
- Fork or hand mixer – While mashing yolks with just a fork works perfectly fine, if you’re looking for an ultra-smooth consistency (and who isn’t?), using an electric hand mixer can save time and effort.
Preparing the Deviled Eggs Recipe
Step 1: Boiling Those Perfect Eggs
To kick off our adventure into making deviled eggs, let’s start by boiling our large eggs properly—a step that’s absolutely paramount for achieving that perfect hard-boiled texture! Begin by placing all twelve large eggs gently into your large pot and covering them completely with cold water—about an inch above them should do nicely. Now here comes the critical part: bring this water to a rolling boil over medium-high heat; once you see those vigorous bubbles dancing away, cover your pot tightly with its lid and turn off the heat immediately! Yes, you heard me right: turn off that burner! Let them sit undisturbed for 10 to 15 minutes depending on how firm you like your yolks (10 minutes yields softer yolks which are divine!). After time’s up, carefully drain hot water from the pot before transferring those beauties into an ice bath—this helps halt cooking instantly while making peeling easier later on!
Step 2: Peeling Perfection
Once your boiled eggs have cooled in ice water for several minutes (patience pays off here!), it’s time to peel away their shells—and trust me when I say there’s nothing more satisfying than peeling perfectly boiled eggs! Start by gently tapping each egg against a hard surface until cracks form all around before rolling them lightly under your palm; this loosens up stubborn membranes stuck beneath those fragile shells. Remember: fresher eggs tend to be trickier when peeling so don’t fret if some egg whites come off along with shell bits—that’s just part of life! Aim for smooth halves but embrace imperfections too—they’ll still taste amazing!
Step 3: Creating That Creamy Filling
Now comes my favorite part—the blend of flavors that brings everything together into something utterly intoxicating! Slice each peeled egg in half lengthwise carefully using your sharp knife—you want clean cuts here so take your time as you reveal those golden yolks nestled inside egg whites waiting eagerly for transformation! Gently pop out each yolk into your mixing bowl while ensuring not to break any white halves—they’re going to cradle our luscious filling later on! Once you’ve gathered all yolks together, add four-and-a-half tablespoons of mayonnaise (remember—you can adjust based on preference), one tablespoon yellow mustard followed by two teaspoons Dijon mustard along with four tablespoons drained relish plus salt and pepper according to taste; mash everything together using either fork or hand mixer until combined beautifully!
Step 4: Filling Those Egg Whites
With our creamy filling ready—it’s time now for assembly—a true labor of love where presentation matters too! You can either spoon generous portions directly back into their respective egg white cavities or opt for using a pastry bag fitted with star tip (if feeling fancy). Trust me when I say there’s something special about elegantly piped fillings—it adds flair without sacrificing flavor at all! Don’t hesitate though if you prefer rustic dollops instead; authenticity shines through every bite regardless how they’re served up… Just remember not to overfill since we want each half looking charming yet balanced visually!
Now go ahead sprinkle lightly with paprika which brings an enchanting touch both visually & flavor-wise onto each delectable creation—we eat first with eyes after all right? And voila—you’ve mastered my beloved Deviled Eggs Recipe sure to impress friends & family alike!
Feeling inspired yet? Stay tuned as we continue exploring culinary delights together because every recipe has stories waiting behind them…and I’m here every step along way cheering you on towards success!
Step 5: The Art of Filling the Egg Whites
Now that we have our lush yolk mixture, it’s time to bring these beautiful eggs to life by filling the whites. This is where the magic truly begins! Whether you choose to simply spoon the mixture into each egg white half or opt for a pastry bag will depend on your mood and the occasion—both methods work beautifully. If you’re feeling a little fancy, I highly recommend using a pastry bag fitted with a star tip; it adds an elegant flair that’s utterly delightful! Once you’re ready, gently scoop spoonfuls of that creamy yolk filling and carefully nestle it into the hollowed-out egg whites. You want to fill them generously, creating a lovely mound that stands tall like a cloud of sunshine on your platter.
Take a moment to admire your handiwork; the contrast of the bright yellow filling against the pristine white of the egg is nothing short of stunning. As you fill each half, think about how this step is crucial for both flavor and presentation. A well-filled deviled egg not only looks appealing but also ensures that every bite is bursting with that symphony of flavors we’ve created. If you find yourself running low on filling, don’t fret! Just mix up a small amount more—it’s totally normal. And trust me, with how good these are, there won’t be any leftovers.
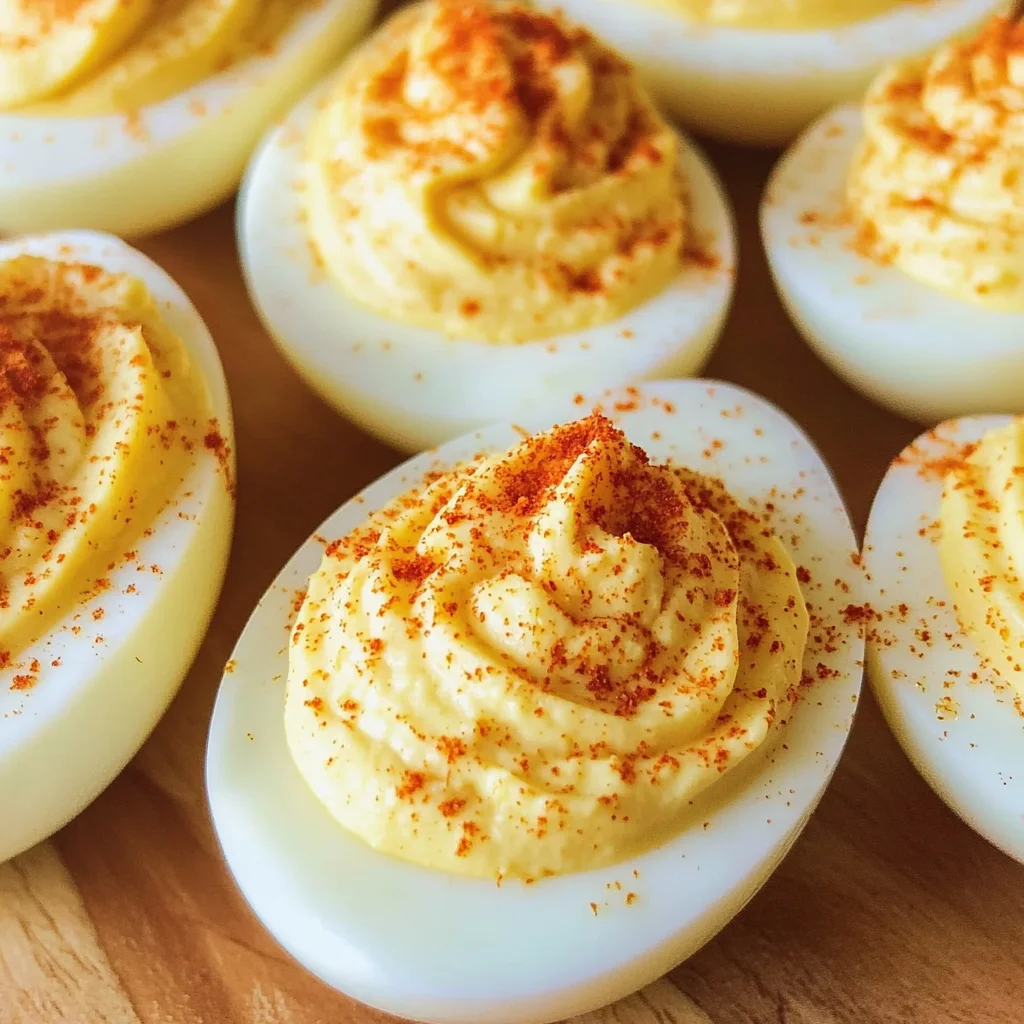
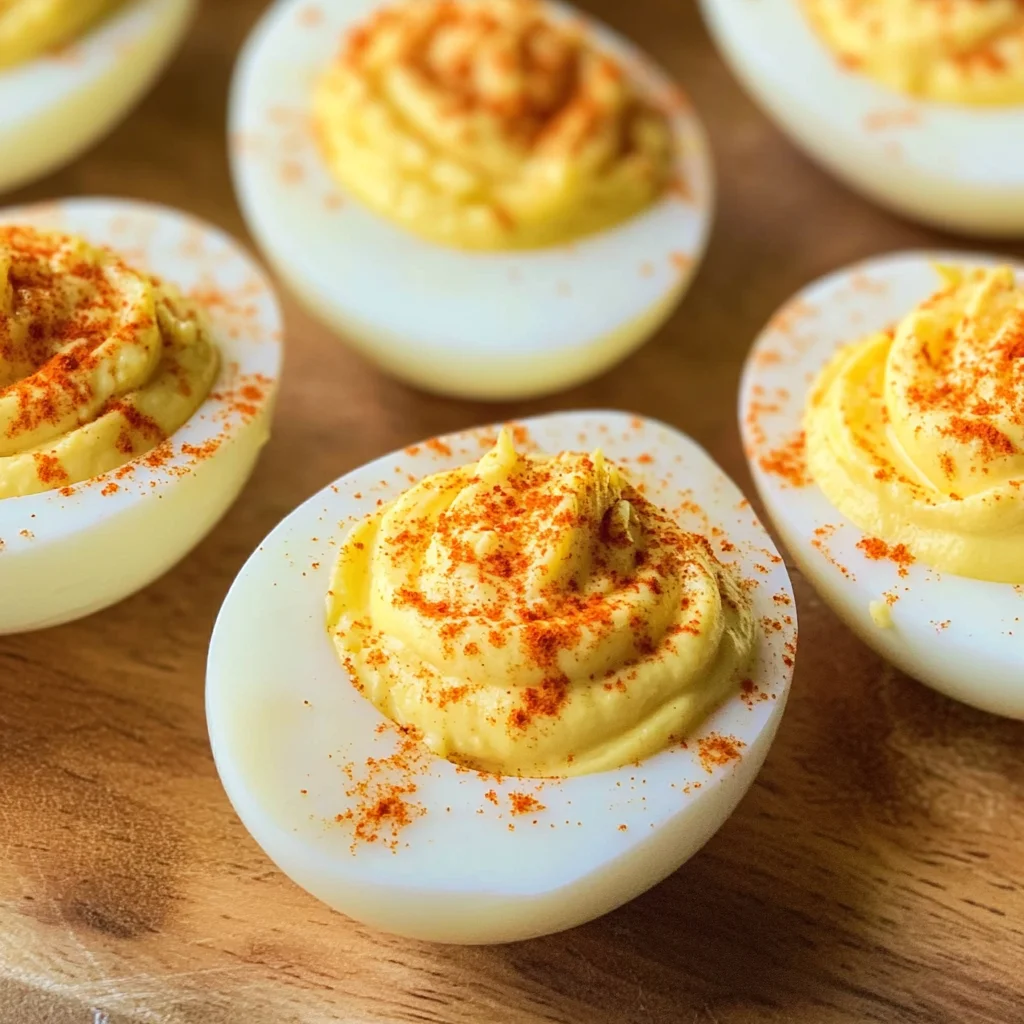
Step 6: The Finishing Touch – A Dusting of Paprika
With our eggs now looking gorgeous and inviting, it’s time to sprinkle on some paprika—a step I believe is absolutely paramount in elevating your Deviled Eggs Recipe from delicious to extraordinary. Not only does paprika add a pop of color that makes each egg look vibrant and enticing, but it also infuses just a whisper of smokiness and warmth that beautifully complements the creamy filling. Using your fingers or a small sifter, lightly dust each filled egg with paprika. Don’t rush this step! A gentle touch is all you need; too much can overpower those delicate flavors we’ve so lovingly crafted.
As you step back to survey your work, notice how this simple addition transforms your dish into something visually stunning. The paprika not only enhances flavor but brings an inviting aroma that will tantalize anyone nearby—it’s almost like it’s beckoning them closer! If you’re feeling adventurous, consider experimenting with other spices too—like cayenne for heat or even smoked paprika for depth—but remember, balance is key here. You want every bite to feel harmonious.
Step 7: Chill Out – Why Resting Matters
After all that hard work assembling these beauties, there’s one more crucial step before serving: chilling them in the refrigerator for at least 30 minutes. Now, I know this might feel like torture when you’re eager to dig in—that anticipation can be tough! But trust me on this: chilling allows the flavors to meld together beautifully and creates an utterly intoxicating experience for your taste buds. As they rest in their cool environment, the mayonnaise thickens slightly around those yolks while every ingredient gets cozy with one another.
This resting period isn’t just about flavor; it also enhances texture. Cold deviled eggs have a refreshing creaminess that contrasts perfectly with their rich filling—a true delight on warm days or as appetizers at gatherings. So go ahead and wrap them gently in plastic wrap or place them in an airtight container; just make sure they’re covered so they don’t absorb any unwanted odors from your fridge. After about 30 minutes (or longer if you can bear it!), you’ll be rewarded with bites that feel well-rounded and sophisticated.
Step 8: Serve with Love – Presentation Matters
At long last, it’s time for the grand unveiling! Carefully remove your chilled deviled eggs from the refrigerator and arrange them on a beautiful serving platter or individual plates if you’re feeling extra generous—let’s spread that joy! The visual appeal here is significant; after all, we eat first with our eyes! Consider garnishing them further with fresh herbs like chopped chives or parsley for an extra burst of freshness and color—they not only enhance aesthetics but add another layer of flavor.
Before serving them to your friends and family (or just indulging yourself), take a moment to appreciate all the love you’ve poured into this Deviled Eggs Recipe—from boiling those eggs just right to perfecting that luscious filling and finally presenting them like mini works of art. Remember that food made with passion has its own kind of magic—it invites people together around tables and sparks joyful conversations. As you watch everyone savor those first bites, you’ll realize why this recipe holds such a special place in my heart—it’s not just about food; it’s about connection!
Conclusion:
As we wrap up our journey through this scrumptious Deviled Eggs Recipe, I hope you’re feeling as excited as I am about creating these delightful bites! The way each ingredient harmonizes—the creamy mayonnaise mingling flawlessly with tangy mustard and sweet pickle relish—is truly extraordinary. It’s like a symphony of flavors dancing together on your palate! And let’s not forget about that sprinkle of paprika; it’s not just for looks—it adds that essential zing that elevates these treats from ordinary to unforgettable.
This recipe isn’t just about taste; it’s an experience waiting to be had. Imagine gathering around with loved ones during celebrations or casual get-togethers, sharing laughter while indulging in these creamy morsels—it’s moments like these that make cooking worthwhile! They’re versatile enough to shine at any occasion—from holiday feasts to backyard barbecues—and incredibly simple for anyone to master, even if you’re new in the kitchen. Picture yourself pulling out a platter adorned with these beauties; their alluring aroma fills the room and immediately draws everyone in.
And as far as serving suggestions go, I can hardly contain my enthusiasm! Imagine savoring one alongside crisp veggie sticks or perhaps pairing it with freshly baked bread rolls spread lightly with herbed butter—heavenly! For an afternoon pick-me-up at picnics or brunches, serve them next to crunchy potato salad or zesty coleslaw for that ultimate summer vibe. And if you’re looking for something really decadent, consider topping each egg with crispy capers or finely crumbled vegan bacon—trust me; it takes this dish over-the-top!
Feeling adventurous? This Deviled Eggs Recipe is wonderfully adaptable! Perhaps try swapping out traditional mustard for spicy sriracha or adding avocado for a rich twist—each variation brings its own unique flair while staying true to its roots. The possibilities are endless, and I wholeheartedly encourage you to explore all kinds of enhancements that excite your taste buds! So grab those ingredients and dive into this culinary adventure; I’d love nothing more than for you to share your variations with me afterward!
Deviled Eggs Recipe

Delight in this easy Deviled Eggs Recipe that’s creamy and flavorful! Discover how easy it is—try it today!
- Prep Time: 15 minutes
- Cook Time: 15 minutes
- Total Time: 30 minutes
- Yield: Makes 24 deviled egg halves (12 servings) 1x
- Category: Appetizer
- Method: Boiling
- Cuisine: American
Ingredients
- 12 large eggs
- 4 1/2 tablespoons mayonnaise
- 1 tablespoon prepared yellow mustard
- 2 teaspoons Dijon mustard
- 4 tablespoons sweet or dill pickle relish, drained
- Salt and pepper to taste
- Paprika for garnish
Instructions
- Place the eggs in a large pot and cover them with cold water. Bring to a rolling boil over medium-high heat. Once boiling, cover the pot and turn off the heat. Let sit for 10-15 minutes.
- Transfer the eggs to an ice bath to cool for several minutes before peeling.
- Slice each egg in half lengthwise and remove the yolks into a mixing bowl.
- Mash the yolks with mayonnaise, yellow mustard, Dijon mustard, relish, salt, and pepper until smooth.
- Fill each egg white half with the yolk mixture using a spoon or pastry bag.
- Sprinkle paprika on top for garnish and chill for at least 30 minutes before serving.
Nutrition
- Serving Size: 1 deviled egg half (25g)
- Calories: 70
- Sugar: 0g
- Sodium: 110mg
- Fat: 5g
- Saturated Fat: 1g
- Unsaturated Fat: 3g
- Trans Fat: 0g
- Carbohydrates: 1g
- Fiber: 0g
- Protein: 6g
- Cholesterol: 186mg