Crispy Dill Pickle Grilled Cheese Sandwich
There’s something truly special about food that transcends mere nourishment; it’s an experience. When I think about my Crispy Dill Pickle Grilled Cheese Sandwich, it evokes a rush of memories and emotions. Picture this: golden-brown bread sizzling in butter, the intoxicating aroma of cheese melting into gooey perfection, and the sharp tang of dill pickles cutting through the richness like a refreshing breeze on a summer day. It’s more than just a meal; it’s a bridge between childhood comfort and adult cravings—a symphony of flavors that dances on your palate. Trust me when I say, each bite is an embrace wrapped in nostalgia, warmth, and joy.
Oh, how I’ve always been captivated by the humble grilled cheese! There’s something profoundly satisfying about its simplicity—the way it brings people together around the dinner table or serves as a quick snack after a long day. But what makes this version so special is that delightful crunch from the dill pickle-flavored potato chips, lending an unexpected twist to this classic comfort food. Perfect for weeknight meals or even a cozy weekend brunch, this sandwich is your ticket to effortless gourmet dining at home. Whether you’re enjoying it solo on a rainy afternoon or sharing it with friends during game night, I promise you will fall in love with this combination of crispy, cheesy goodness.
Crispy Dill Pickle Grilled Cheese Sandwich: A Delightfully Tangy Twist on Comfort Food
Welcome to this culinary adventure where we take the beloved grilled cheese sandwich and elevate it with zesty dill pickles and crunchy potato chips! This recipe is a celebration of flavors—creamy cheese meets tart pickles, all housed within perfectly toasted sourdough. It’s simple yet sophisticated, and I can’t wait for you to try it.
Ingredients:
As we embark on this delightful culinary journey together, let’s explore each ingredient that makes up our Crispy Dill Pickle Grilled Cheese Sandwich. Each one plays a vital role in creating that perfect balance of flavors and textures.
- 2 slices sourdough bread. The choice of bread is absolutely paramount here! Sourdough brings not only a lovely tanginess but also an incredible texture that holds up beautifully against melting cheese and tangy pickles. Look for bread with a nice crust—this ensures your sandwich will have that coveted crunch while remaining soft inside. If you’re feeling adventurous or want to add an extra dimension of flavor, consider using whole grain or rye sourdough for an earthy twist.
- 6 oz dill havarti cheese, grated. Ah, dill havarti—this creamy delight is what dreams are made of! Its smooth texture melts effortlessly into gooey goodness while the dill notes provide a refreshing contrast to the richness of the cheese itself. Grating it allows for quicker melting and ensures every bite delivers that luscious cheesiness you crave. If you can’t find dill havarti, feel free to substitute with another soft cheese like Monterey Jack or even mozzarella; just be sure to add some fresh dill for that herbaceous kick!
- 2 tbsp dill pickles, chopped and patted dry. Now we arrive at our secret ingredient—the dill pickles! Their crispness adds an exciting textural element while their acidity cuts through the richness of the cheese perfectly. By patting them dry before adding them to your sandwich, you prevent any additional moisture from making your bread soggy—a non-negotiable step for achieving optimal crispiness! If you’re not a fan of traditional dill pickles, try using bread-and-butter pickles for a sweeter variation.
- 2 pieces salted butter. Butter is magic—it’s truly what makes everything better! Using salted butter is crucial here as it enhances all the flavors by adding richness while also promoting that beautiful golden-brown crust we all adore in grilled cheese sandwiches. Be sure to let your butter come to room temperature so it’s easy to spread without tearing your precious bread; this small detail makes all the difference in achieving that perfect sear.
- 1 handful dill pickle flavored potato chips. Now here’s where things get really fun! Adding these potato chips gives our sandwich an unexpected crunch that elevates every bite into something extraordinary. The salty flavor pairs beautifully with everything else—think of them as crispy little nuggets of joy tucked inside your sandwich! If you’re unable to find dill pickle-flavored chips near you or prefer something different, go ahead and use plain chips or even crumbled tortilla chips for added texture.

Equipment You’ll Need:
Cooking can be such an artful experience when you have the right tools at your disposal; they’re like cherished companions guiding you through each step of your culinary journey! While they may not be “ingredients,” having quality equipment makes whipping up our Crispy Dill Pickle Grilled Cheese Sandwich smoother and more enjoyable.
- Non-stick skillet – This essential piece allows us to achieve that perfect golden crust without worrying about sticking or burning our masterpiece! The non-stick surface ensures our sandwich can glide effortlessly across the pan as it cooks evenly on both sides. If you don’t have one handy, cast iron skillets work wonders too—they retain heat beautifully but require careful attention to ensure nothing sticks.
- Spatula – A sturdy spatula is crucial for flipping your sandwich gently without squishing all those delicious fillings out! Look for one with a wide surface area so you can easily slide under your sandwich without any fuss.
- Grater – Since we’ll be grating our havarti cheese (and possibly other ingredients), having a good grater on hand means you’ll have even melt distribution throughout your sandwich ensuring every bite sings with flavor!
Now that we’ve gathered our ingredients and tools let’s dive into preparing this mouthwatering delight together!
Step 1: Preparing Your Ingredients
Before we jump into cooking, it’s important to have everything prepped and ready to go—this is known as mise en place in culinary terms! Start by grating your havarti cheese; you’ll want it finely shredded so it’ll melt quickly and evenly during cooking. Next up are those delightful dill pickles—chop them finely (about two tablespoons) and make sure they’re patted dry with paper towels; trust me when I say this step will help keep your sandwich from getting soggy later on! Keep everything organized on your counter so as soon as you’re ready to cook, you’ll be able to assemble quickly without any hitches!
Step 2: Buttering Your Bread
Now comes one of my favorite parts: buttering the bread! Take those slices of sourdough and generously spread softened salted butter on one side of each slice—don’t skimp here; we want rich flavor throughout! This process helps achieve that irresistible crispness while infusing buttery goodness into every single bite. Make sure not to rush this step because even coverage is key—you want every corner coated so there are no bare spots once they hit the skillet!
Step 3: Assembling Your Sandwich
Next up is putting together our masterpiece—and oh boy does it get exciting here! Place one slice of sourdough (butter-side down) onto your preheated non-stick skillet over medium heat; let’s hear that sizzle! Now sprinkle half of our grated havarti evenly over the slice until covered—and remember: more cheese equals melty perfection! Follow up by evenly distributing those chopped dill pickles atop the cheese followed by another generous layer of havarti—yes please! Finally top it off with the other slice of sourdough (butter-side facing out).
Step 4: Cooking Until Golden Brown
Now comes one crucial moment—you’ll want patience here because good things take time! Allow this beauty to cook undisturbed for about 3-4 minutes until golden brown before carefully flipping over using your spatula (gently does it!). This step ensures even cooking while developing those irresistible crispy edges we love so much; if things start browning too quickly before reaching melty goodness inside then reduce heat slightly—not too hot now!
Stay tuned—we’re just getting started on how truly spectacular this Crispy Dill Pickle Grilled Cheese Sandwich can be…
Step 5: The Great Cheese Assembly
Now that you’ve prepared all your ingredients, it’s time for the magic to happen! Begin by taking one slice of your beautiful sourdough bread and placing it on a clean, flat surface. This is where we’re going to build our crispy dill pickle grilled cheese sandwich, so let’s make it count! Generously sprinkle half of the grated dill havarti cheese on top of the slice. Here’s why this matters: dill havarti is not only creamy and rich, but its mild flavor harmonizes perfectly with the tangy notes of the dill pickles. The cheese also acts as a glue during cooking, holding everything together beautifully. Trust me on this, you want a solid foundation for your sandwich!
Next, take those chopped dill pickles—patted dry to remove excess moisture—and distribute them evenly over the cheese. This step is crucial because if you skip drying the pickles, you risk a soggy sandwich that loses that coveted crunch factor. Then, add the remaining half of the grated cheese on top of the pickles; this creates a cheesy barrier that will melt into gooey perfection while cooking. Finally, place the second slice of sourdough bread on top to complete your masterpiece. Gently press down to ensure all those layers meld together—think of it as giving your sandwich a warm hug!
Step 6: Buttering Up for Success
With our sandwich assembled, let’s move on to one of my favorite parts: buttering! Take your two pieces of salted butter and allow them to soften at room temperature for about 5 minutes before using them. This might seem like a small detail, but spreading room-temperature butter ensures an even coat that won’t tear your precious sourdough bread. Now, grab a butter knife and slather one side of each slice with a generous layer of that luscious softened butter. You want every inch covered; this is non-negotiable! Why? Because as we grill our sandwich, that butter will transform into golden liquid gold, creating an irresistible crust that’s both crispy and flavorful.
Once you’ve achieved an even spread on both sides, set your sandwich aside for just a moment while you heat up your skillet or griddle over medium-low heat. Patience in this step is key; if your heat is too high, you may end up with burnt bread and unmelted cheese—a true tragedy! You want to achieve that perfect balance where the exterior becomes wonderfully crispy while allowing enough time for the inside to reach melty bliss. A well-heated pan creates an inviting environment for those flavors to meld together beautifully.
Step 7: Grilling Perfection
Now comes the moment we’ve been waiting for—the grilling phase! Carefully place your beautifully assembled sandwich onto the preheated skillet or griddle (but be gentle; we don’t want any cheesy spillage just yet!). The sound of that bread meeting hot metal should be music to your ears—a sizzle that promises crunchy goodness ahead! Allow it to cook for about 3-4 minutes without moving it around too much; this step allows that buttery crust to form perfectly without interruption.
As you wait patiently (and I know it’s hard!), keep an eye on the edges and color developing on your bread—you’re looking for a gorgeous golden brown hue that’s absolutely mouthwatering. Using a spatula, gently lift up one corner after about 3 minutes just to peek at how things are coming along. If it’s not quite there yet, don’t rush this step; give it another minute or so until it reaches that ideal color before flipping it over. Trust me when I say that those visual cues will guide you toward grilled cheese greatness!
Step 8: Flip It & Melt Away
Once your first side has achieved its glorious golden perfection, it’s time to flip! This moment can feel exhilarating; it’s like unveiling a treasure after some careful excavation! Gently slide your spatula underneath and turn the sandwich over in one fluid motion—this is where confidence plays a vital role in maintaining all those delicious layers inside. As soon as it lands back onto the skillet, take a deep breath and savor that aroma wafting up—a truly intoxicating mix of crispness and melted cheese.
Now let’s talk timing again—allow this side to cook for another 3-4 minutes as well, keeping vigilant watch over its progress. It’s important not to rush here either; every second counts in achieving utter cheesiness! During this cooking time, use your spatula every so often to gently press down on the sandwich (not too hard!)—this technique helps ensure even melting throughout and enhances that wonderful texture contrast between crispy exterior and gooey interior. After about 4 minutes or once you’ve reached another dazzling golden-brown color on both sides, simply remove it from heat.
Final Touches: Crunchiness Awaits
Step 9: The Grand Reveal
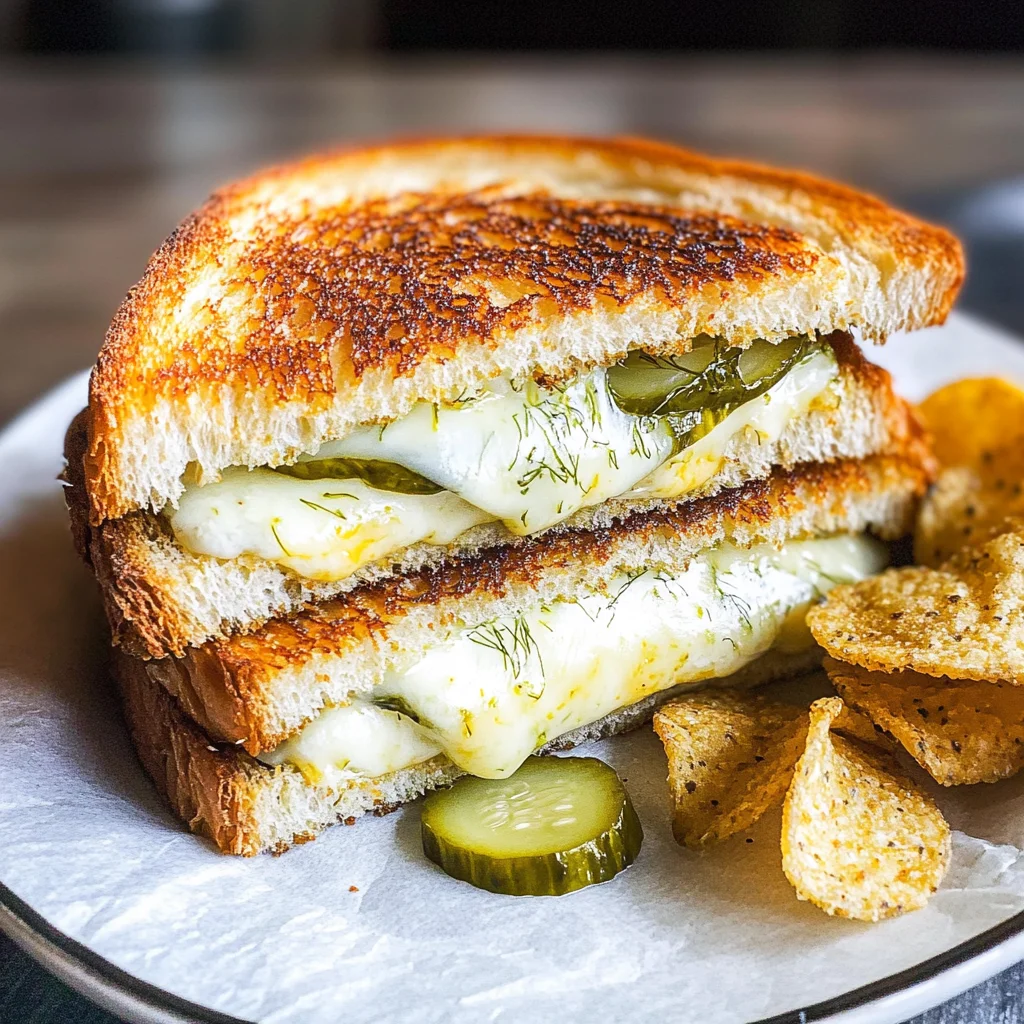
Your crispy dill pickle grilled cheese sandwich is now ready for its grand reveal! Slice through the middle with a serrated knife—I promise you’ll hear that satisfying crunch as you cut through both the crusty exterior and into the melty interior bursting with flavor! Don’t rush this part; take a moment to admire how those layers come together so beautifully—each bite will be an explosion of flavors: creamy havarti mingling with tangy dill pickles encased in perfectly toasted sourdough.
But wait—there’s one last flourish I can’t recommend enough: crush some dill pickle-flavored potato chips into smaller pieces and sprinkle them over one half before closing up or serving alongside! This added element introduces delightful crunchiness alongside each bite—trust me when I say it takes everything to another level entirely. Serve immediately while still hot; there’s nothing worse than letting all those beautiful textures fade away due to coldness!
As you take your first bite of this comforting culinary creation filled with nostalgia and warmth from years past, remember—it doesn’t just have crispy edges; it’s also packed with memories waiting to be made anew every time someone sits down at your table sharing laughter alongside each satisfying munch. Enjoy every moment—you’ve earned it!
Storage and Enjoyment Tips for Your Crispy Dill Pickle Grilled Cheese Sandwich
Now that you’ve crafted this delightful Crispy Dill Pickle Grilled Cheese Sandwich, it’s time to revel in the joy of your creation! With its gooey, melty cheese and that satisfying crunch from the dill pickle flavored potato chips, each bite is like a warm hug on a plate. But what happens if you have leftovers? Don’t fret! You can savor this deliciousness later without losing any of its enchanting flavors. Let’s dive into how to store these sandwiches properly so you can continue enjoying them even after the first round.
Storing Leftover Crispy Dill Pickle Grilled Cheese Sandwich
When it comes to storing your leftover Crispy Dill Pickle Grilled Cheese Sandwich, the goal is to maintain that glorious crunch while keeping everything as fresh as possible. I recommend placing your sandwiches into an airtight container; this is absolutely paramount for keeping moisture at bay! If you happen to have parchment paper on hand, placing a piece between each sandwich will help preserve their crispiness. Stored this way in the fridge, they’ll stay delicious for about 2-3 days. However, trust me—these sandwiches are best enjoyed fresh out of the skillet! If you find yourself with extra time or just want to savor them later, reheat them on a skillet over low heat. This gentle warmth revives their crunchy exterior while ensuring that cheese melts beautifully once again—it’s like magic!
Freezing Crispy Dill Pickle Grilled Cheese Sandwich for Later
Now, if you’re looking to prepare ahead and freeze some sandwiches for future enjoyment—what a fantastic idea! Start by letting your grilled cheese cool completely before wrapping each sandwich tightly in plastic wrap or aluminum foil. This will help prevent freezer burn, which can dull those vibrant flavors we’ve worked so hard to achieve. They’ll keep well in the freezer for up to three months, making it super convenient when unexpected cravings strike or those busy weeknights roll around. When you’re ready to enjoy one, simply thaw it in the refrigerator overnight and then reheat in a skillet or toaster oven until crispy again. There’s something wonderfully satisfying about knowing you have a scrumptious treat waiting for you, don’t you think?
Crispy Dill Pickle Grilled Cheese Sandwich
Embark on a delightful culinary journey with our Crispy Dill Pickle Grilled Cheese Sandwich, where the classic comfort of grilled cheese meets the zesty crunch of dill pickles. Each bite offers a perfect balance of creamy dill havarti cheese melting into gooey perfection, complemented by the tangy crunch of dill pickles and crispy dill pickle-flavored potato chips. Nestled between beautifully toasted sourdough bread, this sandwich is not just a meal; it’s a nostalgic experience that brings joy to any occasion. Ideal for quick weeknight dinners or cozy weekend brunches, you’ll find your taste buds dancing with excitement.
- Prep Time: 10 minutes
- Cook Time: 8 minutes
- Total Time: 18 minutes
- Yield: Serves 1
- Category: Main
- Method: Frying
- Cuisine: American
Ingredients
- 2 slices sourdough bread
- 6 oz dill havarti cheese, grated
- 2 tbsp dill pickles, chopped and patted dry
- 2 pieces salted butter
- 1 handful dill pickle flavored potato chips
Instructions
- Prepare your ingredients: Grate the dill havarti cheese and chop the dill pickles, patting them dry to avoid sogginess.
- Butter one side of each slice of sourdough bread generously with softened salted butter.
- Assemble the sandwich: Place one slice of bread (butter-side down) in a preheated non-stick skillet. Layer half the grated cheese on top, followed by the chopped pickles, then another layer of cheese before topping with the second slice of bread (butter-side up).
- Cook on medium heat for 3-4 minutes until golden brown, then carefully flip and cook for an additional 3-4 minutes until both sides are crispy and the cheese is melted.
- Remove from heat, slice in half, and enjoy immediately.
Nutrition
- Serving Size: 1 sandwich (225g)
- Calories: 540
- Sugar: 2g
- Sodium: 940mg
- Fat: 30g
- Saturated Fat: 17g
- Unsaturated Fat: 13g
- Trans Fat: 0g
- Carbohydrates: 46g
- Fiber: 2g
- Protein: 18g
- Cholesterol: 60mg