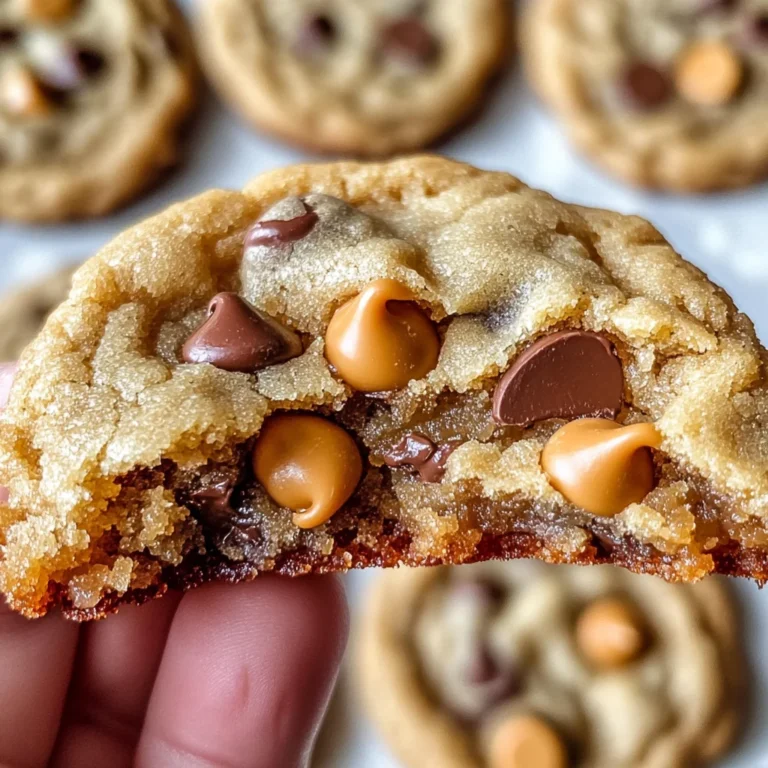
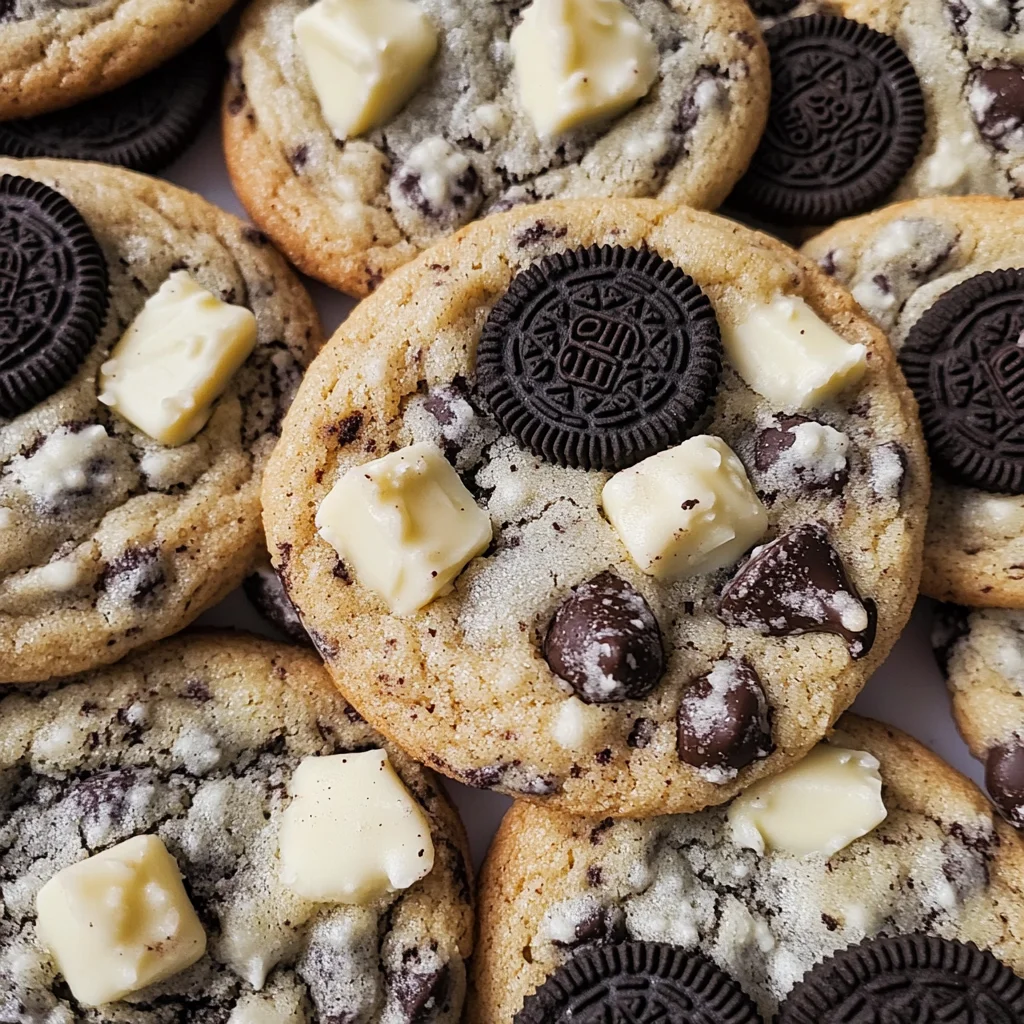
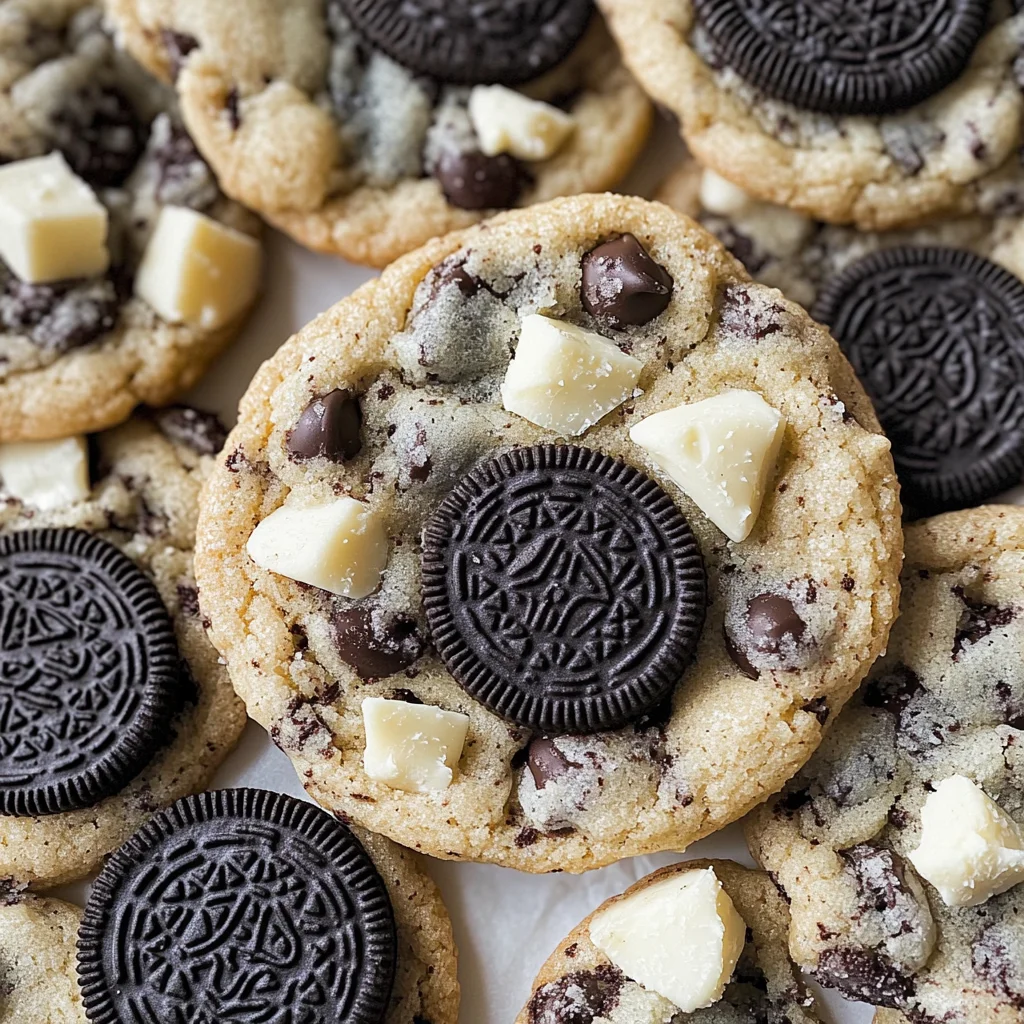
Cookies and Cream Cookie Recipe
There’s something utterly magical about cookies that can bring a smile to anyone’s face, and when it comes to comfort food, nothing quite compares to the Cookies and Cream Cookie Recipe. Imagine biting into a cookie that’s both soft and chewy, bursting with chunks of Oreo cookies and creamy white chocolate chips. It’s like your favorite cookies and cream ice cream has decided to come to life as a cookie! This recipe is more than just a sweet treat; it’s an experience—a delightful bridge between nostalgia and innovation, igniting memories of childhood joys while offering a contemporary twist that any dessert lover will adore.
I’ve always been captivated by the way these cookies can evoke such joy, whether they’re shared at a gathering or savored during a quiet evening at home. They remind me of baking days spent in the kitchen with friends, laughter ringing through the air as we whisked together ingredients with abandon. The rich, creamy flavor of these cookies is profoundly satisfying; it delivers that sweet dreaminess we all crave without overwhelming our senses. I promise you, once you try these Cookies and Cream Cookies, they’ll become a staple in your dessert repertoire—perfect for every occasion, from casual weeknight treats to festive celebrations.
Cookies and Cream Cookie Recipe: A Sweet Nostalgic Delight
Let’s dive into this indulgent recipe together! Each step holds its own secret for achieving those perfectly chewy cookies that are sure to impress everyone around you. I’m thrilled to share my tips and tricks for ensuring each bite is filled with flavor and texture that will have your loved ones begging for seconds—or even thirds!
Ingredients:
As we embark on this culinary journey together, it’s important to understand how each ingredient contributes to the delightful symphony of flavors we’re about to create. Let’s take a closer look at what we need for our Cookies and Cream Cookie Recipe.
- 1 cup + 2 tablespoons all-purpose flour. This is the backbone of our cookie dough, providing structure while keeping things light and airy. The precise measurement is important here; too much flour can lead to dry cookies that lack that coveted chewiness we desire. When measuring flour, spoon it into your measuring cup rather than scooping directly from the bag—this technique prevents packing it too densely.
- 1 teaspoon cornstarch. You might wonder why cornstarch makes an appearance in this recipe. It acts as a tenderizer; adding cornstarch helps create that soft texture reminiscent of freshly baked cookies from your favorite bakery. It also interacts beautifully with the other ingredients to keep our cookies from spreading too much while baking.
- 3/4 teaspoon baking powder. This leavening agent is crucial—it gives our cookies just the right lift so they don’t end up flat as pancakes! Baking powder works by releasing carbon dioxide bubbles when mixed with moisture and heat, creating those lovely pockets of air within our cookies.
- 1/2 teaspoon baking soda. Another leavening hero! Baking soda contributes not only to rising but also enhances browning due to its alkaline nature. The combination of both baking powder and baking soda ensures our cookies rise perfectly while achieving that beautiful golden-brown color we all love.
- 1/2 teaspoon salt. Never underestimate the power of salt in baking! It intensifies flavors and balances sweetness—this small amount will elevate the overall taste of our Cookies and Cream Cookies without making them taste salty.
- 4 tablespoons unsalted butter (softened, at room temperature). Butter is truly liquid gold in cookie-making! Softened butter is essential for creaming with sugar; this process introduces air into your dough, resulting in a light texture. Make sure it’s at room temperature—not melted—as melted butter will lead to spread-out cookies instead of those soft mounds we’re aiming for.
- 1/2 cup plus 2 tablespoons granulated sugar. Sugar plays multiple roles here: it sweetens our dough but also affects texture significantly by contributing moisture retention while helping achieve that perfect crisp edge once baked. The combination of granulated sugar with white chocolate chips creates an exciting contrast between textures.
- 1 large egg. Eggs are another cornerstone in baking; they provide richness and act as a binding agent that brings all our ingredients together harmoniously. Room temperature eggs blend more easily into your mixture compared to cold eggs straight from the fridge—so be sure to plan ahead!
- 1 teaspoon vanilla extract. This ingredient adds depth and complexity with its warm notes; vanilla extract is non-negotiable when striving for flavor perfection in cookies. Look for pure vanilla extract if possible—the difference between imitation vanilla and pure extract is night and day!
- 10 Oreo or chocolate sandwich cookies (coarsely chopped). Ahh, here comes the star of our show—the beloved Oreo cookie! These chocolatey gems bring not only flavor but also delightful crunchiness that contrasts beautifully with soft dough surrounding them; their creamy filling adds an extra touch of sweetness.
- 1/2 cup white chocolate chips. If you’re like me, you can never go wrong with white chocolate! Its creamy sweetness complements the deep cocoa flavor from Oreos wonderfully; choose high-quality chips for better melting properties—trust me on this one!
Equipment You’ll Need:
Now that we have all our ingredients lined up like soldiers ready for battle, let’s gather some essential tools that will make this journey smoother and more enjoyable! Having the right equipment at hand transforms cooking from a chore into an exciting adventure where creativity shines through.
- Mixing bowls (various sizes). A set of mixing bowls is fundamental—they provide space for everything from combining dry ingredients to mixing wet ones smoothly without splatters everywhere! Opt for glass or stainless steel options since they won’t absorb odors or colors.
- Electric mixer or stand mixer. While you could mix everything by hand (and get quite the workout!), having an electric mixer saves time while ensuring even blending throughout your dough—a crucial aspect when creating deliciously consistent results!
- Measuring cups & spoons. Accurate measurements are key when mastering any recipe; investing in good-quality measuring tools means you’ll achieve success every time without guesswork muddying up your results!
- Rubber spatula or wooden spoon. These trusty companions are perfect for scraping down sides of bowls (which helps avoid lumps) while also giving you control over folding ingredients gently without deflating any precious air pockets created during creaming processes.
- Baking sheets lined with parchment paper or silicone mats. Lining pans prevents sticking while ensuring easy cleanup—plus they promote even baking by allowing heat circulation around each cookie evenly!
Preparing the Cookies and Cream Cookie Recipe
Step 1: Prepping Your Oven & Pans
Before diving into mixing those delicious ingredients together, let’s prepare our kitchen environment first! Preheat your oven to 350 degrees Fahrenheit—that’s key because starting off at just the right temperature allows those glorious aromas wafting through your home later on during baking time! While waiting on preheating magic to happen, line two baking sheets using either parchment paper or silicone mats—this step keeps things neat while preventing any unwanted sticking during transfer after baking has completed successfully.
Step 2: Whisking Dry Ingredients
In a small bowl (it doesn’t have to be fancy!), combine together one cup plus two tablespoons of all-purpose flour along with cornstarch, baking powder, baking soda—and salt too! Use a whisk here—it introduces air into these dry components which helps ensure everything mixes uniformly later down the line once combined alongside wet elements too! Setting aside means giving yourself peace-of-mind knowing everything’s prepped nicely before diving headfirst into mixing those delightful buttery sugary creations soon enough!
Step 3: Creaming Butter & Sugar
Now onto one of my favorite steps—the creaming process! In either a large mixing bowl (if using handheld) or bowl attached securely under stand mixer attachment (for optimal ease), beat four tablespoons softened unsalted butter alongside half cup plus two tablespoons granulated sugar over medium speed until fully combined whilst becoming light fluffy clouds themselves—a total transformation occurs here thanks largely due incorporation air bubbles formed during beating action itself which translates directly into texture once cooled post-baking session wraps up nicely later on down road ahead!
Step 4: Adding Egg & Vanilla Extract
Once buttery-sugar clouds have formed beautifully together successfully now it’s time add one large egg alongside teaspoon pure vanilla extract straight away without hesitation whatsoever—mixing on low speed until everything blends seamlessly into each other transforming mixture from grainy-looking mess towards silky smooth consistency where no lumps remain visible anywhere present anymore either—all concentration must be maintained during this stage since rushing leads potential failure outcomes down pathway towards achieving ultimate goal properly made exquisite Cookies And Cream Cookie Recipe awaits patiently ahead still yet!
Stay tuned as we continue this delicious journey through making these heavenly treats—I promise you’re going to love every moment spent in this delightful process together!
Cookies and Cream Cookie Recipe: A Sweet Symphony of Delight
There’s something utterly enchanting about creating a Cookies and Cream Cookie recipe, wouldn’t you agree? Each step is like adding a note to a beautiful melody, culminating in a treat that sings of nostalgia and indulgence. Now, let’s continue our journey through this cookie-making adventure with the next steps that will lead us to those chewy, creamy bites of bliss. Trust me—every moment spent in the kitchen will be worth it when you take that first delicious bite!
Step 5: Mixing the Dough to Perfection
Once you’ve combined your wet ingredients—those luscious butter and sugar concoctions—you’re ready to welcome the dry ingredients into the mix. Lower the speed of your mixer to avoid flour clouds (and trust me, nobody wants a kitchen explosion!), and gently incorporate your pre-mixed flour mixture into the butter-sugar blend. This step is crucial because it allows the flour to hydrate properly, ensuring your cookies have that delightful chewy texture we all crave! As you mix, watch for signs that the dough is just coming together; it should be slightly sticky but hold its shape.
Now, here’s where the magic truly happens: after you’ve achieved that perfect cookie dough consistency, add those coarsely chopped Oreo cookies and white chocolate chips. I promise you, this is where things get exciting! The chunks of Oreo will melt slightly during baking, creating pockets of creaminess that are simply irresistible. As you fold these delicious morsels into your dough, take care not to over-mix; this can lead to tougher cookies instead of soft pillows of joy. Instead, use a spatula or wooden spoon for gentle folding—think of it as tucking in those sweet bits with love.
Step 6: Shaping Your Cookies
With your dough now infused with Oreo goodness and sweet white chocolate bliss, it’s time to shape them into perfect little rounds. I recommend using a small cookie scoop—approximately two tablespoons—to portion out your dough. This ensures uniformity in size so they bake evenly; no one likes a half-baked cookie! After scooping the dough onto your lined baking sheets, take a moment to round each scoop in your hands gently. Think of it as giving each cookie a warm embrace before sending them off to bake!
Don’t forget this next step: lightly press down on each ball of dough just a bit—this helps them spread nicely while retaining that wonderful chewiness at their cores. You want them to puff ever so slightly without losing their shape completely; this balance is key! As they bake, they’ll develop beautiful golden edges while remaining soft in the center—a visual cue that tells you these cookies are well on their way to perfection.
Step 7: Baking for Cookie Bliss
Now comes the moment we’ve all been waiting for: it’s time to slide those delectable trays into the preheated oven! Set your timer for 8-10 minutes, but keep an eye on them—every oven behaves differently. The best part about baking cookies is watching them transform right before your eyes; you’ll see their edges turn golden brown while their centers might look just slightly underbaked—that’s absolutely normal! In fact, it’s what you’re aiming for!
This slight underbaking is non-negotiable if you want cookies that retain their soft texture once cooled. As they rest on the baking sheet after coming out of the oven—don’t rush this step—allowing them to cool for just a few minutes creates an even more satisfying experience when you finally dig in. The residual heat will continue cooking those centers perfectly without drying them out.
Step 8: Cooling and Savoring Every Moment
After letting your cookies rest on the baking sheet for about 5-7 minutes—a practice that allows them to set up just right—it’s time to transfer them onto a cooling rack. This step might seem simple, but it plays an essential role in ensuring each cookie retains its ideal texture while cooling down. Placing them on a cooling rack allows air circulation around each cookie so they don’t get soggy from steam collecting underneath—a common pitfall if left on warm surfaces too long.
Take a moment here—you deserve it! The aroma wafting through your kitchen is nothing short of intoxicating; it’s like being enveloped in sweet memories of childhood treats shared with loved ones. I encourage you to give yourself permission to pause and enjoy this rewarding experience before diving into those warm cookies. Once they’re completely cooled—or at least cool enough not to burn your fingers—go ahead and enjoy every last crumb!
Conclusion:
As we wrap up this delightful journey through my beloved Cookies and Cream Cookie recipe, I hope you’re as excited as I am about creating these sweet treats in your own kitchen! There’s something profoundly satisfying about mixing simple ingredients together and watching them transform into such delicious morsels. The combination of crunchy Oreo bits and smooth white chocolate creates a symphony of flavors that dances on your palate—each bite offers a nostalgic whisper of childhood ice cream indulgence while wrapping you in a warm hug of sweetness.
This recipe truly is a must-try for anyone who appreciates not just great taste but also the joy that comes with baking. It’s incredibly accessible—perfect for novice bakers or seasoned chefs looking for a quick dessert fix. Imagine pulling these cookies from the oven: golden edges with soft centers spilling over with rich chocolate chips and Oreo chunks—it’s an experience worth sharing at gatherings or simply enjoying during cozy nights in with family. Whether it’s game night or movie marathons, these cookies will always elevate any occasion!
For serving suggestions, imagine savoring one with a tall glass of cold milk or perhaps alongside a scoop of vanilla ice cream—the contrast between warm cookie and cold cream is nothing short of heavenly! Or how about crumbling some over yogurt for an unexpected breakfast treat? You can even sandwich two cookies together with frosting or whipped cream for an indulgent twist that will leave everyone asking for seconds!
Feeling adventurous? This recipe is wonderfully adaptable too! You could swap out white chocolate chips for dark chocolate or even throw in some chopped nuts or dried fruits for added texture and flavor complexity! Each variation opens up new avenues of creativity in your baking journey. So go ahead—try it out, share your experiences, connect with loved ones over this delightful treat, and relish every moment spent in the kitchen crafting these joy-filled bites!
Cookies and Cream Cookie Recipe

Indulge in the delightful nostalgia of childhood with this easy Cookies and Cream Cookie Recipe! These cookies combine the rich flavors of Oreos and creamy white chocolate chips, delivering a chewy texture that will make your taste buds dance. Perfect for sharing at gatherings or enjoying during a cozy night in, these cookies are a modern twist on classic comfort food.
- Prep Time: 15 minutes
- Cook Time: 10 minutes
- Total Time: 25 minutes
- Yield: Approximately 12 cookies 1x
- Category: Dessert
- Method: Baking
- Cuisine: American
Ingredients
- 1 cup + 2 tablespoons all-purpose flour
- 1 teaspoon cornstarch
- 3/4 teaspoon baking powder
- 1/2 teaspoon baking soda
- 1/2 teaspoon salt
- 4 tablespoons unsalted butter (softened)
- 1/2 cup + 2 tablespoons granulated sugar
- 1 large egg (room temperature)
- 1 teaspoon vanilla extract
- 10 Oreo cookies (coarsely chopped)
- 1/2 cup white chocolate chips
Instructions
- Preheat your oven to 350°F (175°C) and line two baking sheets with parchment paper.
- In a bowl, whisk together flour, cornstarch, baking powder, baking soda, and salt. Set aside.
- In a large mixing bowl, cream softened butter with granulated sugar until light and fluffy.
- Beat in the egg and vanilla extract until well combined.
- Gradually add the dry mixture to the wet ingredients until just combined.
- Fold in chopped Oreos and white chocolate chips gently.
- Use a cookie scoop to portion dough onto prepared baking sheets, lightly pressing each ball.
- Bake for 8-10 minutes or until edges are golden but centers look slightly underbaked.
- Allow cookies to cool on the baking sheet for about 5 minutes before transferring to a cooling rack.
Nutrition
- Serving Size: 1 cookie (30g)
- Calories: 150
- Sugar: 9g
- Sodium: 90mg
- Fat: 7g
- Saturated Fat: 4g
- Unsaturated Fat: 3g
- Trans Fat: 0g
- Carbohydrates: 20g
- Fiber: <1g
- Protein: 2g
- Cholesterol: 15mg