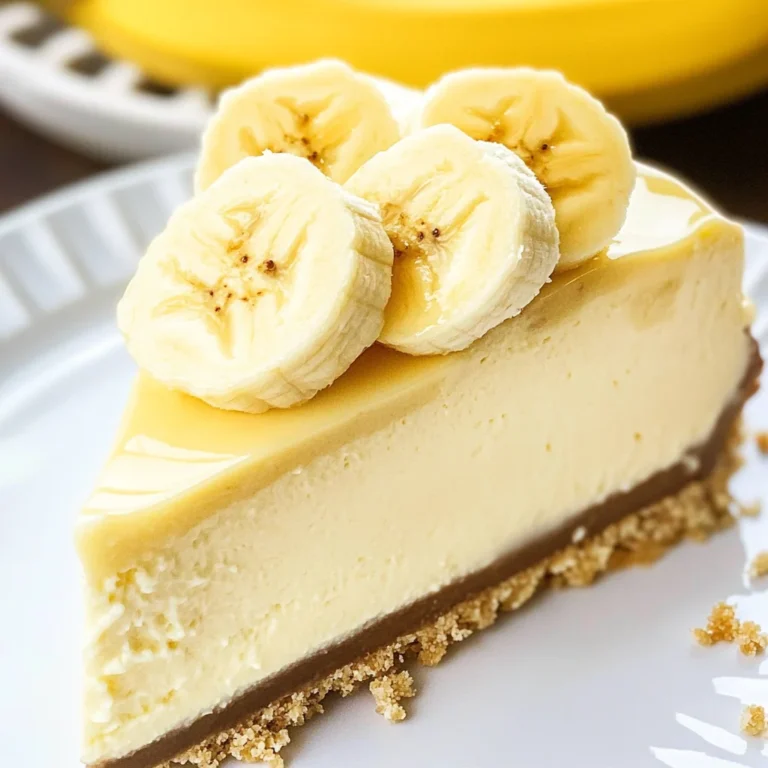
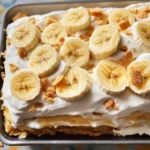
Banana Pudding Lasagna
There’s something profoundly satisfying about creating a dessert that brings people together, isn’t there? The mere thought of Banana Pudding Lasagna fills me with warmth and nostalgia, transporting me back to sun-soaked afternoons when family gathered around the table to share laughter and stories. This magnificent dessert is not just a treat; it’s an experience that melds the comforting flavors of classic banana pudding with the delightful structure of a lasagna. Layers of rich creaminess, fresh bananas, and crunchy vanilla wafers come together in perfect harmony to create an utterly intoxicating dish that will leave your taste buds singing. Each bite is a celebration—an invitation to relish not only the flavors but also the memories we create while sharing it with loved ones.
As you embark on this culinary journey, let me assure you that Banana Pudding Lasagna is as simple as it is delicious. It’s one of those recipes that feels like a warm hug, effortlessly blending tradition with a modern twist. I promise you that once you serve this beauty at your next gathering, you’ll be met with smiles and maybe even a few happy tears! This dessert is perfect for any occasion: potlucks, family reunions, or simply as a sweet treat after dinner. The best part? It requires no baking! Just layers upon layers of goodness waiting patiently in your refrigerator until you’re ready to indulge.
Banana Pudding Lasagna: A Delightful Twist on a Classic
Let’s dive into the world of Banana Pudding Lasagna! This recipe takes all the nostalgic flavors we adore from banana pudding—sweet bananas, rich creaminess, and crispy vanilla wafers—and transforms them into an icebox cake that is both visually stunning and absolutely delectable.
Ingredients:
As we gather our ingredients for this delightful creation, remember that each component plays a crucial role in crafting something truly special. Think of these ingredients as the building blocks to our layered masterpiece!
- 2 – 11 oz boxes vanilla wafers: These delightful cookies are essential for our crust and layering; they provide not just crunch but also infuse the dish with their sweet flavor. Look for high-quality vanilla wafers—they should have a light crunch and a rich vanilla flavor. If you’re feeling adventurous, consider using graham crackers or shortbread cookies as alternatives; however, I assure you the traditional wafer brings an irreplaceable charm to this dessert.
- 6 tbsp butter, melted: This golden liquid gold is crucial for binding our crust together and imparting richness. Using unsalted butter allows us to control the overall saltiness of our dish better; ensure it’s melted but not hot when combining it with the cookie crumbs, or else you risk melting those precious wafers too much!
- 2 – 8 oz packages cream cheese: Cream cheese provides that luscious creamy texture we’re after in our cheesecake layer. Make sure to choose full-fat cream cheese for optimum richness; it will whip up beautifully into soft peaks when blended with sugar. Allowing it to soften at room temperature before mixing ensures we avoid lumps—trust me on this!
- 3/4 cup sugar: Sugar does more than add sweetness; it balances out the tangy cream cheese perfectly while contributing to that delightful fluffiness in our cheesecake layer. If you’re looking for alternatives due to dietary preferences, feel free to use coconut sugar or even a sugar substitute tailored for baking.
- 2 cups heavy whipping cream: This ingredient is what elevates our cheesecake layer into something truly extraordinary! When whipped properly—until stiff peaks form—it becomes airy and light like clouds floating above your dessert. Always chill your mixing bowl beforehand for best results; cold cream whips faster and achieves volume more easily.
- 1 tsp vanilla extract: Vanilla extract adds depth and warmth to both our crust and filling; it’s like adding a hug in liquid form! Opt for pure vanilla extract instead of imitation for its superior flavor profile—you’ll taste the difference immediately.
- 3.4 oz box banana pudding mix: This magic powder thickens quickly when combined with milk; it’s what gives our lasagna its signature banana flavor without needing fresh bananas throughout every layer. If you’re aiming for organic or natural options, there are brands available without artificial additives.
- 1 3/4 cups milk: Whole milk works best here due to its fat content which enhances flavor and richness in combination with the pudding mix. You could try almond or oat milk if you’re seeking non-dairy alternatives; just keep in mind that they might change the texture slightly.
- 5 large bananas, sliced: Bananas are truly the stars of this dessert! They add freshness and natural sweetness that cuts through the richness of cream cheese and whipped cream layers beautifully. Choose ripe yet firm bananas—overripe ones may turn mushy too quickly within our layers.
Equipment You’ll Need:
Having the right tools can make all the difference in your cooking experience! While they may not be “ingredients,” these essential partners will help ensure your Banana Pudding Lasagna comes together smoothly and beautifully.
- 9×13 inch baking dish: This size is non-negotiable for creating those beautiful layers we’re after! It allows ample room for stacking ingredients while ensuring even cooling throughout once refrigerated. Glass dishes work wonderfully because they allow you to see those gorgeous layers!
- Blender or food processor: A blender or food processor is vital for creating fine crumbs from your vanilla wafers effortlessly! The smoother your crumbs are, the better they’ll hold together in your crust—a key factor in achieving great texture.
- Mixing bowls (various sizes): Having multiple mixing bowls on hand allows you to keep things organized as you work through each step without confusion—no one wants to be scrambling mid-recipe!
- Electric mixer: An electric mixer will save time (and arm strength!) when whipping up creamy mixtures like cream cheese or heavy whipping cream. If you don’t have one handy, don’t despair—just put some elbow grease into it with a whisk!
Now that we’re all set up with ingredients and tools let’s get started making this delicious Banana Pudding Lasagna that’ll surely become a favorite among friends and family alike!
Step 1: Creating Our Crust
To start off on the right foot with our luscious banana pudding lasagna, we need the perfect base—the crust! Begin by placing one box of those irresistible vanilla wafers into your blender or food processor. Pulse them until they reach fine crumbs resembling sandy beach shores (you know what I mean!). Imagine how fragrant those crushed cookies smell already—this aroma sets such an inviting stage! Once processed smoothly enough so there aren’t any large chunks remaining, mix these crumbs together with six tablespoons of melted butter using a fork until everything looks well-combined—a crumbly mixture should form reminiscent of damp sand that holds together when pressed.
Now comes my favorite part—pressing this mixture firmly into your greased 9×13 baking dish! Trust me on this one; take your time here because forming an even layer ensures everything stays intact later on during assembly. Use either your hands or measuring cup bottom—a flat surface helps achieve uniformity across all corners (this step matters!). Once you’ve created this sturdy foundation fit for heaven itself (seriously!), set aside while we turn our attention toward crafting that irresistible cheesecake layer next!
Step 2: Whipping Up That Dreamy Cheesecake Layer
Now let’s dive into making what I like to call liquid gold—the cheesecake layer! Grab your large mixing bowl and combine two packages (16 ounces total) of softened cream cheese along with three-fourths cup sugar using an electric mixer set at medium speed initially until fluffy perfection arises before us (about two minutes). You want it smooth enough so there aren’t any lumps left behind—imagine silk sliding across skin—that’s exactly how creamy it should feel!
Once we’ve reached peak fluffiness within our bowl’s contents, it’s time for another indulgent addition—two cups’ worth of heavy whipping cream plus one teaspoon pure vanilla extract go right in next! Increase mixer speed again until stiff peaks begin forming—this means when lifted from the bowl it’ll hold shape without collapsing back down (around five minutes). The beauty lies within understanding how air incorporates into each droplet giving life beyond mere mixture—it’s profound transformation happening right before our eyes!
Step 3: Bringing Together Cheesecake & Pudding
With both components ready now—the light fluffy cloud from earlier combined alongside creamy goodness—it’s time we unite these worlds by introducing three-point-four-ounce box banana pudding mix combined alongside one-and-three-quarter cups cold milk within another separate mixing bowl first before gradually folding gently back into previous concoction till fully incorporated without deflating anything too dramatically (we want lightness retained!). This union creates layers packed full of delightful banana flavor alongside dreamy textures working harmoniously towards ultimate satisfaction!
Step 4: Layering It All Together
Now comes my absolute favorite part—the layering process where flavors meld beautifully beneath each slice made later on down line once chilled appropriately overnight (or minimum two hours)! Start by spreading half cheesecake mixture gracefully over crust prepared earlier—the goal here? A smooth even layer reaching every corner so everyone gets equal amounts later down road…next add slices freshly cut bananas atop followed closely behind whole vanilla wafers laid flat against previous fruits laid out—a true marriage occurring before us right now filled simply joyfulness throughout kitchen space surrounding us attentively watching each move taken forward carefully!
As tempting as it may seem at this moment just dive straight away digging fingers directly inside…don’t rush please—you want remaining cheesecake mixture spread evenly over top final cookie layer showing commitment made thus far towards pursuing greatness today ahead reaching levels attained previously experienced rarely elsewhere within world outside walls surrounding kitchen home sweet home belonging entirely unto ourselves filled warmth compassion shared among those gathered round tables celebrating life moments cherished forevermore…
In future steps ahead we’ll finish layering off completely topping last touches crushed vanilla wafer pieces sprinkled generously upon last banana slice shining brightly beneath revealing beauty contained deep inside waiting patiently till served shortly thereafter…stay tuned hungry souls united under love shared amongst friends gathered near celebrating joys found within simple pleasures like these desserts reminding us why continue cooking unabashedly sharing passion authentically felt through every bite enjoyed thoroughly alongside laughter coursing through hearts rejoicing endlessly forevermore…
Step 5: Crafting the Creamy Cheesecake Layer
Now that you’ve got your crust firmly pressed into the baking dish, it’s time to create a cheesecake layer that will be the heart and soul of your Banana Pudding Lasagna. Grab a large mixing bowl and start by beating together the two packages of cream cheese and 3/4 cup of sugar. You want to achieve a fluffy consistency here—it should feel light and airy, which is crucial for that dreamy texture we all crave in desserts. I often think of this as creating the base for happiness! After a couple of minutes of vigorous mixing, add in your heavy whipping cream and vanilla extract. Trust me on this part; these elements are what transform your mixture into pure liquid gold!
Continue to beat this luscious combination until stiff peaks begin to form, which typically takes about 3-5 minutes. This is where patience truly pays off; those stiff peaks mean air has been incorporated, giving your cheesecake layer that delightful fluffiness. If you rush through this step, you risk ending up with a dense mixture rather than the airy delight we’re aiming for. I can’t stress enough how satisfying it is to watch this transformation happen! Once you have those peaks, set this creamy mixture aside while we work on the next layer.
Step 6: Blending the Banana Pudding
Now comes the magic moment when we introduce our banana pudding into the mix! In a separate mixing bowl (yes, we’re adding another bowl into the equation), combine the contents of the 3.4 oz box of banana pudding with 1¾ cups of milk. Use an electric mixer to blend these together until it thickens—this usually takes just a couple of minutes. What makes this step so special? The instant pudding mix reacts beautifully with milk, thickening perfectly to create that iconic banana flavor without any fuss. It’s an easy shortcut that delivers profound flavor and texture—absolutely paramount for our lasagna!
Once you see it thickening up—think of a custard-like consistency—it’s time to fold this luscious banana pudding into your previously prepared cream cheese mixture. Gently fold it in using a spatula or wooden spoon; you want to maintain that airiness from earlier while ensuring everything is combined seamlessly. The goal here is to create a harmonious blend where each bite bursts with banana goodness paired with creamy cheesecake richness. Don’t rush this step; take your time and enjoy the beautiful swirl of yellow and white coming together!
Step 7: Layering Your Masterpiece
With your decadent cheesecake mixture ready, it’s time for assembly—this is where things get exciting! Start by spreading half of your cheesecake-banana pudding mixture over the crust you’ve lovingly created earlier. Use a spatula to dollop it onto the crust before gently spreading it outwards in an even layer. You want every corner covered because trust me, each bite deserves that rich combination! As you spread, take care not to disturb your crust too much; we want that solid base holding everything together.
Next up are those glorious bananas! You’ll need about five large bananas, sliced evenly. Arrange them thoughtfully over your first layer of cheesecake mixture; they add not just flavor but also a beautiful visual contrast against all that creamy goodness below. Bananas bring such sweetness and freshness—it’s like they were made for this dessert! After laying down those luscious slices, take whole vanilla wafers and place them atop the bananas like little soldiers standing guard over their delicious territory. Their crunch will provide an incredible textural contrast against the smooth layers below.
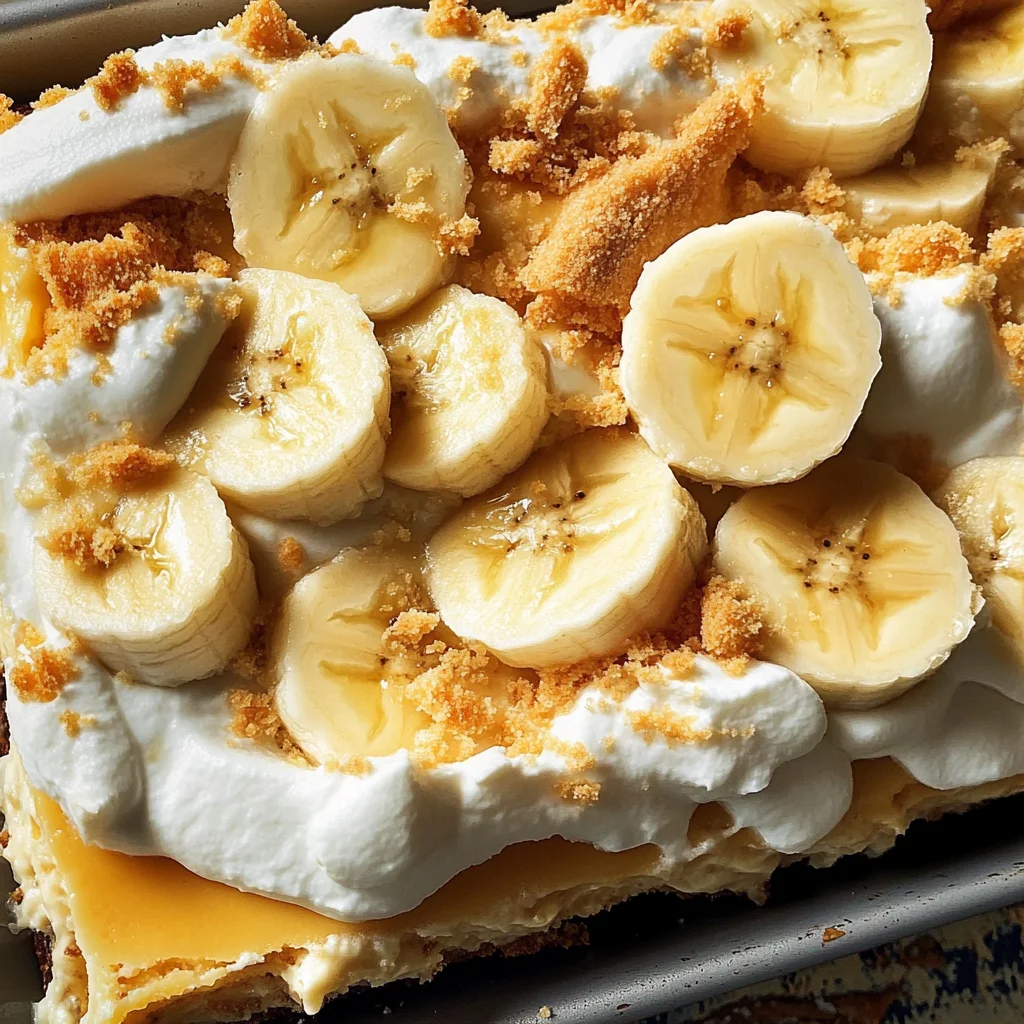
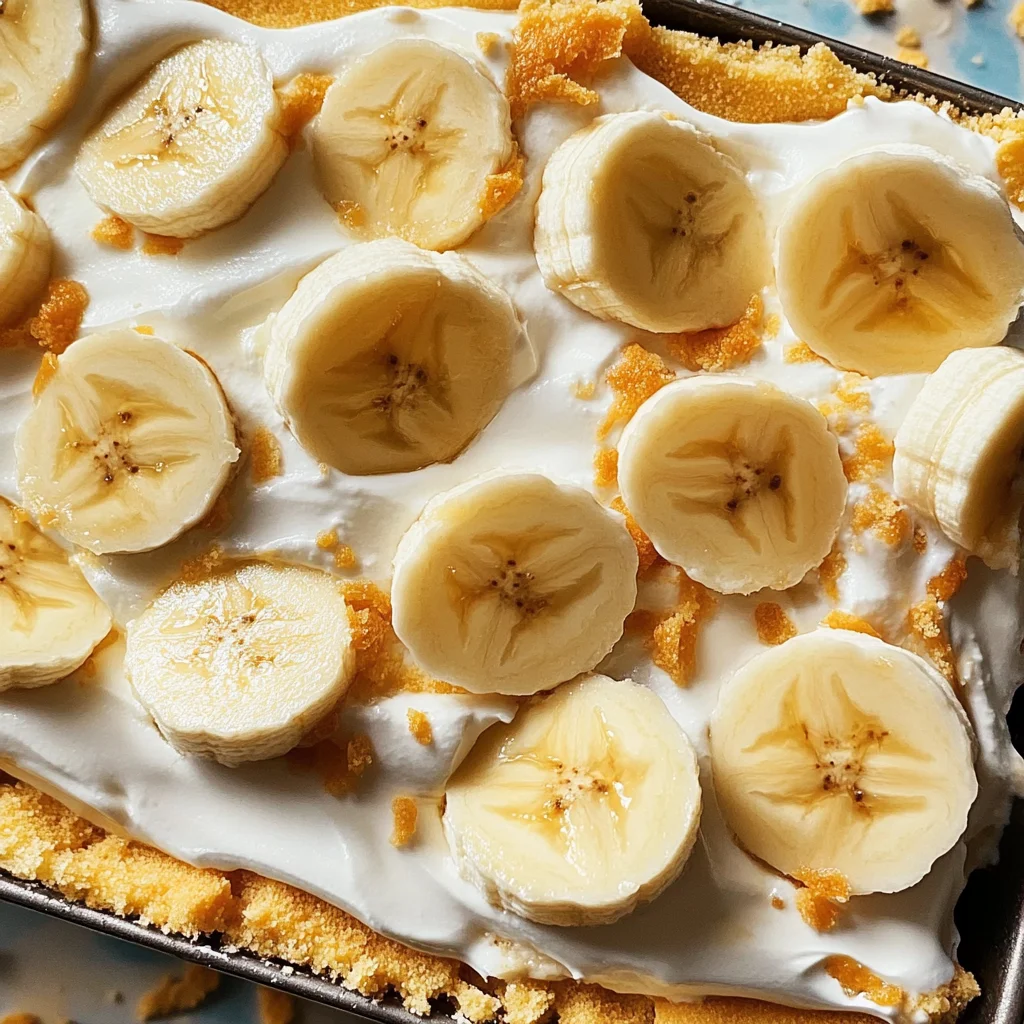
Step 8: The Final Layers
Now that we have our first two layers completed—the cheesecake mixture and banana slices topped with wafers—it’s time to repeat with what remains of our cheesecake filling. Spread that remaining mixture over these whole wafers carefully, ensuring every nook is filled with creamy delight. This final layer should feel luxurious as you smooth it out across the top; remember to take your time here! Each layer adds complexity and depth to our Banana Pudding Lasagna, making every slice utterly intoxicating.
After smoothing everything out perfectly—whew! You’re almost there—let’s finish strong by adding one last touch of whimsy. Take any remaining vanilla wafers and crush them into smaller chunks or crumbs before sprinkling them generously over the top layer of bananas. Not only does this add an appealing crunch when serving but also invites excitement as friends dig in with eager spoons ready to explore each delectable layer beneath.
And there you have it—a journey through crafting an unforgettable Banana Pudding Lasagna that’s sure to make hearts flutter and taste buds dance with joy! Each step is imbued with love and care because food isn’t just about nourishment; it’s about creating memories around shared experiences with loved ones. Enjoy every moment while preparing this delightful treat—you deserve it!
Storage and Enjoyment Tips for Your Banana Pudding Lasagna
Now that your Banana Pudding Lasagna is all assembled, it’s time for the most delightful part – enjoying this masterpiece! But let’s talk about how to preserve those scrumptious layers for future indulgence. With its creamy textures and vibrant flavors, every bite of this dessert is a celebration, and I know you’ll want to savor it as long as possible. Whether you’re hosting a gathering or simply treating yourself, knowing how to store it properly ensures that each slice remains as heavenly as the first.
Storing Leftover Banana Pudding Lasagna
When it comes to storing your leftover Banana Pudding Lasagna, choosing the right container is crucial. I recommend using an airtight glass dish; not only does it keep your dessert fresh, but it also allows you to see those beautiful layers. Just cover it tightly with plastic wrap or a lid before placing it in the fridge. This delicious treat will keep well for up to 3 days, though trust me, it might just vanish before then! To maintain its quality during storage, consider adding a slice of bread on top (inside the container) – this little trick helps absorb moisture and keeps the crust from getting soggy. When you finally dig in after a day or two, you’ll be pleasantly surprised by how the flavors deepen and meld together; it’s still creamy and utterly divine! For serving suggestions after storage, simply take it out of the fridge, let it sit for about 10 minutes to soften slightly, then enjoy every luscious layer!
Freezing Banana Pudding Lasagna for Later
If you find yourself with extra Banana Pudding Lasagna (or simply want to be prepared for a future sweet craving), freezing is an excellent option! To freeze properly, slice your lasagna into individual servings and wrap each piece tightly in plastic wrap before placing them in an airtight freezer bag. This method prevents freezer burn and keeps them fresh for up to 2 months. When you’re ready to indulge again, just take out a slice and let it thaw in the refrigerator overnight; it’s like having a little surprise waiting for you! The convenience of having this delightful dessert at your fingertips makes meal planning so much easier. Imagine pulling out a piece when guests drop by or when you’re craving something sweet after dinner – pure bliss!
With these storage tips in hand, you’ll always have that irresistible Banana Pudding Lasagna ready for enjoyment!
Banana Pudding Lasagna
Experience bliss with our Banana Pudding Lasagna! Layers of creamy goodness await—try this delightful recipe today!
- Prep Time: 30 minutes
- Cook Time: None
- Total Time: 0 hours
- Yield: Serves approximately 12 people 1x
- Category: Dessert
- Method: No-Bake
- Cuisine: American
Ingredients
- 2 – 11 oz boxes vanilla wafers
- 6 tbsp butter, melted
- 2 – 8 oz packages cream cheese
- 3/4 cup sugar
- 2 cups heavy whipping cream
- 1 tsp vanilla extract
- 3.4 oz box banana pudding mix
- 1 3/4 cups milk
- 5 large bananas, sliced
Instructions
- Prepare the crust by processing vanilla wafers into fine crumbs and combining them with melted butter. Press this mixture into the bottom of a greased 9×13 inch baking dish.
- In a mixing bowl, beat softened cream cheese and sugar until fluffy. Add heavy whipping cream and vanilla extract; whip until stiff peaks form.
- In another bowl, combine banana pudding mix with milk until thickened. Gently fold this mixture into the cream cheese mixture until well blended.
- Layer half of the cheesecake mixture over the crust, followed by banana slices and whole vanilla wafers. Repeat layers with remaining cheesecake mixture and top with crushed vanilla wafers.
- Chill in the refrigerator for at least two hours before serving.
Nutrition
- Serving Size: 1 slice (150g)
- Calories: 350
- Sugar: 30g
- Sodium: 180mg
- Fat: 24g
- Saturated Fat: 14g
- Unsaturated Fat: 8g
- Trans Fat: 0g
- Carbohydrates: 34g
- Fiber: 2g
- Protein: 5g
- Cholesterol: 70mg