Banana Pudding Cheesecake
There’s something truly magical about the way food can evoke memories and stir emotions, isn’t there? When I think of Banana Pudding Cheesecake, I’m transported to sunlit afternoons spent with family, laughter echoing in the air as we gather around the table. This dessert is not just a recipe; it’s an experience that bridges generations, blending tradition with a touch of modern flair. Each creamy bite envelops you in the warm embrace of nostalgia, while the crisp Nilla Wafer crust adds that perfect crunch—a delightful contrast that makes every mouthful a symphony of flavors. The lusciousness of ripe bananas and velvety cream cheese creates a harmony that’s profoundly satisfying, reminding us of simpler times while celebrating the joy of sharing delicious moments together.
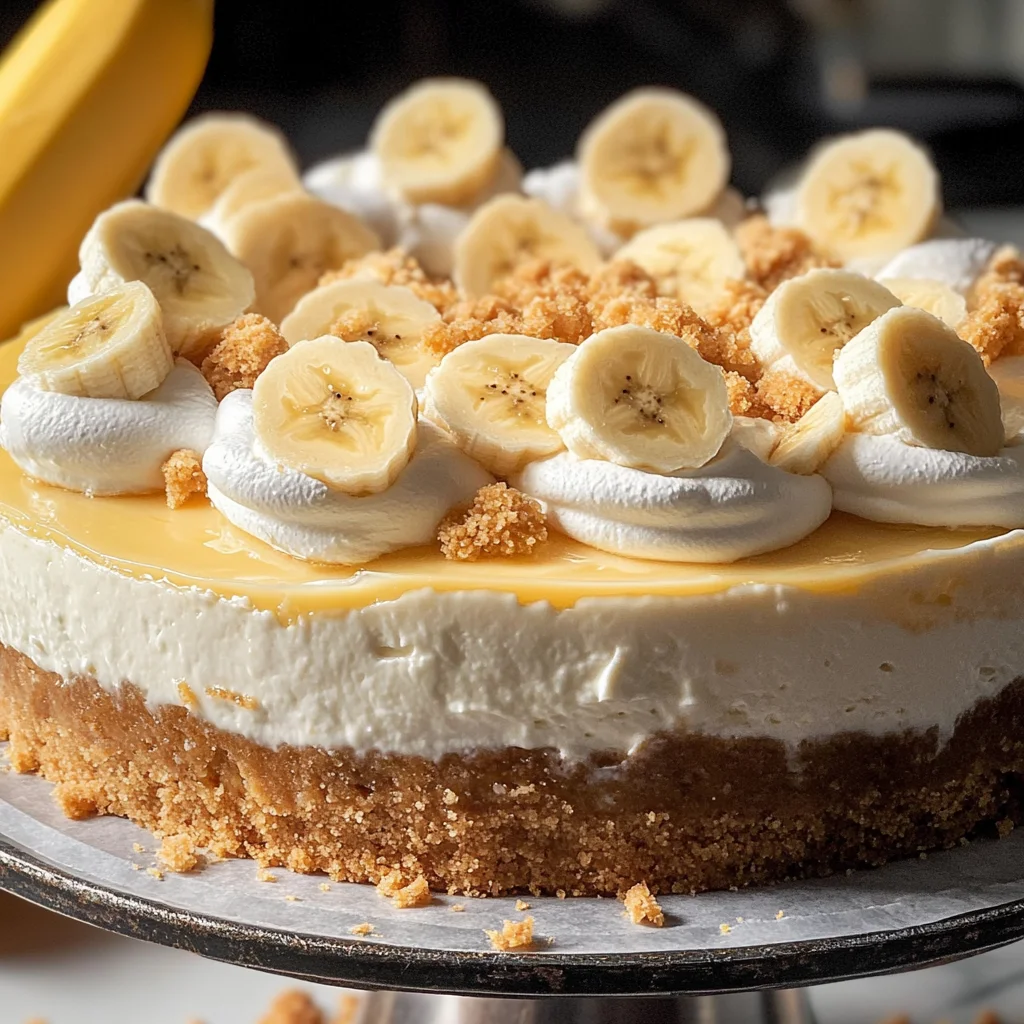
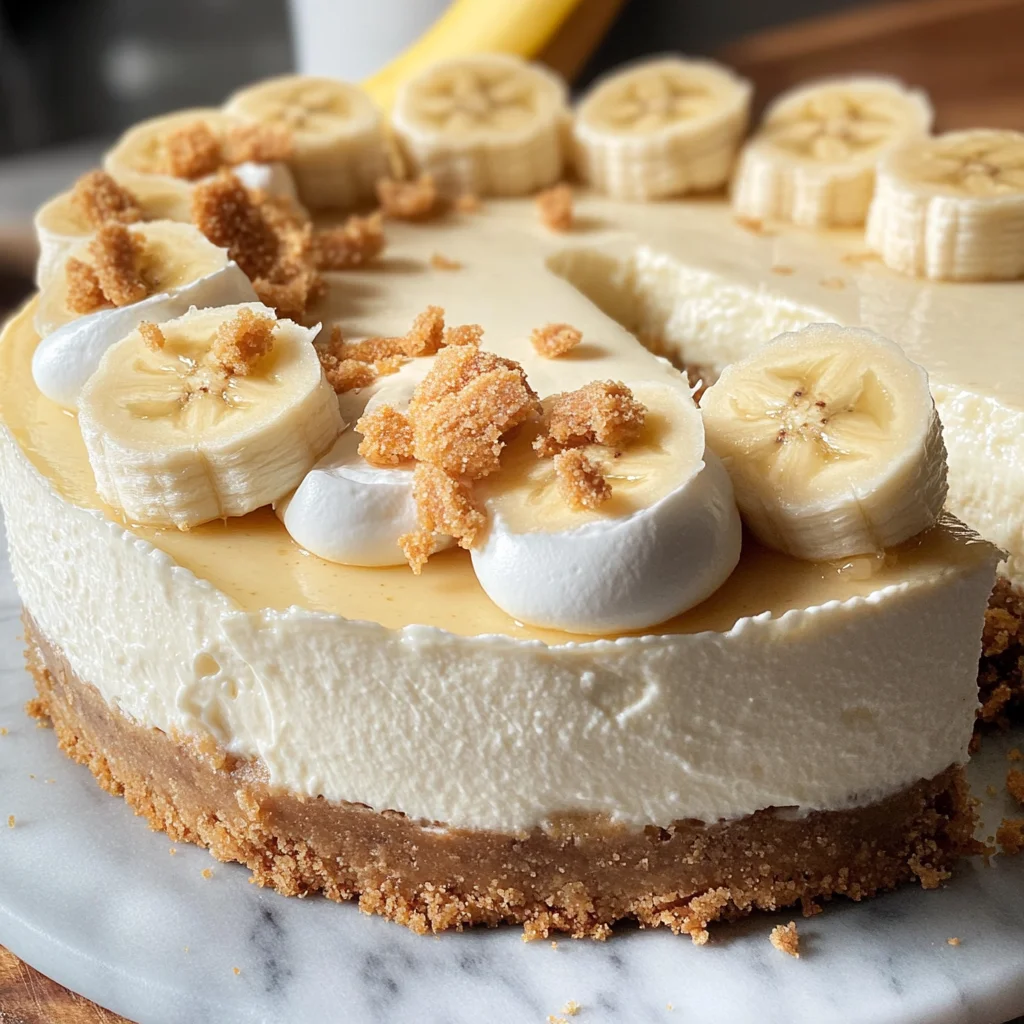
What makes this Banana Pudding Cheesecake so special is its ability to bring people together, whether it’s for birthdays, family reunions, or just because you want to brighten someone’s day. I promise you, once you’ve tasted this creamy masterpiece topped with fresh whipped cream and banana slices, you’ll understand why it has become a beloved staple in many homes. It’s not just dessert; it’s a celebration—of love, friendship, and all those little moments that make life extraordinary. So grab your apron and let’s dive into this enchanting recipe together—it could very well become your new go-to treat!
Banana Pudding Cheesecake: A Creamy Dream Come True
This Banana Pudding Cheesecake is a delightful twist on two classic favorites—banana pudding and cheesecake—wrapped up in one stunning dessert. Perfectly balanced and utterly irresistible, this cheesecake will leave your friends and family asking for seconds (and thirds!). With a buttery Nilla Wafer crust and a filling that’s both rich and refreshing, you’ll find yourself coming back for more long after the last slice has been served.
Ingredients:
As we embark on this culinary adventure together, let’s take a moment to appreciate each ingredient that plays a crucial role in crafting our Banana Pudding Cheesecake. From the buttery crust to the creamy filling, every component adds its own unique essence to this delectable dessert.
- 3 cups whole Nilla wafers (crushed; 180 grams): The star of our crust! These iconic cookies provide an incredible buttery flavor and delightful crunch that sets the foundation for our cheesecake. When selecting Nilla Wafers, look for those made with real vanilla for an authentic taste. If you’re feeling adventurous or wish to customize further, you might consider using graham crackers or even shortbread cookies as alternatives—though they’ll impart different flavor profiles.
- ¼ cup granulated sugar (50 grams): This sugar doesn’t just sweeten; it enhances the flavor of our cookie crust by creating that delicate balance between sweetness and richness. It helps bind the crumbs together when combined with melted butter while also caramelizing slightly during baking to give our crust a lovely golden hue.
- 5 tablespoons unsalted butter (melted and slightly cooled; 70 grams): Butter is essential for achieving that signature texture in our crust—rich yet crumbly. Using unsalted butter allows us to control the level of saltiness in our recipe. Make sure it’s melted but not too hot when mixing; otherwise, it can lead to overly greasy crumbs instead of a delightful crunch.
- 32 ounces brick-style cream cheese (softened to room temperature; 4 blocks; 905 grams): Cream cheese is what gives our cheesecake its luxurious creaminess! Always opt for brick-style cream cheese instead of spreadable varieties as they have less moisture and yield better results. Letting it soften at room temperature ensures smooth mixing without lumps—you want every slice to be silky!
- 1 cup mashed ripe banana (2 large ripe fresh bananas; 250 grams): Ripe bananas are sweeter and offer more intense flavor than their underripe counterparts. They not only add natural sweetness but also contribute moisture to our cheesecake filling. Plus, their vibrant yellow color will brighten up your dessert!
- ½ cup full-fat sour cream (room temperature; 115 grams): Sour cream adds tanginess and depth of flavor while contributing to the overall creaminess of our filling. Make sure it’s at room temperature before using because incorporating cold ingredients can lead to curdling issues when mixed with warm ones.
- 1 cup granulated sugar (200 grams): More sugar means more sweetness! This addition balances out the acidity from the sour cream while enhancing the banana flavor throughout our cheesecake.
- 1 (3.4 oz) box dry instant banana cream pudding mix: This magical ingredient gives us that unmistakable banana flavor without having to cook anything down or spend hours preparing layers! Just make sure you reach for instant pudding mix—not cook & serve—as they have different preparation methods.
- 1 teaspoon pure vanilla extract: Vanilla is like a hug in liquid form—it elevates all flavors in your dish! Always choose pure vanilla extract over imitation for maximum depth and authenticity in taste.
- 4 large eggs (at room temperature): Eggs are non-negotiable here as they provide structure while keeping things moist during baking. Room temperature eggs mix more evenly into batters compared to cold ones—trust me on this one!
- 2 cups whipped cream or whipped topping: Whipped cream adds lightness and elegance when decorating your cheesecake—it’s like frosting on a cake but even more charming! You can use store-bought whipped topping if you’re short on time or whip up some homemade goodness if you’re feeling inspired.
- 1 to 2 bananas (sliced): Fresh banana slices make an exquisite topping for your cheesecake—they’re not only visually appealing but also add bursts of fresh flavor with each bite! Choose bananas that are firm yet ripe so they hold their shape well on top of the creamy filling.
- 10 to 20 Nilla wafers: These little gems serve double duty—they’re both part of our crust AND gorgeous garnishes! They’ll add delightful crunch alongside those soft banana slices atop your cheesecake.
Equipment You’ll Need:
Having the right tools can make all the difference between culinary chaos and kitchen harmony. These essential partners will help ensure that your baking journey goes smoothly as we create this beautiful Banana Pudding Cheesecake together.
- 9-inch springform pan – A springform pan allows you to easily release your cheesecake after baking without ruining its appearance—a must-have for any cheesecake lover! If you don’t have one on hand, you can use a regular round cake pan but be extra cautious when serving.
- Parchment paper – Lining your springform pan with parchment paper helps prevent sticking while providing an easy way to lift out your finished creation after cooling. It’s such a simple step but absolutely paramount!
- Food processor or blender – Whether you’re crushing those Nilla Wafers into fine crumbs or blending ingredients for smooth batter consistency, having either tool at your disposal speeds up prep work significantly!
- Stand mixer or handheld electric mixer – Mixing is key here! A stand mixer fitted with a paddle attachment makes beating softening ingredients effortless while ensuring everything is uniformly combined without overworking them—a great tool but don’t fret if you only have an electric hand mixer!
- Rubber spatula – This handy tool helps scrape down sides of bowls during mixing as well as folding lighter batters gently without deflating them—a true kitchen companion!
- Large roasting pan – For creating our water bath during baking! This method ensures even heat distribution around our cheesecake which prevents cracking—something we definitely want to avoid!
Now that we have all our ingredients prepped along with essential tools laid out before us let’s dive headfirst into preparing this sensational Banana Pudding Cheesecake!
Step 1: Crafting The Perfect Crust
To begin making our luscious Banana Pudding Cheesecake, preheat your oven to 325°F (163°C). This initial step is crucial because we want everything ready when it’s time for baking! While that’s heating up nicely, grab your springform pan and line its bottom with parchment paper—this simple act will save us from heartbreak later when trying to remove our precious creation from its mold without losing any bits along the way! Next comes one of my favorite parts—the crust itself! Crush those Nilla Wafers until they’re fine crumbs using either a food processor or by placing them in a sealed ziplock bag and going at them with a rolling pin until they resemble sandy granules. Don’t rush through this process—take time finding just the right consistency because these cookie crumbs are what will give structure underneath all that heavenly filling we’re about to create.
In another bowl combines these crushed cookies with granulated sugar before introducing melted butter into their midst—the combination should feel like wet sand once thoroughly mixed together; this means it’s ready! Firmly press this mixture into the bottom of your prepared springform pan until it’s compacted evenly across its surface—this action keeps everything intact during baking while creating an irresistible base layer below all those creamy delights we’re soon layering on top! Bake this beautiful crust alone in preheated oven for about ten minutes before removing it carefully so it can cool down completely while we prepare ourselves for what’s next—the dreamy filling awaits!
Step 2: Preparing The Creamy Filling
Now let’s shift gears towards crafting that indulgent cheesecake filling which will serve as both centerpiece AND delightfully rich experience upon first bite! To start off right away place water into a large pot on stove setting high heat so it begins boiling—we’ll need hot water ready shortly as part of our water bath method later on which helps maintain moisture levels throughout baking process preventing cracks forming atop surface layer too soon—that’s something none of us desire now isn’t it? Meanwhile grab another mixing bowl fitted either within stand mixer equipped paddle attachment OR simply use manual handheld mixer whichever suits best preference wise then toss softened brick-style cream cheese inside letting beat until smooth about one minute total time frame should suffice here don’t worry if few lumps remain—they’ll disappear once additional ingredients join party shortly thereafter!
Next introduce mashed ripe bananas along side full-fat sour cream ensuring everything gets mixed together thoroughly—you may need stop midway scraping down sides occasionally just check consistency remains uniform across board—this step ensures no chunks hide away unnoticed amidst luscious batter! Once mixture flows gracefully from spoon add granulated sugar alongside dry instant banana pudding mix finish off adding splash pure vanilla extract always remember folks quality matters here so choose wisely since nothing compares taste wise against pure product derived directly nature itself rather than synthetic alternatives—we want authentic flavors shining through beautifully tonight don’t we?!
Step 3: Adding Eggs And Combining Flavors
At this point we’ve created something magnificent already haven’t we? But wait there’s more magic left… In another small bowl take four large eggs crack them open gently whisking lightly until blended fully before incorporating them slowly into main mixing bowl filled previously mixed goodness taking care not overmix rather combine gently allowing air pockets build slightly throughout batter bringing lightness forth later during final bake cycle ahead trust me folks doing so pays dividends once unwrapped reveal comes around next day!
After achieving desired consistency run rubber spatula through entire mixture ensuring everything blends harmoniously oh how divine aroma wafts through kitchen right now aren’t we lucky? Just imagine enjoying slice rewarding effort put forth thus far—it feels like reward waiting patiently at end journey doesn’t it? Now let set aside until preparation phase completed cueing up next steps needed finalize assembly…
Step 4: Assembling Our Cheesecake For Baking
Let’s get serious now shall we? We’re nearing completion my dear friend but first some precautions must be taken ensuring no unwanted water seeps inside springform pan during cooking process because nobody wants soggy bottoms ruining perfectly crafted cheesecakes do they?! Secure bottom portion wrapped tightly within aluminum foil creating barrier against potential leaks then place wrapped springform inside oven bag rolling edges down snugly surrounding outer shell providing extra protection needed from accidental drips later down line… Patience pays off greatly here believe me!
Pour luscious creamy concoction lovingly prepared moments ago directly onto baked cooled Nilla wafer crust smoothing surface gently flat making sure edges come right up against walls leaving no gaps behind whatsoever—we’re looking sleek presentation coming soon don’t forget about aesthetics now everyone eats first visually before tasting remember?! Next fill roasting pan halfway deep boiling hot water added earlier carefully placing filled foiled springform nestled securely into larger vessel allowing steam rise around sides keeping moisture levels optimal within baking environment helping create perfect texture outcome desired later reveal moment looming closer each passing minute…
Now transfer entire setup back oven where patience truly shines bright needing seventy minutes minimum possibly stretching longer based individual ovens watch closely keeping eye edges beginning firm center still slightly jiggling away beneath top surface layer knowing perfectly cooked goodness awaits beneath golden exterior forming slowly outside wrapping warmth enveloping heartily gifting smiles aplenty afterwards…
As we continue forward through remaining steps guiding us ultimately toward luxurious desserts awaiting unveiling perhaps take moment reflect how far journey taken already has brought us thus far isn’t life amazing sometimes?
Stay tuned dear reader because next coming chapters uncover thrilling details assembling finish touches decorating delightfully sweet masterpieces awaiting devouring joyfully…
Step 5: Pressing the Crust with Love
Now that your Nilla wafer crust is ready to go, it’s time to create that beautiful base that will support your luscious Banana Pudding Cheesecake. Make sure you scoop the crumbly mixture into your prepared springform pan and start pressing it down firmly, but gently. You want to create an even layer across the bottom; this step is absolutely paramount because a solid crust will hold everything together during baking and slicing. I like to use the flat bottom of a measuring cup or my hands for this—both methods work wonderfully! Your goal here is to compact those crumbs just right so they meld together as they bake, creating a sturdy foundation for all that creamy goodness.
After you’ve pressed down the crumbs evenly, pop this crust into the oven for about 10 minutes. This slight toasting not only enhances the flavor but also helps set the crust so it doesn’t crumble apart when you serve it. While it bakes, your kitchen will fill with this delightful scent of warm vanilla and buttery goodness that makes your heart sing. Trust me, don’t skip this step! Once baked, let it cool completely while you prepare that heavenly cheesecake filling—it’s important to avoid any melting or sogginess!
Step 6: The Art of Mixing Your Cheesecake Filling
With your crust cooling beautifully, let’s dive into making the filling that will elevate this dessert into sheer bliss. Begin by boiling a large pot of water; we’ll need it later for our bain-marie (that’s French for water bath, and yes, it sounds fancy!). The steam from this hot water during baking helps prevent cracks in your cheesecake while creating an ultra-creamy texture—this is crucial for achieving that smooth consistency we all dream about.
In a stand mixer fitted with the paddle attachment (or using a handheld mixer), add your softened cream cheese and beat on low-medium speed until it’s luxuriously smooth—this usually takes about 1 to 2 minutes. You want to be sure there are no lumps because every bite should be silky and dreamy. Then add in your mashed ripe bananas and room-temperature sour cream; blend these together until fully combined, which brings an incredible depth of flavor to our cheesecake. The bananas lend sweetness and moisture while the sour cream adds richness and tang—an utterly intoxicating combination! Remember to scrape down the sides of the bowl often; we want every ounce of flavor mixed in harmoniously.
Next up, sprinkle in granulated sugar, banana cream pudding mix, and pure vanilla extract; mix until just blended. It should smell divine at this point—kind of like a banana cream pie met a cheesecake at a party! Finally, in a separate bowl, lightly beat your eggs before adding them into the mix. It’s vital not to overbeat at this stage as too much air can lead to cracking during baking. Gently incorporate them until everything is just combined—this extra care ensures you achieve that dense yet fluffy texture we all adore in cheesecakes.
Step 7: The Water Bath Technique
Once your filling is perfectly blended, it’s time for one of my favorite techniques—the water bath! Don’t let the idea intimidate you; I promise it’s worth every bit of effort! First things first: take two or three layers of aluminum foil and wrap them around the outside of your springform pan carefully. This non-negotiable step prevents any water from seeping into your cheesecake while it bakes and ensures a beautifully moist environment as well.
Now place your wrapped springform pan into an oven bag before rolling down its sides—this extra protection gives you peace of mind while baking! When you’re ready, pour that delightful cheesecake filling into the pan and smooth it out with a spatula until it’s evenly spread across the top. Now comes the fun part: take that boiling water you prepared earlier and fill a large roasting pan about one inch deep before delicately placing your filled springform pan inside it. This method creates steam within the oven which keeps our Banana Pudding Cheesecake cozy while baking.
Transfer everything carefully into your preheated oven set at 325°F (163°C). Bake for 70 to 80 minutes. Here’s what to watch for: you want those edges set while maintaining a soft center that jiggles just slightly when you gently shake it—this indicates perfect doneness! If things look too jiggly after 80 minutes, give it another few minutes but keep an eye on those edges; they should be firmly set so as not to overbake.
Step 8: Cooling Down with Patience
After allowing your cheesecake to bake beautifully, turn off that oven and crack open the door ever so slightly—let it sit in there like it’s taking a cozy nap for about an hour. This gentle cooling process helps prevent any shocking temperature changes which can often lead to cracks forming on top—a common nemesis in cheesecake world! After an hour has passed—and believe me when I say this wait will feel like eternity—carefully remove the springform pan from its water bath and transfer it onto a wire rack.
Allowing your cheesecake to cool completely at room temperature is essential before heading into refrigeration—it allows flavors to deepen nicely as well as setting further without condensation building up on top later on once chilled. Cover tightly with plastic wrap once cooled completely and then place in the refrigerator for at least 5-6 hours or overnight if possible. Chilling overnight lets all those flavors meld together beautifully; trust me when I say that slice tomorrow will be profoundly satisfying!
Conclusion:
As we wrap up our delightful journey through making this Banana Pudding Cheesecake together, I can’t help but feel excited about sharing such an extraordinary recipe with you! The combination of rich cream cheese mingling with sweet bananas and that iconic Nilla Wafer crust creates a truly magical experience that goes beyond mere food; it’s comfort wrapped up in every bite. Whether it’s the creamy texture that envelops your taste buds or the nostalgic crunch of those wafer crumbs, this cheesecake stands out as something profoundly satisfying and utterly unforgettable.
This recipe is more than just delicious; it’s an expression of love and joy that transforms any gathering into something special. Picture this: friends gathered around the table, laughter filling the air as they dive into slices of velvety cheesecake topped with fluffy whipped cream and fresh banana slices. It’s perfect for birthdays, potlucks, or just because you’re craving something heavenly after dinner! Making this dessert is an experience worth sharing—not just because of how wonderful it tastes but also due to the cherished memories you’ll create along the way.
When it comes time to serve your masterpiece, imagine savoring one delectable slice with a steaming cup of coffee or perhaps pairing it with a scoop of vanilla bean ice cream for an indulgent treat that elevates this dessert even further. For an afternoon pick-me-up while curled up with a book or enjoying good company over tea, there’s nothing quite like relishing in each luscious mouthful. If you’re feeling adventurous, why not try serving it alongside caramel sauce drizzles or even crushed nuts for added flair? Oh, the possibilities are endless!
Speaking of possibilities—this recipe is wonderfully adaptable! Feeling adventurous? You could experiment by adding layers of chocolate ganache between the cheesecake layers or folding in crushed pineapple along with those ripe bananas for a tropical twist. Each variation brings something unique to the table while maintaining that signature comfort we all adore about banana pudding cheesecake. So go ahead—embrace creativity in your kitchen and make this recipe truly yours! I can’t wait to hear how yours turns out; remember to share your experience and connect with others who share our passion for baking!
Banana Pudding Cheesecake
Indulge in a creamy Banana Pudding Cheesecake that’s sure to impress! Try this delightful dessert today and bring joy to your table!
- Prep Time: 30 minutes
- Cook Time: 80 minutes
- Total Time: 1 hour 50 minutes
- Yield: Approximately 12 servings 1x
- Category: Dessert
- Method: Baking
- Cuisine: American
Ingredients
- 3 cups Nilla Wafers (crushed)
- ¼ cup granulated sugar
- 5 tablespoons unsalted butter (melted)
- 32 ounces brick-style cream cheese (softened)
- 1 cup mashed ripe bananas (approximately 2 large bananas)
- ½ cup full-fat sour cream
- 1 cup granulated sugar
- 1 box (3.4 oz) dry instant banana cream pudding mix
- 1 teaspoon pure vanilla extract
- 4 large eggs (room temperature)
- Whipped cream for topping
- Sliced bananas for garnish
Instructions
- Preheat your oven to 325°F (163°C). Line the bottom of a springform pan with parchment paper.
- In a mixing bowl, combine crushed Nilla Wafers, granulated sugar, and melted butter. Press this mixture firmly into the bottom of the prepared pan.
- Bake the crust for about 10 minutes until lightly golden. Allow it to cool.
- In a stand mixer, beat softened cream cheese until smooth. Add mashed bananas, sour cream, sugar, pudding mix, and vanilla; blend until combined.
- Lightly whisk the eggs in a separate bowl before adding them slowly to the cheesecake mixture, mixing gently until just combined.
- Pour the filling over the cooled crust and smooth the top.
- Place the springform pan into a larger roasting pan filled with hot water about halfway up the sides of the cheesecake pan.
- Bake for 70-80 minutes until edges are set and center jiggles slightly when shaken.
- Turn off the oven and crack the door open; let it cool in there for an hour before transferring to a wire rack to cool completely.
- Chill in the refrigerator for at least 5 hours or overnight before serving.
Nutrition
- Serving Size: 1 serving
- Calories: 350
- Sugar: 30g
- Sodium: 220mg
- Fat: 22g
- Saturated Fat: 11g
- Unsaturated Fat: 9g
- Trans Fat: 0g
- Carbohydrates: 32g
- Fiber: 1g
- Protein: 6g
- Cholesterol: 75mg