Baked Lemon Pudding
There’s something profoundly magical about the way a simple dessert can transport us to cherished moments and evoke deep emotions. Baked Lemon Pudding is one of those enchanting dishes that dances on the palate with a delightful balance of sweetness and tartness, creating an experience that feels like a warm hug on a sunny day. As you dig your spoon into this light, airy confection, you’ll discover a symphony of flavors that sing sweetly together—a gentle reminder that sometimes the simplest ingredients can create the most extraordinary results. With just eggs, sugar, and fresh lemon juice, this delightful pudding serves as a bridge between cherished family traditions and modern culinary creativity. I promise you, once you take that first bite, you’ll feel like you’ve stumbled upon a hidden treasure.
Baked Lemon Pudding isn’t just a recipe; it’s an heirloom passed down through generations, cherished by friends and families alike. Imagine gathering around the table, laughter filling the air as everyone savors this zesty delight. It’s perfect for brunch gatherings or as a refreshing finish to any meal—especially after a hearty dinner when your taste buds crave something bright and invigorating. This dessert has also earned its place in our hearts during festive celebrations where every spoonful brings joy and nostalgia. So grab your apron and join me on this delightful journey; I can’t wait to share all the secrets behind this heavenly Baked Lemon Pudding!
Baked Lemon Pudding: A Zesty Delight for Any Occasion
This Baked Lemon Pudding is not only easy to make but also incredibly rewarding! The blend of fresh lemon juice and zest brings an invigorating brightness that will awaken your senses. If you’ve never made a pudding before, let me assure you—it’s simpler than it sounds! As we embark on this culinary adventure together, you’ll find that each step is designed to ensure your success in creating this light and fluffy treat.
Ingredients:
Let’s gather our ingredients! Each component plays a vital role in crafting this delectable dessert, so I encourage you to take your time selecting the best quality items available.
- 1 cup (200g) granulated sugar. This sweetener is essential for balancing out the tartness of the lemons while providing structure to our pudding. When choosing sugar, opt for fine granulated sugar as it dissolves easily into the mixture, ensuring a smooth consistency without any graininess. The right amount is absolutely paramount—too little sugar will make your pudding too tart, while too much can overwhelm its delicate flavor profile.
- 1/4 cup (30g) all-purpose flour. Flour acts as the binding agent in our recipe; it helps give body to the pudding without making it heavy. It’s crucial not to over-mix once added—doing so can develop gluten which may lead to a denser texture instead of that light fluffiness we’re aiming for. When purchasing flour, look for brands that are finely milled for optimal results.
- 1/4 teaspoon salt. Don’t underestimate salt; it enhances all other flavors in this dish! A touch of salt helps balance sweetness and accentuates the citrus notes from our lemons beautifully. Always use fine sea salt or kosher salt for precise measurements; coarse salts might not dissolve completely in such delicate mixtures.
- 1 cup (240ml) milk. Whole milk provides richness and creaminess to our pudding base without being overwhelming. If you’re looking for alternatives due to dietary preferences or lactose intolerance, unsweetened almond milk or oat milk work wonderfully here as well—they’ll lend their unique flavors while maintaining that creamy texture we crave.
- 1/2 cup (120ml) fresh lemon juice. Freshly squeezed lemon juice is non-negotiable! It provides that refreshing tanginess that makes this dessert so special—nothing compares to its vibrant flavor compared to bottled varieties which often contain preservatives or artificial flavors. When selecting lemons, look for ones that feel heavy for their size—this indicates juiciness!
- Zest of 1 lemon. Zesting adds another layer of lemony goodness by infusing our pudding with intense flavor without additional acidity from more juice. Use only the yellow part when zesting—this contains aromatic oils that will elevate your dish while keeping things balanced.
- 3 large eggs, separated into yolks and whites. The egg yolks add richness and depth to our pudding while thickening it beautifully during baking. Egg whites are whipped until they form stiff peaks—this process adds airiness to our final product creating that lovely soufflé-like texture that’s simply irresistible! Always ensure eggs are at room temperature before using them; they whip up better when warmed slightly.
- 1/4 teaspoon cream of tartar. This stabilizing agent is crucial when whipping egg whites; it helps maintain their structure preventing them from collapsing after you’ve worked hard to achieve those stiff peaks! If you don’t have cream of tartar on hand, you can substitute with an equal amount of white vinegar or lemon juice—they provide similar stabilizing effects.
- Powdered sugar, for serving. A dusting of powdered sugar before serving not only adds an elegant touch but also enhances visual appeal while offering just a hint more sweetness against the tartness below.
Now that we have everything ready at hand, let’s move forward with crafting our delightful Baked Lemon Pudding!
Equipment You’ll Need:
Before we dive into preparing this delicious dessert, having the right tools makes all the difference in ensuring everything runs smoothly in your kitchen! These essential partners will help transform simple ingredients into something truly extraordinary.
- Mixing bowls – A good set of mixing bowls is indispensable in any kitchen; they allow us to combine ingredients efficiently without making a mess! Opt for glass or stainless steel options as they’re durable and won’t retain odors from various food items over time.
- Whisk – A sturdy whisk is perfect for beating egg whites until they form those glorious stiff peaks we’re aiming for! This tool also helps incorporate air into mixtures effortlessly—something crucial when making light desserts like our Baked Lemon Pudding.
- Electric mixer – While you could whisk by hand, an electric mixer saves time and energy when beating egg whites or creaming mixtures together; if you’ve never experienced watching those beautiful peaks form quickly with minimal effort—you’re in for a treat!
- Measuring cups & spoons – Precision matters when baking; having accurate measuring tools ensures consistency across batches leading us closer towards perfection each time we make Baked Lemon Pudding!
- Baking dish – Choose either an 8-inch square dish or individual ramekins depending on how you’d like to serve these treats! Just make sure it’s greased well before pouring in your batter so nothing sticks during baking—a well-greased pan equals easy clean-up later too!
With all these tools gathered together alongside our beautiful ingredients—it’s time to embark upon preparing our scrumptious Baked Lemon Pudding!
Step 1: Preheat Your Oven & Combine Dry Ingredients
To kick off this culinary journey, preheat your oven to 350°F (175°C). This step is crucial because starting with an adequately heated oven ensures even cooking throughout—I can’t stress enough how important it is not rush through preheating! While that’s happening, grab one of those mixing bowls and whisk together your granulated sugar, flour, and salt until thoroughly combined—the mixture should look uniform without any clumps remaining at all. Doing so creates an impeccable base where every ingredient plays nice together later on—trust me on this!
Step 2: Mixing Wet Ingredients
Next up comes my favorite part: gradually adding milk along with fresh lemon juice and zest right into those dry ingredients you’ve just combined! Oh boy—this step infuses such incredible aroma into your kitchen already! As you whisk these wet components together gently but thoroughly until smooth—you’ll see how they start forming liquid gold before your eyes! This combination allows us not only create flavor but also achieve that silky-smooth texture needed in puddings—a true game changer!
Step 3: Whisking Egg Yolks
In another bowl altogether (you know I love using separate bowls!), beat those egg yolks until they’re pale yellow and creamy—they should almost resemble sunshine captured within! Slowly incorporate them into our luscious lemon mixture while stirring constantly—it’s vital here because we want everything seamlessly blended together without any lumps forming which could disrupt our final product’s integrity later down line.
Step 4: Beating Egg Whites
Now comes one of my favorite techniques: whipping egg whites alongside cream of tartar until stiff peaks form atop their white fluffy surfaces like clouds floating above us—pure magic unfolding right there! To achieve maximum volume during this process—and avoid any unwanted moisture content slipping inside—I recommend using clean dry mixing equipment since lingering grease could hinder their ability rise fully during baking later on down road as well!
As we continue crafting our beloved Baked Lemon Pudding together—I hope you’ll find joy along every step taken towards creating happiness within each bite shared amongst friends or family gathered around tables celebrating life’s sweetest moments ahead!!
Step 5: The Art of Folding – Creating Lightness
Now, let’s bring a little magic into our lemon mixture. In a clean mixing bowl, take those three egg whites and sprinkle in 1/4 teaspoon of cream of tartar. This is where the real transformation begins! The cream of tartar acts as a stabilizer, ensuring that those egg whites whip up into fluffy clouds, giving our Baked Lemon Pudding that airy texture we adore. Using an electric mixer set to medium-high speed, beat the egg whites until they reach stiff peaks—this means when you lift the beater out, the peaks should stand tall and proud without collapsing. This step is absolutely paramount because properly whipped egg whites incorporate air into our pudding, creating a delicate balance between richness and lightness that dances on your palate.
Once you achieve those lovely stiff peaks—which you’ll notice are glossy and hold their shape beautifully—it’s time for the gentle folding process. Take a spatula and scoop a generous portion of the whipped egg whites into your lemon mixture. This initial addition helps lighten the batter, making it easier to fold in the rest without deflating all that precious air you just worked hard to create. With a gentle hand, use a folding motion—think of it as cradling rather than stirring. You want to combine them until there are no visible streaks of white but be careful not to overmix; we’re aiming for that fluffy texture! Trust me on this: the lightness here will make every bite feel like sunshine on your tongue.
Step 6: Pouring with Purpose – Into the Baking Dish
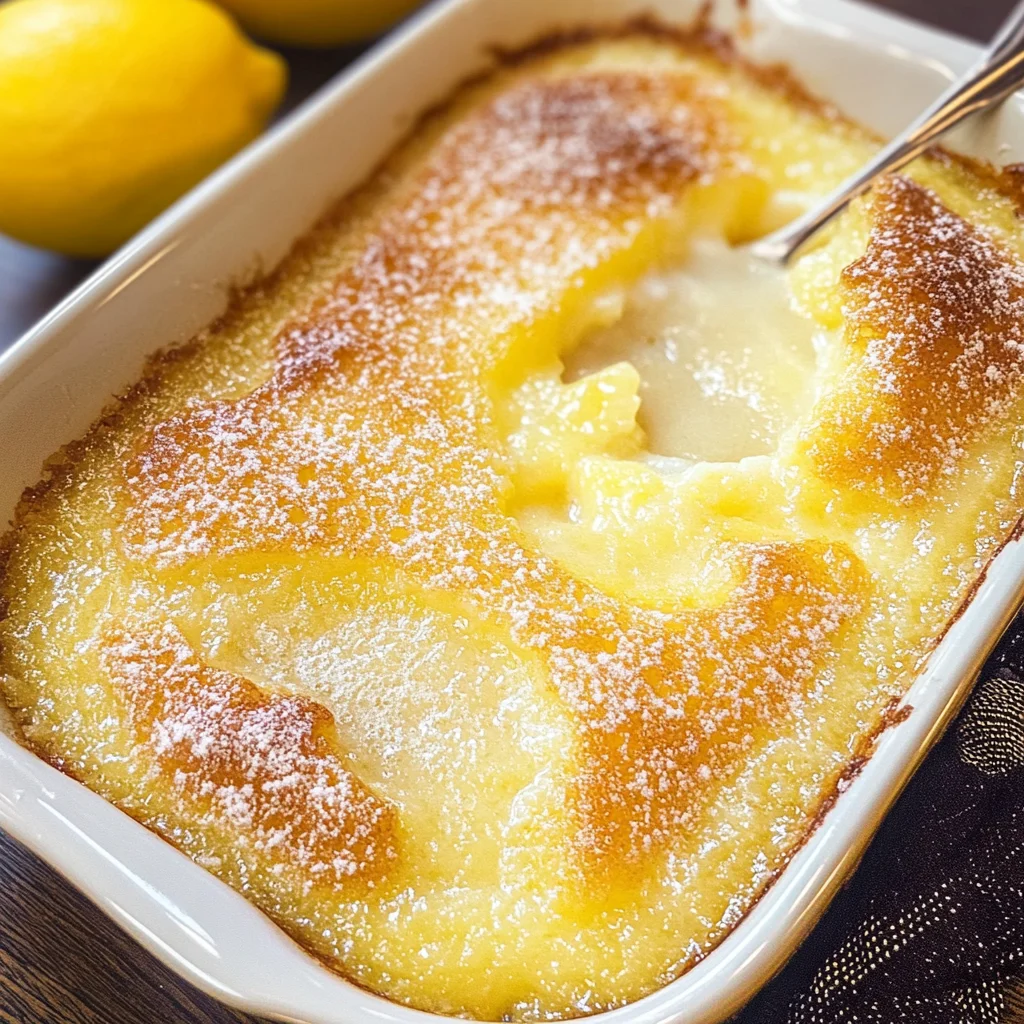
Now that we’ve combined our lemony goodness with that ethereal fluffiness, it’s time to pour this divine mixture into our greased baking dish. Choose a dish that’s roughly 8 inches square or similar in size; this is where all the magic will happen! Gently scrape every last bit of batter from your mixing bowl into the dish, using your spatula to coax every morsel out—there’s no room for waste here! As you do this, take a moment to appreciate how vibrant and enticing the batter looks; it should have a sunny yellow hue with tiny flecks of airy white from the egg whites peeking through.
Once you’ve poured everything in, give it a slight jiggle to level the batter out evenly. This little action ensures that each part will bake consistently, resulting in an evenly cooked dessert that doesn’t leave anyone fighting for the best piece! Now comes an exciting part: we’re going to bake this beauty in a preheated oven at 350°F (175°C) for about 30-35 minutes. During this time, keep an eye on it; you’ll want to look for that gorgeous golden top and slightly puffed edges. It’s normal for your pudding to rise beautifully while baking—don’t fret if it looks like it’s towering above the dish; it will settle back down once removed from heat.
Step 7: The Waiting Game – Cooling Down
Ah, patience—the true secret ingredient in any great recipe! Once those 30-35 minutes have passed and your kitchen is filled with an utterly intoxicating aroma reminiscent of summer days spent outdoors under bright sunbeams, it’s time to pull your Baked Lemon Pudding from the oven. However, resist the urge to dive right in! Allowing our pudding to cool for at least 10-15 minutes is essential because it gives all those flavors time to meld together beautifully while also letting it set properly. If you skip this step, you risk ending up with a dessert that’s too runny at first bite—a tragedy no one wants!
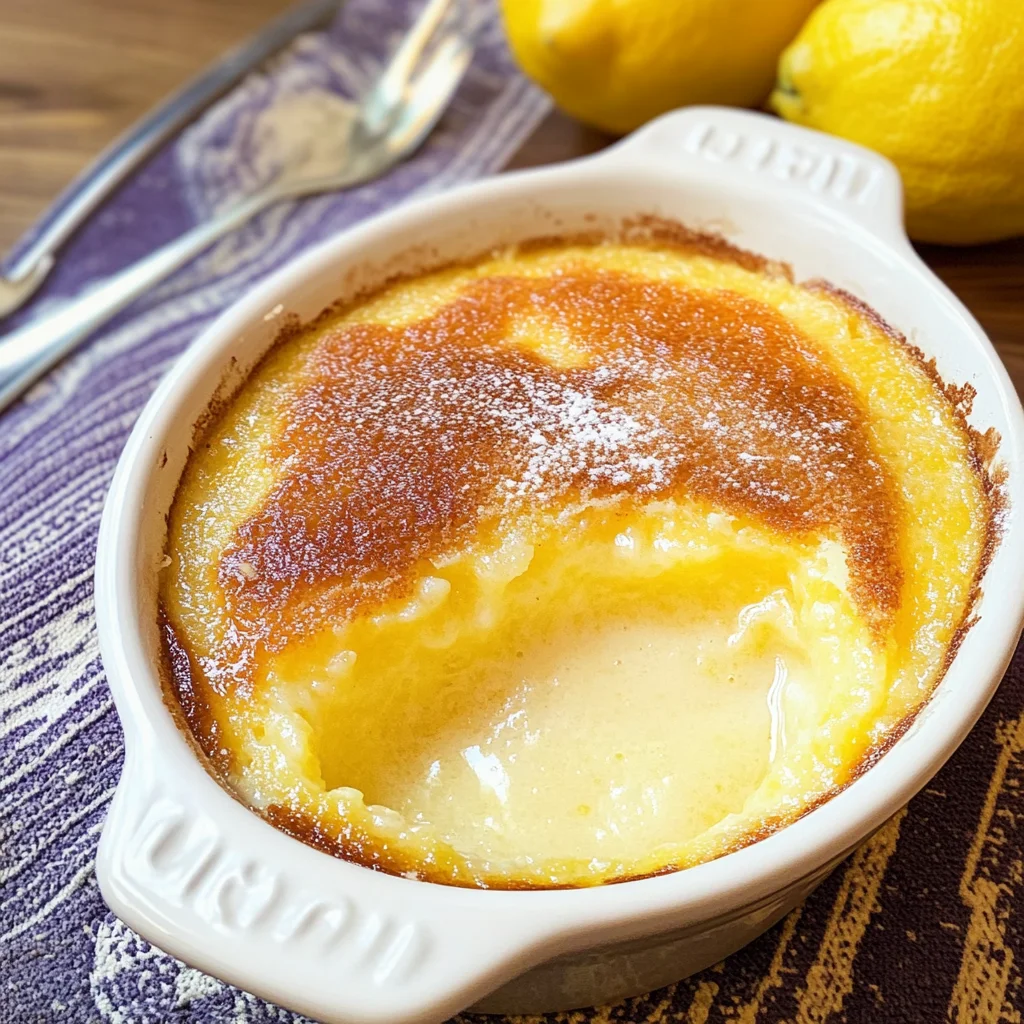
As your pudding cools on the counter, notice how its surface may develop small cracks or slight imperfections; don’t worry—this adds character and charm! You can also feel free to cover it loosely with parchment paper or a kitchen towel if you’re worried about dust settling on its golden crown during this resting period. The cooling phase is also when we can start thinking about presentation—how will you serve this delightful treat? A sprinkle of powdered sugar right before serving elevates its visual appeal while adding just another hint of sweetness.
Step 8: Plating Perfection – The Final Touches
After allowing your Baked Lemon Pudding some well-deserved cooling time, it’s finally time for us to present this masterpiece! Before serving, I highly recommend giving it one last touch—a light dusting of powdered sugar over the top. Not only does this add an elegant flair that makes everything look fancy-dancy (and who doesn’t love feeling like royalty?), but it also offers just a whisper of sweetness against that zesty lemon tang. You can use a fine mesh sieve or simply tap powdered sugar through your fingers over each serving—let your creativity shine through!
When plating up portions for yourself or guests (trust me; they’ll be begging for seconds!), consider pairing each slice with some fresh berries or perhaps even a dollop of non-dairy whipped topping if you’re looking for extra decadence without animal products. These elements not only enhance flavor but also introduce delightful textures contrasting against the creamy pudding base. And as you serve up this dazzling dessert, take a moment to inhale deeply—the aroma alone will captivate everyone around you!
Now gather everyone around and watch their eyes widen in delight as they experience their first bites of this Baked Lemon Pudding—it’s truly extraordinary how something so simple can spark such joy! Each spoonful carries with it memories waiting to be made and stories waiting to be shared around your table. Enjoy every moment—you’ve earned it!
Storage and Enjoyment Tips for Your Baked Lemon Pudding
Oh, the moment has arrived! Your Baked Lemon Pudding is ready to be devoured, and I can’t help but feel a tingle of excitement at the thought of you indulging in that warm, zesty goodness. But here’s a little secret: this delightful dessert doesn’t just stop at satisfaction upon first bite; it has the potential to bring joy even after it has cooled. Whether you’re saving leftovers for a midnight snack or planning ahead for an upcoming gathering, let’s dive into how to keep that flavor alive and well.
Storing Leftover Baked Lemon Pudding
Once you’ve had your fill of that fluffy goodness, you’ll want to store any leftovers properly to maintain its bright flavor and airy texture. The best way to do this is by transferring your Baked Lemon Pudding into an airtight container—this is crucial because we want to lock in that delightful taste while keeping unwanted odors at bay. You can keep it in the refrigerator for about 3-4 days without compromising its integrity. Here’s a pro tip: placing a slice of bread inside the container can help absorb excess moisture, which means your pudding stays perfectly light and not overly soggy. Now, as time passes, you might notice that the flavors meld beautifully together; it’s like they’re having their own little party in there! When you’re ready to enjoy again, simply take it out of the fridge and serve chilled or give it a quick warm-up in the oven at a low temperature—just until it’s warmed through. Trust me, you’re going to love this refreshing treat all over again.
Freezing Baked Lemon Pudding for Later
If you’re like me and love planning ahead, freezing your Baked Lemon Pudding is an absolute game-changer! To do this effectively, allow the pudding to cool completely before slicing it into portions. Wrap each piece tightly in plastic wrap and then place them in a freezer-safe container or bag—this ensures no freezer burn will sneak in! It can be stored frozen for up to three months without losing its charm. When you’re ready to indulge once more, simply let it thaw overnight in the refrigerator or reheat from frozen at a low temperature in the oven. The beauty of freezing lies not only in convenience but also in how those invigorating lemon flavors can continue to develop even while stored away. Isn’t that wonderful?
In both storage methods—whether refrigerated or frozen—you’ll find that your Baked Lemon Pudding remains a tantalizing treat waiting for you whenever you need a sweet escape!
Baked Lemon Pudding

Baked Lemon Pudding is a delightful dessert that perfectly balances sweetness and tartness, offering a refreshing taste that’s sure to brighten up any meal. This airy pudding combines the vibrant flavors of fresh lemons with a light, fluffy texture that feels indulgent yet comforting.
- Prep Time: 15 minutes
- Cook Time: 35 minutes
- Total Time: 50 minutes
- Yield: Serves approximately 8
- Category: Dessert
- Method: Baking
- Cuisine: American
Ingredients
- 1 cup granulated sugar
- 1/4 cup all-purpose flour
- 1/4 teaspoon salt
- 1 cup milk (or non-dairy alternative)
- 1/2 cup fresh lemon juice
- Zest of 1 lemon
- 3 large eggs (separated)
- 1/4 teaspoon cream of tartar
- Powdered sugar for serving
Instructions
- Preheat your oven to 350°F (175°C).
- In a mixing bowl, whisk together sugar, flour, and salt.
- Gradually add milk along with fresh lemon juice and zest, mixing until smooth.
- Beat egg yolks until pale and creamy; stir into the lemon mixture.
- In another bowl, whip egg whites with cream of tartar until stiff peaks form.
- Gently fold the whipped egg whites into the lemon mixture until no white streaks remain.
- Pour the batter into a greased baking dish and bake for 30-35 minutes until golden.
- Cool for 10-15 minutes before dusting with powdered sugar and serving.
Nutrition
- Serving Size: 1 slice (80g)
- Calories: 150
- Sugar: 22g
- Sodium: 150mg
- Fat: 2g
- Saturated Fat: 1g
- Unsaturated Fat: 0g
- Trans Fat: 0g
- Carbohydrates: 30g
- Fiber: 0g
- Protein: 3g
- Cholesterol: 70mg