Jack-O-Lantern Hand Pies
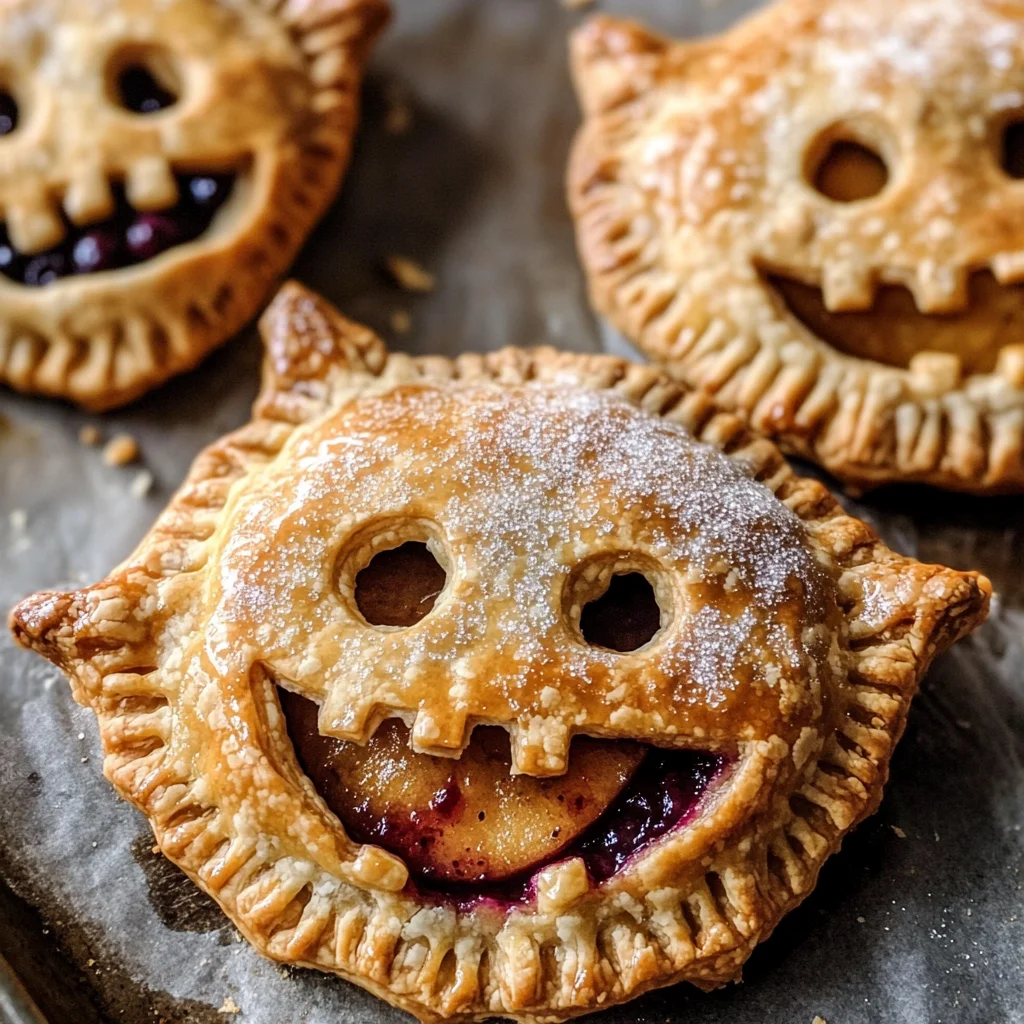
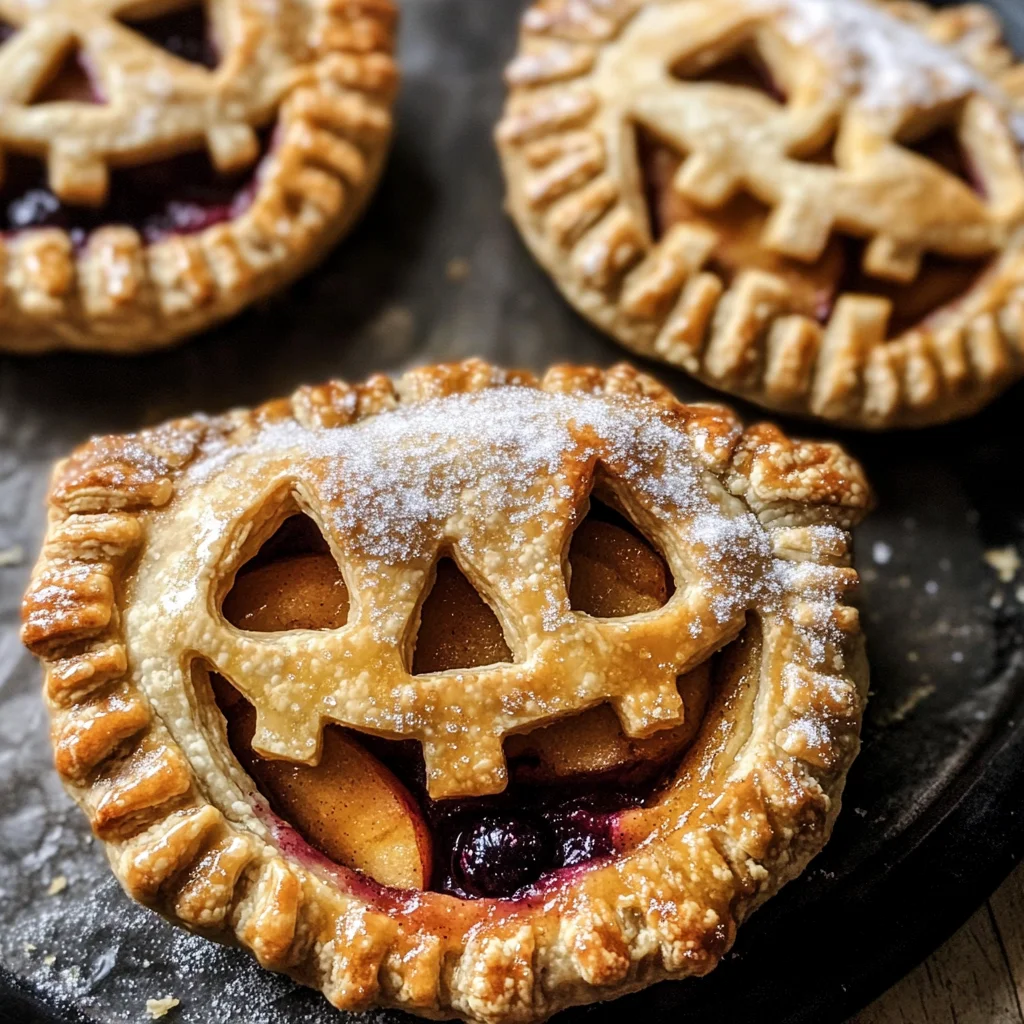
If you’re looking for a fun and festive treat to celebrate Halloween, these Jack-O-Lantern Hand Pies are just the thing! They not only bring a smile with their adorable pumpkin faces but also deliver a delightful mix of flavors that everyone will love. Whether you’re hosting a spooky gathering, enjoying a cozy family night, or just want to whip up something special, these hand pies are perfect for the occasion.
What I adore about this recipe is how it combines the warmth of baked apples and juicy blackberries into flaky pastry pockets. Plus, they’re simple enough to make with your kids, creating wonderful memories in the kitchen. So roll up your sleeves, and let’s get ready to bake some delicious Jack-O-Lantern Hand Pies!
Why You’ll Love This Recipe
- Family-friendly fun: Kids will love helping to cut out the pumpkin shapes and decorate their own pie faces!
- Delicious flavor combination: The sweet apples and tangy blackberries create a mouthwatering filling that’s hard to resist.
- Make ahead convenience: You can prepare the dough and fillings in advance, making it easy to assemble when you’re ready to bake.
- Perfect for any celebration: These hand pies are ideal for Halloween parties but can be enjoyed throughout fall.
- Impressive presentation: Everyone will be wowed by these cute little desserts that look great on any table.
Ingredients You’ll Need
To make these delightful Jack-O-Lantern Hand Pies, we’ll use simple, wholesome ingredients that you can easily find at your local grocery store. Gather these goodies before we dive into the recipe!
For the Pie Crust:
- 2 1/2 cups all-purpose flour
- 1 tablespoon granulated sugar
- 1 teaspoon kosher salt
- 2 sticks (8oz unsalted butter, diced and very cold)
- 6-9 tablespoons ice water
- 1 egg (for egg wash)
- 1/4 cup raw or turbinado sugar (for sprinkling)
For the Fillings:
- 2 large honey crisp apples (peeled and diced small)
- 3 tablespoons salted butter
- 2 tablespoons bourbon barley tea
- 1 teaspoon vanilla bean paste
- 1/2 teaspoon ground cinnamon
- 2/3 cup brown sugar
- 18 oz fresh blackberries
- 1/3 cup granulated sugar
- 1 teaspoon vanilla extract
Variations
One of the best things about Jack-O-Lantern Hand Pies is their flexibility! Feel free to get creative with the fillings or crust. Here are some tasty ideas:
- Use different fruits: Substitute with pears or peaches for a unique twist on the filling.
- Try different spices: Experiment with nutmeg or cardamom instead of cinnamon for a warm flavor profile.
- Switch up the dough: Use store-bought puff pastry if you’re short on time; it will still turn out delicious!
- Make it savory: For a change of pace, fill them with a mixture of sautéed vegetables and cheese.
How to Make Jack-O-Lantern Hand Pies
Step 1: Make the Crust
To start off our Jack-O-Lantern Hand Pies, we need to create a flaky crust. In your stand mixer fitted with the paddle attachment, combine flour, sugar, and salt. Mixing on low helps blend everything together without overworking the dough. Adding cold butter is crucial so that we achieve that lovely texture—think coarse sand! Don’t forget to add ice water gradually; this helps bind everything while keeping our crust tender.
Step 2: Chill Out
After mixing your dough until it clumps together nicely, tip it onto a floured surface. Kneading it briefly helps shape it into two rough balls. Wrapping them in plastic wrap and chilling them in the fridge is essential—it allows the gluten to relax and makes rolling out easier later on.
Step 3: Prepare Your Fillings
Now let’s get those delicious fillings ready! Start by caramelizing your apples in butter until they soften slightly—this brings out their sweetness. After adding spices and sugar, cook until everything melds into a syrupy goodness that cools down perfectly at room temperature.
Step 4: Roast Those Blackberries
For our blackberry filling, roasting intensifies their natural flavors. Bake them until soft before simmering with sugar and vanilla until thickened. Let this mixture cool as well; it will be worth the wait!
Step 5: Roll Out That Dough
Remove your chilled dough from the fridge and roll it out carefully on a floured surface. Using a pumpkin cookie cutter is fun—and don’t forget to cut out faces on half of them! These shapes ensure each pie has its own personality.
Step 6: Assemble Your Pies
Now comes my favorite part—assembling our hand pies! Place uncut pumpkin shapes on a lined baking sheet before adding generous spoonfuls of filling right in the center. Brush those edges with egg wash; this step ensures they seal beautifully during baking.
Step 7: Bake Until Golden Brown
Pop those cutely crafted hand pies into an oven preheated to 375°F. Within about 25 minutes, they’ll emerge golden brown and fragrant—it’s hard not to nibble one right away! Allow them to cool slightly before serving so everyone can enjoy their warm goodness together.
There you have it—a delightful recipe for Jack-O-Lantern Hand Pies that’s sure to be loved by friends and family alike! Enjoy these little treats all season long!
Pro Tips for Making Jack-O-Lantern Hand Pies
Making these festive hand pies can be a fun and rewarding experience, especially with a few handy tips!
-
Use cold ingredients: Keeping your butter and water cold helps create a flaky crust that’s perfectly tender. Warm ingredients can lead to a tough crust, so don’t skip this step!
-
Don’t overwork the dough: Mix just until combined to ensure your hand pies remain light and airy. Overworking the dough can develop gluten, making the crust chewy instead of flaky.
-
Chill the cutouts: After cutting out your pumpkin shapes, chilling them again before baking helps retain their shape during cooking. This way, your jack-o-lanterns will look as adorable as they taste!
-
Experiment with fillings: Feel free to mix up the fillings based on what you have at home or what’s in season. Pears, peaches, or even chocolate can be delightful alternatives to keep things exciting.
-
Keep an eye on baking time: Ovens can vary, so watch for that beautiful golden brown color. If you find they’re browning too quickly, cover them loosely with aluminum foil to prevent burning while allowing them to cook through.
How to Serve Jack-O-Lantern Hand Pies
Presenting your Jack-O-Lantern Hand Pies can be just as much fun as making them! Here are some ideas to make them shine on your Halloween table.
Garnishes
-
Whipped coconut cream: A dollop of whipped coconut cream offers a light and dairy-free contrast that complements the sweetness of the pies beautifully.
-
Cinnamon powder: A light dusting of cinnamon adds an aromatic touch and enhances the warm spices in the filling.
Side Dishes
-
Mixed greens salad: A simple salad with mixed greens, cherry tomatoes, and a lemon vinaigrette provides a refreshing contrast to the sweet hand pies.
-
Pumpkin soup: A warm bowl of creamy pumpkin soup can create a cozy and seasonal vibe at your gathering. Its rich flavors pair well with the sweetness of the hand pies.
-
Cheese platter: A selection of cheeses—both sharp and mild—can balance out the sweetness of the pies. Add some nuts and dried fruits for extra texture and flavor.
With these tips on serving and garnishing, you’ll create an enchanting Halloween experience that delights everyone at your party! Enjoy baking these adorable treats!
Make Ahead and Storage
These Jack-O-Lantern Hand Pies are perfect for making ahead of time, making them an excellent choice for your Halloween festivities. You can easily prepare the dough and fillings in advance, ensuring you have a delicious dessert ready to go!
Storing Leftovers
- Allow the hand pies to cool completely before storing.
- Place them in an airtight container to keep them fresh.
- Store at room temperature for up to 2 days or in the refrigerator for up to a week.
Freezing
- To freeze, place unbaked hand pies on a baking sheet lined with parchment paper and freeze until solid.
- Transfer the frozen hand pies to a freezer-safe bag or container.
- They can be stored in the freezer for up to 3 months.
Reheating
- For baked hand pies: Preheat your oven to 350°F (175°C). Place the pies on a baking sheet and heat for about 10-15 minutes, or until warmed through.
- For unbaked hand pies: Bake from frozen at 375°F (190°C) for an additional 5-10 minutes longer than the original recipe time.
FAQs
Here are some common questions you might have while making these delightful hand pies.
Can I make Jack-O-Lantern Hand Pies ahead of time?
Absolutely! You can prepare both the dough and fillings in advance. Just assemble and bake when you’re ready to serve!
What can I use instead of bourbon barley tea in Jack-O-Lantern Hand Pies?
You can substitute bourbon barley tea with apple juice or any herbal tea of your choice for a lovely flavor profile.
How do I prevent my Jack-O-Lantern Hand Pies from leaking filling?
Make sure to seal the edges tightly with a fork and avoid overfilling them. A little bit of filling goes a long way!
Can I use other fruits for the filling in Jack-O-Lantern Hand Pies?
Yes! Feel free to experiment with different fruits like pears, peaches, or even pumpkin puree for a seasonal twist.
Final Thoughts
I hope you enjoy making these charming Jack-O-Lantern Hand Pies as much as I do! They’re not just delicious but also add a festive touch to any Halloween gathering. Whether you’re hosting a party or just want a cozy treat, these hand pies are sure to impress. Enjoy baking, and don’t forget to share your creations with friends and family!
Jack-O-Lantern Hand Pies

Indulge in the festive spirit of Halloween with these delightful Jack-O-Lantern Hand Pies! These charming pastries feature a flaky homemade crust filled with a warm mixture of sweet honey crisp apples and juicy blackberries, making them the perfect treat for gatherings, cozy family nights, or simply to brighten your day. Not only are they fun to make with kids—cutting out pumpkin shapes and decorating faces—but they also serve as an impressive centerpiece on any table. Easy to prepare ahead of time, these hand pies will surely become a seasonal favorite!
- Prep Time: 30 minutes
- Cook Time: 25 minutes
- Total Time: 55 minutes
- Yield: Approximately 10 servings 1x
- Category: Dessert
- Method: Baking
- Cuisine: American
Ingredients
- 2 1/2 cups all-purpose flour
- 1 tablespoon granulated sugar
- 1 teaspoon kosher salt
- 8 oz unsalted butter (diced and very cold)
- 6–9 tablespoons ice water
- 2 large honey crisp apples (peeled and diced)
- 3 tablespoons salted butter
- 18 oz fresh blackberries
- 2/3 cup brown sugar
Instructions
- For the pie crust, mix flour, sugar, and salt in a stand mixer. Add cold butter until it resembles coarse sand. Gradually add ice water until combined.
- Chill the dough in the refrigerator for at least 30 minutes.
- Prepare fillings by caramelizing apples in butter with spices and sugar until syrupy. Roast blackberries with sugar and vanilla until thickened.
- Roll out chilled dough and cut into pumpkin shapes; cut faces on half.
- Assemble by placing filling on uncut shapes, sealing edges with egg wash.
- Bake at 375°F for around 25 minutes until golden brown.
Nutrition
- Serving Size: 1 serving
- Calories: 235
- Sugar: 12g
- Sodium: 150mg
- Fat: 10g
- Saturated Fat: 6g
- Unsaturated Fat: 4g
- Trans Fat: 0g
- Carbohydrates: 34g
- Fiber: 2g
- Protein: 3g
- Cholesterol: 20mg