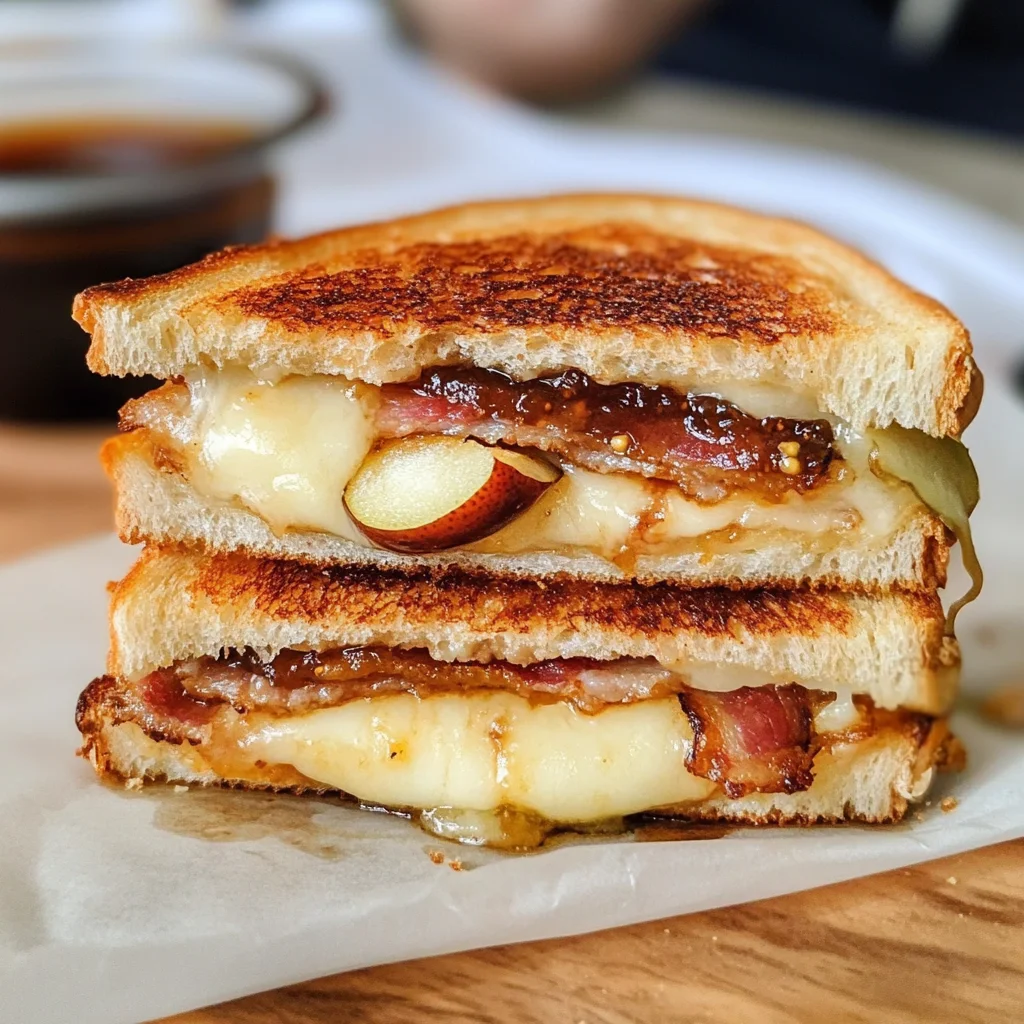
Bacon, Pear and Fig Grilled Cheese
If you’re looking for a delightful twist on a classic comfort food, you’ve come to the right place! This Bacon, Pear and Fig Grilled Cheese is a favorite of mine that beautifully combines sweet, savory, and gooey goodness. It’s the kind of meal that can brighten up busy weeknights or add a special touch to family gatherings. Trust me, once you take a bite, you’ll understand why this grilled cheese holds such a special place in my heart!
What makes this recipe even more wonderful is how easy it is to whip up. With just a few simple ingredients, you can create a mouthwatering sandwich that everyone will love. So grab your skillet, and let’s get cooking!
Why You’ll Love This Recipe
- Quick and Easy: This recipe comes together in just 10 minutes, making it perfect for those hectic evenings when time is tight.
- Family-Friendly: Kids and adults alike will enjoy the sweet and savory flavors packed into every bite.
- Gourmet Touch: With the addition of pear and fig jam, this grilled cheese feels fancy enough for entertaining while remaining simple.
- Customizable: You can easily swap out ingredients based on what you have on hand or your personal preferences.
- Comfort Food at Its Best: The melty cheese combined with crispy bacon and fresh fruit creates an irresistible combination that feels like a warm hug.

Ingredients You’ll Need
Let’s talk about the simple, wholesome ingredients that make this Bacon, Pear and Fig Grilled Cheese so delicious. These items are likely already in your kitchen or easy to find at your local store!
For the Sandwich
- 2 tablespoons mayonnaise
- 4 large slices sourdough bread
- 3-4 ounces white cheddar cheese, thinly sliced into 4-8 slices or shredded
- 3-4 strips bacon, cooked and cut into quarters
- 1 pear, thinly sliced
- 2 tablespoons fig jam or thinly sliced dried figs
Variations
One of the best things about this recipe is its flexibility! Feel free to get creative and make it your own with these variations:
- Swap the protein: Try using turkey bacon or even plant-based bacon as a substitute for traditional bacon.
- Change up the cheese: Gouda or brie could bring a new flavor profile while still keeping things creamy and delicious.
- Add greens: Toss in some arugula or spinach for an extra crunch and a boost of freshness.
- Make it spicy: If you like a kick, add some sliced jalapeños or pepper jack cheese for heat.
How to Make Bacon, Pear and Fig Grilled Cheese
Step 1: Prepare Your Bread
Start by slathering one side of each slice of bread with mayonnaise. Setting them plain side up while you prep ensures that your sandwiches will have that gorgeous golden crust when they’re done.
Step 2: Assemble Your Sandwich
Now it’s time to build your masterpiece! Begin with one slice of bread (mayo side down), add a layer of cheese followed by a dollop of fig jam, slices of pear, crispy bacon pieces, another layer of cheese, and finally top it off with another slice of bread (mayo side facing out). Make sure the cheese touches the bread on both sides; this helps everything melt beautifully together.
Step 3: Cook to Perfection
Heat up your griddle or skillet over medium heat (around 325°F if using a griddle). Place your sandwiches in the pan and press down gently. This step maximizes contact with the heat source which helps melt that cheese perfectly! Cook for about 1-2 minutes until golden brown before flipping to repeat on the other side.
Step 4: Slice and Serve
Once both sides are beautifully browned and crispy, carefully transfer your sandwiches to a cutting board. A smooth cut down the middle showcases all those layers—and trust me; everyone will want to see what’s inside! Serve hot because nothing beats warm melted cheese.
Step 5: Share Your Experience
I’d love to hear how yours turns out! If you try this Bacon, Pear and Fig Grilled Cheese recipe, come back to leave us your thoughts in the comments or share some star ratings. Enjoy!
Pro Tips for Making Bacon, Pear and Fig Grilled Cheese
Creating the perfect grilled cheese is an art, and I’m here to help you master it with a few simple tips!
- Choose Quality Ingredients: Opt for fresh sourdough bread and high-quality cheese. This makes all the difference in flavor and texture, ensuring your sandwich is a delightful experience from the first bite.
- Don’t Rush the Cooking: Cooking over medium heat allows the cheese to melt evenly while giving the bread time to toast to a beautiful golden brown. It prevents burning while ensuring everything inside is warm and gooey.
- Experiment with Cheese: While this recipe calls for white cheddar, feel free to mix in other cheeses like gouda or brie for additional creaminess and flavor complexity. The right cheese can elevate your grilled cheese to new heights!
- Press Down Gently: When cooking, use a spatula to gently press down on the sandwich. This helps achieve maximum contact with the pan, allowing for even melting and a crispy crust.
- Let It Rest: After cooking, let your sandwich rest for a minute before cutting into it. This allows the melted cheese to set slightly, making it less likely to ooze out when you make that first delicious cut.
How to Serve Bacon, Pear and Fig Grilled Cheese
Presentation can elevate your meal from ordinary to extraordinary! Here are some ideas on how to serve this scrumptious sandwich.
Garnishes
- Fresh Herbs: A sprinkle of fresh thyme or rosemary can add a burst of flavor and color that complements the sweet and savory elements of your grilled cheese.
- Microgreens: These tiny greens not only look beautiful but also pack a punch of fresh flavor that enhances your dish.
Side Dishes
- Mixed Green Salad: A light salad with arugula, spinach, or mixed greens dressed with lemon vinaigrette offers a refreshing contrast to the richness of the grilled cheese.
- Sweet Potato Fries: Crispy sweet potato fries provide a satisfying crunch and natural sweetness that pairs beautifully with the flavors of bacon, pear, and fig.
- Tomato Soup: A classic pairing! The acidity of tomato soup balances out the creamy sandwich and adds comfort on chilly days.
- Fruit Salad: A vibrant fruit salad with seasonal fruits will enhance the sweet notes in your sandwich while providing a refreshing side.
With these serving suggestions and pro tips in mind, you’re ready to enjoy an unforgettable meal. Don’t forget to share your experiences in the comments below—I’d love to hear how your Bacon, Pear and Fig Grilled Cheese turns out!
Make Ahead and Storage
This Bacon, Pear and Fig Grilled Cheese recipe is perfect for meal prep! You can easily whip up a few sandwiches in advance, making it a convenient choice for busy weeknights or quick lunches.
Storing Leftovers
- Store any leftover grilled cheese sandwiches in an airtight container in the refrigerator.
- Consume within 2-3 days for the best flavor and texture.
- To keep the bread from getting too soggy, you might want to place a paper towel in the container.
Freezing
- Assemble the sandwiches without cooking them, and wrap each one tightly in plastic wrap.
- Place wrapped sandwiches in a freezer-safe bag or container.
- Freeze for up to 2 months for optimal freshness.
Reheating
- For best results, reheat leftovers on a skillet over low-medium heat until warmed through and crispy on the outside.
- Alternatively, you can microwave them for about 30 seconds to 1 minute, but this may result in softer bread.
FAQs
Here are some common questions about our delicious Bacon, Pear and Fig Grilled Cheese:
Can I make Bacon, Pear and Fig Grilled Cheese without bacon?
Absolutely! You can substitute bacon with crispy tempeh or smoked tofu for a similar savory flavor that complements the sweetness of the pear and fig.
What cheese works best for Bacon, Pear and Fig Grilled Cheese?
While white cheddar is fantastic, you could also try gouda or havarti for a creamy texture that pairs well with the other ingredients.
How do I achieve the perfect crispiness with my Bacon, Pear and Fig Grilled Cheese?
The key is to cook your sandwich over medium heat and press down gently. This will ensure even melting of the cheese while achieving that golden-brown crust!
Can I prepare Bacon, Pear and Fig Grilled Cheese ahead of time?
Yes! You can assemble them ahead of time and store them properly. Just follow the storing instructions for optimal taste when reheating later.
Final Thoughts
I hope you find joy in creating this delightful Bacon, Pear and Fig Grilled Cheese! It’s not just a sandwich; it’s a warm hug on a plate. Whether you’re enjoying it as a quick lunch or sharing it with family at dinner, I am sure you’ll fall in love with these amazing flavors. Don’t forget to let me know how yours turns out—I can’t wait to hear from you!
Turkey, Pear, and Fig Grilled Cheese

If you’re in search of a deliciously unique spin on the classic grilled cheese, this Turkey, Pear, and Fig Grilled Cheese is a must-try. This easy-to-make sandwich harmoniously blends sweet and savory flavors, creating a comforting meal perfect for busy weeknights or special family gatherings. The combination of melty white cheddar cheese with sweet pear slices and fig jam offers a gourmet experience without any fuss. With just a few simple ingredients and minimal prep time, you’ll have everyone coming back for seconds. Get ready to indulge in this mouthwatering delight!
- Prep Time: 5 minutes
- Cook Time: 10 minutes
- Total Time: 15 minutes
- Yield: Makes 2 sandwiches 1x
- Category: Dinner
- Method: Frying
- Cuisine: American
Ingredients
- 2 tablespoons mayonnaise
- 4 large slices sourdough bread
- 3–4 ounces white cheddar cheese, thinly sliced or shredded
- 3–4 strips turkey bacon (or plant-based bacon), cooked and cut into quarters
- 1 pear, thinly sliced
- 2 tablespoons fig jam or thinly sliced dried figs
Instructions
- Spread mayonnaise on one side of each slice of sourdough bread.
- On the non-mayo side of one slice, layer cheese, fig jam, pear slices, turkey bacon, more cheese, and top with another slice of bread (mayo side out).
- Heat a skillet over medium heat (about 325°F). Place the sandwich in the pan and gently press down. Cook for 1-2 minutes until golden brown; flip and repeat.
- Once both sides are crispy and golden, transfer to a cutting board. Slice in half to reveal the layers.
Nutrition
- Serving Size: 1 sandwich (198g)
- Calories: 520
- Sugar: 9g
- Sodium: 780mg
- Fat: 25g
- Saturated Fat: 10g
- Unsaturated Fat: 12g
- Trans Fat: 0g
- Carbohydrates: 56g
- Fiber: 3g
- Protein: 22g
- Cholesterol: 55mg