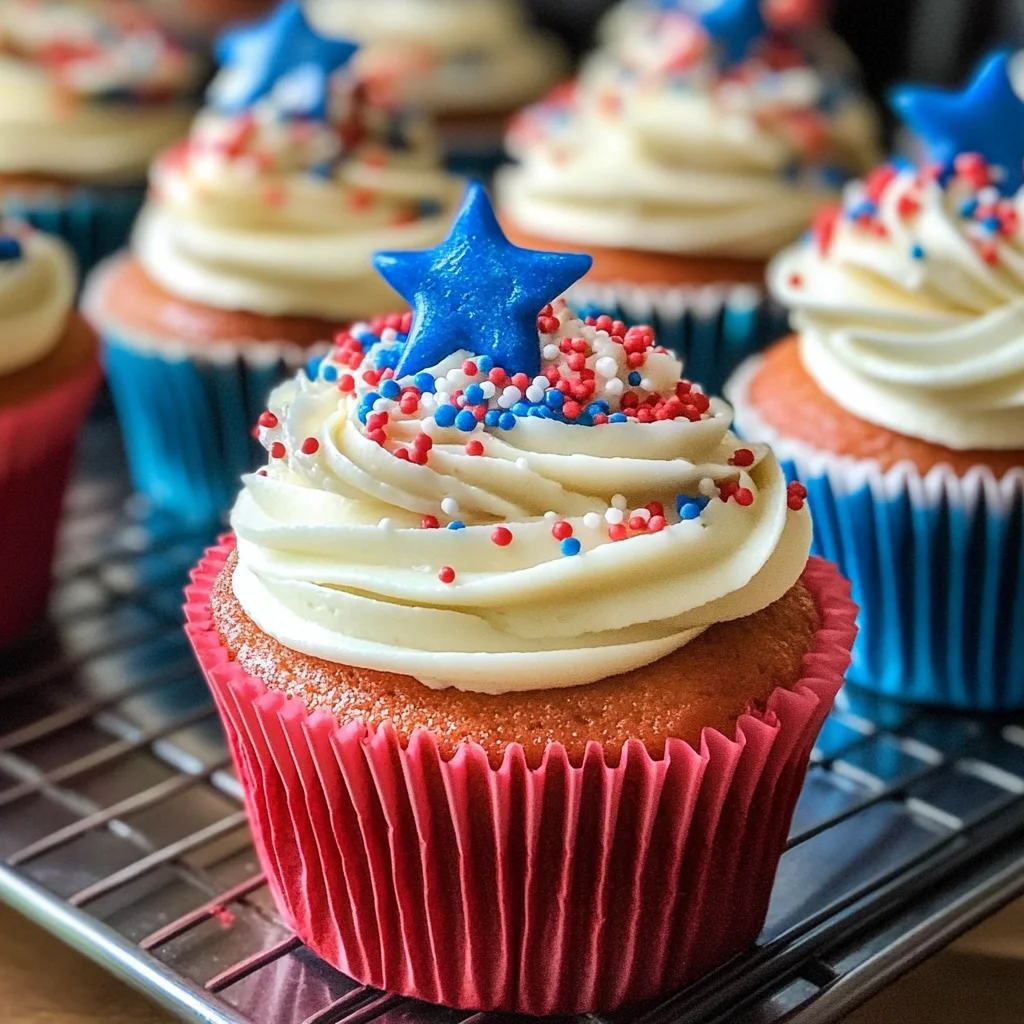
Red White and Blue Patriotic Cupcakes
There’s something absolutely magical about baking that transcends the mere act of mixing ingredients. It’s a journey, a heartfelt experience that brings us closer to our loved ones, especially during special occasions like the Fourth of July. The scent of sweet vanilla wafting through your kitchen as cupcakes rise in the oven evokes memories of summer barbecues and laughter shared with friends and family. These Red White and Blue Patriotic Cupcakes are more than just dessert; they’re a celebration of freedom, joy, and community. Each delightful layer represents the colors of our flag, bringing not only sweetness to our palates but also a sense of pride and togetherness. With every bite, you’re transported to those sun-soaked days filled with fireworks, parades, and heartfelt camaraderie.
I’ve always been captivated by how food can encapsulate emotion and tradition. That’s why I’m thrilled to share this recipe with you! It’s incredibly easy to whip up these vibrant cupcakes using a boxed cake mix as your base while infusing it with love and a few tweaks to elevate it into something truly extraordinary. Trust me when I say that once you’ve made these cupcakes, they will become an annual tradition in your household. The layers of red, white, and blue are visually stunning, creating a dessert that is as beautiful as it is delicious. So grab your apron, gather your ingredients, and let’s embark on this sweet adventure together!
Red White and Blue Patriotic Cupcakes: Celebrate Freedom with Every Bite!
These Red White and Blue Patriotic Cupcakes are perfect for showcasing your American pride while indulging in delightful flavors that will leave everyone wanting more. As we prepare to celebrate Independence Day or any summer gathering, these cupcakes will undoubtedly steal the show at your dessert table.
Ingredients:
As we dive into this culinary journey together, let’s take a moment to appreciate each ingredient that plays its part in crafting these festive cupcakes. Each element has its own unique contribution that elevates the overall taste and texture.
1 box (15.25 oz) white cake mix. This is where our cupcake magic begins! A boxed cake mix offers convenience without sacrificing flavor—an ideal choice for those who want to spend less time measuring flour but still crave homemade goodness. Look for one that uses high-quality ingredients—this will make all the difference in flavor and texture.
4 egg whites (as called for + one extra). Egg whites are critical for achieving that light and airy lift in your cupcakes. By adding an extra egg white, you’re enhancing moisture content without adding too much fat, which results in fluffy cupcakes that aren’t dense or heavy.
1/2 cup (1 stick) butter. Instead of oil as directed by the box instructions, melting butter gives our cupcakes a richer taste and adds moisture—a non-negotiable detail for those seeking buttery goodness in their baked goods!
1 cup whole milk. This ingredient is key for achieving a tender crumb! By substituting milk for water (as many boxed mixes suggest), we’re enriching the batter with creaminess that contributes to an utterly intoxicating flavor profile.
Red food coloring gel. The vibrant hue created by this gel helps capture the spirit of Independence Day! Using gel instead of liquid food coloring means more intensity without adding excess moisture—so go heavy here; we want those bold colors to shine after baking.
Blue food coloring gel. Just like red, this gel adds beautiful color to our cupcake layers while ensuring they maintain their structure during baking—after all, we want those patriotic stripes!
Non-stick spray or paper liners. Whether you choose spray or liners depends on your preference; both ensure easy removal from tins! I always recommend liners because they add another layer of charm while making cleanup effortless.
*2 sticks unsalted butter (softened). * For our frosting! This is crucial because softened butter whips beautifully into a creamy base that holds air well—creating an airy frosting that pairs perfectly with our cupcakes.
1/4 teaspoon salt. A small yet mighty addition! Salt enhances sweetness by balancing flavors—it’s like giving your dish an unexpected twist that makes every bite profoundly satisfying.
1 teaspoon vanilla extract. Vanilla brings warmth and depth to our frosting; it’s an aromatic hug wrapped around each cupcake creating familiarity that’s comforting and nostalgic.
6 cups confectioners’ sugar (sifted). This sugary fluff creates the body of our frosting—sifting ensures there are no lumps so we achieve that smooth consistency essential for perfect piping!
1 – 2 tablespoons whole milk. Adjust as necessary! Adding milk thins out the frosting slightly so it becomes spreadable while maintaining stability—a vital aspect when decorating those lovely layers!

Equipment You’ll Need:
Baking is truly an art form where having the right tools can make all the difference between success and frustration. Just like an artist needs their brushes and canvas, you’ll need specific equipment to help you create these festive Red White and Blue Patriotic Cupcakes seamlessly!
A large mixing bowl. A sturdy bowl is essential for combining your cake batter easily – look for one that’s big enough so you have room to whisk without spilling over the edges!
A whisk or electric mixer. While whisking by hand can be therapeutic (and great exercise!), an electric mixer makes life infinitely easier when it comes time to cream butter or whip up fluffy frosting quickly – I promise you’ll thank me later!
A muffin tin. You’ll need this trusty companion to house your cupcake batter while they bake beautifully into shape. If possible, opt for non-stick versions to ensure easy release post-baking.
Cupcake liners or non-stick spray. As mentioned above—these will help keep your cupcakes intact while also adding visual appeal!
*A piping bag (or plastic storage bag). * When it’s time to frost those beauties! Piping bags give you control over design; however, if you’re feeling creative without investing in specialty tools—a storage bag with one corner snipped off works wonders too!
Now that we’ve gathered all our ingredients and equipment like old friends reunited for a feast let’s dive into creating these delightful Red White and Blue Patriotic Cupcakes together!
Step 1: Preheat Your Oven & Prepare Your Tins
The first step is crucial: preheating your oven ensures even cooking from start to finish. Set it at 350 degrees Fahrenheit—or whatever temperature your boxed cake mix recommends—and let it warm up while you get everything else ready. Meanwhile, prepare your muffin tin by either spraying it generously with non-stick spray or lining each cup with festive paper liners; trust me when I say nothing feels better than peeling away a perfectly baked cupcake from its cozy little home without any sticky mishaps!
Step 2: Mix Your Batter
Now grab that large mixing bowl! Combine all ingredients according to package instructions but remember our modifications: add one extra egg white instead of whole eggs—this enhances fluffiness—and replace water with whole milk along with melted butter doubling what oil would typically be required. Mixing should take just a few minutes until everything blends into dreamy perfection resembling silky liquid gold—it’s absolutely paramount not to overmix here; stop once combined—this preserves tenderness throughout baking.
Step 3: Divide & Color Your Batter
Once mixed thoroughly yet gently—you’ll divide this luscious batter evenly amongst three bowls—the magic happens next as you introduce color! Into one bowl add blue food coloring gel until desired vibrancy emerges; repeat this step using red gel on another bowl yet leave the third original batch untouched—it forms our ‘white’ layer! Remember—a little goes a long way here; aim high on saturation since colors lighten slightly during baking.
Step 4: Layering Is Key
Grab those prepared muffin tins again—it’s finally time to layer! Using a tablespoon measure out one tablespoonful of blue batter first into each liner gently spreading across bottom surfaces evenly before repeating layering technique using white then red batters respectively until each cup reaches two-thirds full—that’s right folks: two-thirds full only—we want room left for rising magic during baking time later on!
And there you have it—the beginning steps toward creating these stunning Red White and Blue Patriotic Cupcakes! We’ll continue layering flavors beautifully into every bite as we proceed through subsequent steps shortly…
Baking Your Perfect Red White and Blue Patriotic Cupcakes
Step 5: Layering the Colors with Care
Now comes the truly exciting part—layering our vibrant batter! Take a moment to appreciate the colors before diving in. Using a tablespoon, gently spoon one tablespoon of your blue batter into each cupcake liner or tin. This step is crucial because it sets the stage for that stunning layered effect once baked. You want to ensure that each layer is even and neat, so take your time here; don’t rush it! After you’ve placed the blue batter, follow with one tablespoon of the white batter, pouring it gently on top of the blue. Finally, finish off with a tablespoon of the red batter. It might feel like a bit of an art project, but trust me, it’s worth every second! The colors will create a mesmerizing striped effect as they rise in the oven. Aim to fill each cup about two-thirds full; this allows room for the cupcakes to rise beautifully without overflowing.
Step 6: Baking to Perfection
Once your cupcakes are filled and looking oh-so-pretty, it’s time to bake them to golden perfection! Slide your tray into the preheated oven and set your timer according to the box instructions—usually around 18 to 22 minutes. However, don’t just rely solely on time; keep an eye out for visual cues that signal readiness. The tops should look slightly domed and spring back when lightly pressed with a fingertip; if they sink, they need more time. This baking process transforms our wet batter into fluffy little cakes infused with layers of flavor—a truly magical transition! Remember that every oven is different; if you find that your cupcakes are browning too quickly, you can rotate them halfway through baking to ensure even cooking.
Step 7: Cooling Down
Once your cupcakes have finished baking and have reached that perfect golden hue, it’s essential to let them rest for about two minutes in the pan before transferring them to a cooling rack. This brief resting period allows them to firm up slightly, making them easier to remove without causing any damage. Be gentle as you transfer them; use a small spatula or simply tip them out carefully if you’re using liners. Placing them on a wire rack is non-negotiable because it allows air circulation around all sides—preventing sogginess from steam buildup while cooling. Trust me on this: letting these beauties cool completely is key before frosting them! If you rush this step and frost while they’re still warm, you’ll end up with melted frosting gliding off rather than sitting pretty atop your cupcakes.
Step 8: Whipping Up That Heavenly Frosting
With your cupcakes now cool to perfection—let’s make our frosting! In a large mixing bowl (a stand mixer works wonders here), whip those two sticks of softened butter until they’re creamy and have transformed into a pale shade of yellow—this could take about 3-5 minutes on high speed. The reason we start with butter alone is simple: we want to incorporate as much air as possible for that light and fluffy texture everyone loves in frosting. Next, gradually add in your sifted confectioners’ sugar—this could be quite messy if added too quickly—so take it slow and steady! Mix until combined before adding in your salt, vanilla extract for that warm aroma, and just enough whole milk (start with one tablespoon) until you reach that smooth consistency that’s easy enough to pipe but thick enough to hold its shape. You want it rich yet spreadable—a fine balance of indulgence!
Final Touches
Step 9: Frosting Your Creations
Now comes the moment we’ve all been waiting for—the decoration! Time to showcase our patriotic spirit! Spoon your luscious frosting into a piping bag fitted with your favorite decorative tip (a star tip works wonders for those beautiful swirls). If you don’t have piping bags handy, no worries! Just snip off one corner of a resealable storage bag—it’s an excellent alternative! Start by frosting your cupcakes from the outside edge and work inward in circular motions; this technique not only looks beautiful but also ensures an even distribution of frosting across each cupcake’s surface.
As you pipe each swirl of frosting atop those colorful treats, I promise you’ll feel an overwhelming sense of pride at how gorgeous they look! And let’s not forget—the final touch can be as fun as you make it: sprinkle some edible glitter or stars on top for that festive flair or scatter some fresh berries on top for an extra burst of flavor. Whatever you decide will bring these Red White and Blue Patriotic Cupcakes over the top! Allow these delightful confections to sit for just a few minutes at room temperature before serving so that all those flavors meld together beautifully.
And there you have it—your very own batch of stunning Red White and Blue Patriotic Cupcakes ready to dazzle at any summer gathering or Fourth of July celebration! These delightful treats aren’t just visually captivating; they represent joy and celebration wrapped up in each bite. Enjoy every moment baking these beauties because sharing them with friends and family will undoubtedly create memories filled with laughter and delight!
Storage and Enjoyment Tips for Your Red White and Blue Patriotic Cupcakes
Now that your Red White and Blue Patriotic Cupcakes are beautifully frosted and ready to dazzle, let’s talk about how to keep that festive spirit alive! I can feel the excitement as you prepare to share these delightful treats with friends and family. But what happens if there are leftovers? Fear not, my friend! These cupcakes can be enjoyed long after the last sparkler has fizzled out. With just a few simple tips, you can ensure they stay fresh and delicious, ready to be enjoyed whenever the craving strikes.
Storing Leftover Red White and Blue Patriotic Cupcakes
To maintain the vibrant colors and flavors of your cupcakes, it’s essential to store them properly. The best option is to place them in an airtight container, which will protect them from drying out. If you have any leftover frosting, I’d recommend separating it into a smaller container so it stays fluffy and fresh for your next cupcake adventure. These cupcakes will keep well at room temperature for up to three days—trust me, they won’t last much longer than that! For even better flavor retention, you could pop a slice of bread in the container; this little trick helps maintain moisture while adding that nostalgic bakery feel. After a day or two, they might lose a bit of their original fluffiness, but honestly? They still taste utterly divine! If you want to serve them after storage, let them come back to room temperature; the flavors will bloom again with every bite.
Freezing Red White and Blue Patriotic Cupcakes for Later
If you’re thinking ahead or simply want to savor these cupcakes at another time, freezing is a fantastic option! To freeze your cupcakes like a pro, allow them to cool completely before wrapping each one individually in plastic wrap. Then, place them in a freezer-safe bag or container—this prevents freezer burn and keeps those gorgeous layers intact. They can be safely stored in the freezer for up to three months without losing their charm! When you’re ready for a taste of summer festivities again, just pull one (or two!) out from the freezer and let them thaw at room temperature for about 30 minutes. This convenience means you can always have a piece of celebratory sweetness on hand, whether it’s an impromptu gathering or just a cozy evening treat.
How wonderful is it that with these simple preservation methods, your Red White and Blue Patriotic Cupcakes can continue spreading joy long after the Fourth of July?
Red White and Blue Patriotic Cupcakes
Red White and Blue Patriotic Cupcakes are a delightful way to celebrate summer festivities and showcase your American spirit. These vibrant cupcakes, layered with rich red, white, and blue batters, not only look stunning but also offer a deliciously moist and fluffy texture. Perfect for the Fourth of July or any gathering, each bite evokes memories of sunshine, laughter, and togetherness. With an easy-to-follow recipe that utilizes a boxed cake mix as the base, these cupcakes are both convenient and festive. Gather your loved ones in the kitchen for a fun baking adventure that will create sweet memories to cherish.
- Prep Time: 20 minutes
- Cook Time: 20 minutes
- Total Time: 40 minutes
- Yield: Approximately 24 cupcakes 1x
- Category: Dessert
- Method: Baking
- Cuisine: American
Ingredients
- 1 box (15.25 oz) white cake mix
- 4 egg whites + 1 extra egg white
- 1/2 cup unsalted butter (melted)
- 1 cup whole milk
- Red food coloring gel
- Blue food coloring gel
- 2 sticks unsalted butter (softened) for frosting
- 6 cups confectioners’ sugar (sifted)
- 1 teaspoon vanilla extract
Instructions
- Preheat your oven to 350°F (or as directed on the cake mix box). Prepare muffin tins with liners or non-stick spray.
- In a large mixing bowl, combine cake mix, egg whites, melted butter, and milk. Mix until just combined.
- Divide batter into three bowls. Color one with red gel and another with blue gel, leaving one plain for the white layer.
- Layer one tablespoon of blue batter in each cupcake liner, followed by one tablespoon of white batter, and finish with one tablespoon of red batter. Fill each liner two-thirds full.
- Bake for 18-22 minutes or until domed and springy to the touch. Cool in pans for two minutes before transferring to a wire rack.
- For frosting: Beat softened butter until creamy, then gradually add sifted confectioners’ sugar. Mix in salt, vanilla extract, and enough milk to achieve a smooth consistency.
- Frost cooled cupcakes using a piping bag or storage bag with a corner snipped off.
Nutrition
- Serving Size: 1 cupcake (70g)
- Calories: 320
- Sugar: 30g
- Sodium: 180mg
- Fat: 14g
- Saturated Fat: 8g
- Unsaturated Fat: 4g
- Trans Fat: 0g
- Carbohydrates: 45g
- Fiber: <1g
- Protein: 3g
- Cholesterol: 35mg