Mexican Eggs Benedict
In the realm of culinary delights, there’s something irresistibly enchanting about a dish that feels like a warm hug on a Sunday morning. Today, I want to share a recipe that does exactly that: Mexican Eggs Benedict. This isn’t just breakfast; it’s a joyful celebration of flavors and textures that will transport you to sun-drenched patios and lively brunches with friends. Imagine the sweet, nutty notes of grilled butternut squash mingling with creamy avocado, perfectly poached eggs, and a spicy kick from chipotle hollandaise that dances on your palate. Each bite is a tapestry of vibrant ingredients woven together to create an experience that’s not just satisfying but utterly unforgettable.
Mexican Eggs Benedict is more than just a creative twist on a classic; it’s an invitation to explore the beautiful fusion of traditional brunch fare with bold Mexican flavors. When I first stumbled upon this recipe, I was struck by how seamlessly it merged familiar elements—like poached eggs and hollandaise—with ingredients that evoke warmth and joy, such as avocado and chipotle. It’s perfect for lazy weekends or whenever you’re in need of comfort food with a twist. Trust me when I say that once you dive into this dish, you’ll find yourself making it time and again, perhaps even customizing it with your favorite toppings or spices. So roll up your sleeves, gather your ingredients, and let’s embark on this delicious journey together!
Mexican Eggs Benedict: A Flavorful Twist on Tradition
Picture this: the sun slowly rising as you prepare your kitchen for a delightful brunch moment. The air is filled with anticipation as you gather the vibrant ingredients for your Mexican Eggs Benedict—each one promising to contribute to the magic we’re about to create. This dish invites you to explore flavors both familiar and new, combining texture and spice in ways that will leave everyone at your table smiling ear to ear.
Ingredients:
As we embark on this culinary journey together, let’s take a moment to appreciate each ingredient’s role in crafting our stunning Mexican Eggs Benedict. Each component has its personality and story, elevating our dish from ordinary to extraordinary.
- 1 butternut squash. The star of our plate! Butternut squash brings a lovely sweetness and creamy texture when grilled. Its vibrant orange hue not only pleases the eye but also provides essential vitamins A and C while being naturally gluten-free. When selecting squash, look for one that’s firm with no soft spots—this indicates freshness. Peeling it may seem daunting at first, but trust me; it reveals tender flesh that’s worth every effort.
- 1 tablespoon olive oil. This golden elixir serves multiple purposes in our recipe—it enhances flavor while providing moisture to the grilled squash slices. Quality matters here: extra virgin olive oil has more nutrients than refined oils and adds depth to our dish’s flavor profile. As you brush it onto those beautiful squash slices before grilling, think of how it’ll caramelize slightly on the grill—creating those mouthwatering char marks.
- 1 large avocado, mashed. Avocados bring creaminess without dairy—a delightful addition that binds all components together while adding healthy fats! They are rich in potassium and fiber too! When choosing an avocado, opt for one that gives slightly when pressed gently; that’s how you’ll know it’s ripe and ready for mashing into smooth perfection.
- 170 grams ground chicken sausage (approximately 5 chicken sausage links, casings removed). This lean protein adds heartiness without overwhelming flavors typical of pork sausages; it’s absolutely perfect for balancing our vibrant dish! Look for sausages made from high-quality meat with minimal fillers or additives for the best taste—it’s important because the quality of meat directly impacts flavor.
- 4 large eggs. What would any Eggs Benedict be without perfectly poached eggs? They provide richness through their silky yolks that are pure magic when broken open! When selecting eggs, fresh is key—look for ones with bright yellow yolks which indicate freshness.
- 1 teaspoon white vinegar. This little gem plays an essential role in helping our egg whites set beautifully during poaching! It’s non-negotiable if you want those picture-perfect eggs with tender whites enveloping runny yolks.
- 1 jalapeño, sliced. For those who crave heat (and who doesn’t?), sliced jalapeños add excitement! Their mild spiciness complements other flavors beautifully; plus, they add color both visually and in taste!
- 1 tablespoon chopped cilantro. Fresh cilantro brings brightness to our dish—its unique flavor cuts through richness while adding freshness reminiscent of sunny Mexican markets!
- 2 egg yolks. These are key players in creating our chipotle hollandaise sauce! Rich in flavor yet light enough not to weigh down our dish—the emulsification process makes them crucial here.
- 1/4 teaspoon salt. Often overlooked but absolutely paramount! Salt enhances every single flavor present—not too little nor too much is critical!
- 1 tablespoon lime juice. Fresh lime juice adds acidity which balances richness beautifully—it’s like sunshine on your plate!
- 1 tablespoon chipotle paste (or 1 teaspoon chipotle powder). Here’s where things get exciting! Chipotle brings smokiness plus heat; it transforms ordinary hollandaise into something truly extraordinary!
- 1/4 cup hot melted butter or ghee (suitable for Paleo/Whole30 diets). Liquid gold! This will elevate our hollandaise sauce into velvety perfection while adding depth we all crave—opt for high-quality butter or ghee for optimal results.

Equipment You’ll Need:
Having the right tools makes cooking feel less like a chore and more like an adventure! Think of these pieces as essential partners in creating something wonderful together—they’ll ensure every step flows smoothly so we can enjoy the journey as much as the destination.
- Grill or Grill Pan – The grill is your best friend here; it imparts beautiful charred flavors to our butternut squash while keeping it tender inside! If you don’t have access to an outdoor grill, don’t fret—a grill pan will work wonders too!
- Immersion Blender or Regular Blender – These are crucial when whipping up our chipotle hollandaise sauce! An immersion blender allows you to blend directly in the container which saves time cleaning up afterwards—but feel free to use any blender if that’s what you’ve got!
- Slotted Spoon – Essential for retrieving those perfectly poached eggs without breaking them apart—you’ll thank me later when they land delicately atop your beautiful stacks rather than splattering everywhere!
Now that we have everything prepped let’s dive into preparing the Mexican Eggs Benedict—the real fun begins here!
Step 1: Prepare Your Butternut Squash
Before anything else can happen in this delightful dance of flavors, we need to prepare our butternut squash—which serves as both base and centerpiece of our dish! Begin by peeling away its tough skin using a sturdy vegetable peeler (don’t rush this step!). Once peeled, slice off the neck part into half-inch thick rounds—the goal here is uniformity so they cook evenly on the grill.
Heating your grill until it’s medium-high ensures those beautiful char marks form quickly without overcooking them inside—a crucial balance we’re aiming for! Brush both sides generously with olive oil before placing them directly onto the preheated grill grates; listen closely for that satisfying sizzle—it means you’re well on your way! Grill each side for about 5–6 minutes until tender yet still holding shape—look out for those gorgeous grill marks as visual cues indicating they’re ready to come off.
Once grilled perfection is achieved (I promise you’ll be reveling in their aroma!), transfer these slices onto an oven set on low heat while we turn our attention elsewhere—to keep them warm without drying out—because nobody wants sad squash at brunch!
Step 2: Make Your Chipotle Hollandaise Sauce
Now comes one of my favorite parts—the creation of that luscious chipotle hollandaise sauce which will drape over everything like liquid gold! In a tall container (or regular blender), combine two egg yolks along with salt—you want everything mixed together nicely before bringing heat into play through emulsification later on.
Next up is lime juice followed by either chipotle paste or powder depending on what you’ve chosen—both options bring different notes but trust me when I say either choice will result in something utterly intoxicatingly delicious!
This blending process lasts only thirty seconds using an immersion blender—you’ll see everything transform before your eyes into creamy goodness ready for butter addition soon after! Now here comes another crucial step: slowly drizzle hot melted butter or ghee into this mixture while blending continuously until smooth—that silky texture should emerge beautifully before you know it!
Step 3: Cook Your Chicken Sausage
With all components prepared thus far let’s move onto cooking up some flavorful ground chicken sausage—we want these crumbles cooked through yet still juicy enough not dry out completely during their transformation process from raw meat balls into delightful morsels bringing hearty satisfaction alongside everything else we’re putting together today.
In a pan over medium heat (make sure it’s nice & hot!), break apart any larger clumps using a fork until browned evenly throughout—this usually takes about 7–10 minutes total time depending upon initial chunk sizes chosen prior—but do keep an eye out because nobody likes burnt sausage lurking around either!
As they finish cooking delightfully golden brown around edges consider tasting one piece just make sure seasoning levels are right where desired—you never want blandness creeping into such flavorful dishes after all!
Step 4: Poach Your Eggs
Now onto perhaps one of my personal favorite steps—the artful practice known as poaching eggs which can seem intimidating at first glance but trust me once mastered becomes second nature over time—you’ll impress everyone around without fail once perfected!
Start by filling up a pot with approximately three inches worth water then bring it all boiling away cheerfully—it needs sufficient depth so egg whites have room enough swirl freely whilst cooking gently within water bath provided ahead later down line too… After boiling occurs add white vinegar directly into bubbling water which helps hold shape during cooking process itself (non-negotiable step!).
Once boiled nicely reduce heat down toward medium-low setting allowing gentle simmering action instead—we want delicate rather than aggressive boiling motion happening now at this stage since it’ll give us better results overall ensuring no rubbery textures appear post-cooking phase either way… Create whirlpool effect within pot using spoon then gently crack open one egg allowing its contents land gently inside center whirlpool created beforehand—that’s how we’ll achieve pretty round shapes effortlessly without worry about losing forms amidst chaos otherwise potentially occurring otherwise here too…
Let each egg swim peacefully around within simmering waters until four minutes pass by before scooping them out carefully using slotted spoon ensuring excess water drains away nicely first before placing upon prepared plates awaiting final assembly moments ahead soon thereafter…
I hope you’re feeling inspired already by what awaits next as we assemble these gorgeous plates brimming full hearty goodness soon enough right now too… Stay tuned because this meal deserves nothing less than perfect presentation amidst all deliciousness promised throughout entire experience ahead—and please don’t forget garnish touches afterward giving even more character towards finished product finally arriving shortly thereafter here soon enough until then…
Step 5: Crafting the Creamy Chipotle Hollandaise
Ah, the hollandaise! This luscious sauce is what truly brings our Mexican Eggs Benedict to life, infusing each bite with a creamy richness that’s utterly intoxicating. To start, gather your tall container—this step is crucial because it allows for easy blending and emulsification of the ingredients. Add in the two egg yolks, the salt, lime juice, and chipotle paste. You might be wondering, “Why chipotle?” Well, this smoky ingredient not only enhances the flavor but also gives a delightful warmth that complements our other ingredients beautifully. Using an immersion blender (my favorite kitchen gadget!), blend these ingredients together for about 30 seconds until they’re well combined and frothy. This initial blending introduces air into the mixture, which is vital for achieving that silky texture we all crave.
Next comes the magic moment where we add our melted butter or ghee—the liquid gold that transforms this simple egg mixture into a decadent sauce. It’s important to drizzle it in slowly while continuing to blend; this gradual process helps to emulsify the fats with the yolks, creating a thick, creamy sauce that won’t separate. If you’re using a regular blender instead of an immersion one, just be careful not to overdo it—blending too much can result in a sauce that’s too thin instead of luxuriously thick. As you blend, keep an eye on the consistency; it should be smooth and velvety with a beautiful sheen. Trust me on this step—perfecting your hollandaise will elevate your brunch game to new heights!
Step 6: Cooking Up Flavorful Chicken Sausage
Now that we have our dreamy hollandaise ready to go, let’s turn our attention to cooking the chicken sausage. In a medium-sized skillet over medium heat, add your ground chicken sausage straight from its casing—don’t worry if it looks clumpy at first; we’ll break it up as it cooks. Use a fork or spatula to crumble it gently into smaller pieces as it heats up. You’ll want to cook it for about 7-10 minutes until it’s fully browned and cooked through—you’ll know it’s done when there’s no pink remaining and those little bits are starting to get crispy on the edges. The key here is patience; don’t rush this step! Allowing those sausage crumbles to develop a golden-brown crust adds depth and flavor that will make every bite of your Mexican Eggs Benedict something truly extraordinary.
As you cook, enjoy the enticing aroma wafting through your kitchen—a sign that you’re well on your way to creating something special! Be sure to stir occasionally so nothing sticks or burns; this not only ensures even cooking but also releases those delicious bits stuck at the bottom of the pan—those little flavor nuggets are gold! Once fully cooked, transfer your savory sausage onto a plate lined with paper towels to absorb any excess grease while you prepare for poaching those eggs.
Step 7: The Art of Poaching Eggs
Poaching eggs might seem daunting at first glance, but I promise you it’s simpler than it sounds—and oh-so-rewarding! Start by filling a pot with about three inches of water and bring it to a gentle boil over medium-high heat. Once boiling, add in one teaspoon of white vinegar; this is absolutely paramount as it helps the egg whites coagulate quickly when they hit the water, ensuring beautifully shaped poached eggs that hold together nicely instead of turning into wispy whites floating around like lost clouds.
Reduce your heat so that the water maintains a gentle simmer—this calm bubbling rather than rolling boil is essential for perfect poaching. Now comes my favorite part: creating a whirlpool! Stir the water vigorously with a spoon until you form a small vortex in the center—it’s like magic watching how this technique pulls the egg whites around their yolk when you drop them in! Crack one egg into a small bowl first (this allows you more control) and then gently slide or drop it right into the center of your whirlpool. Letting it cook for about four minutes will yield perfect soft-boiled eggs with runny yolks—just imagine cutting into them later and watching that golden goodness flow out onto your delicious stack.
As you’re waiting for those eggs to reach their zenith of doneness (which you can check by gently lifting them out with a slotted spoon), remember: practice makes perfect! If you’re unsure whether they’re ready after four minutes, use your spoon to gently nudge one aside; if they feel set but still slightly jiggly in the middle—that’s just right! Repeat this process for each egg while keeping an eye on timing so they all finish close together—a little challenge that makes gathering everyone around the table even more rewarding!
Step 8: Assembling Your Masterpiece
Now comes my absolute favorite part: assembling all these incredible components into something visually stunning and deliciously satisfying—the grand reveal of our Mexican Eggs Benedict! Start by placing two beautifully grilled slices of butternut squash on each plate—these will serve as our hearty base. They provide not just structure but also sweetness and depth from grilling; their caramelization creates a wonderful contrast against our other bold flavors.
Next up is slathering on generous dollops of mashed avocado atop each squash slice. This creamy green layer adds richness while providing healthy fats that complement everything else so perfectly—trust me when I say this combination is nothing short of heavenly! Now sprinkle some warm chicken sausage over each avocado layer; its savory spiced notes harmonize beautifully with both squash and avocado whilst adding textural variety.
Finally, we crown each creation with perfectly poached eggs—a sight so beautiful you’ll want to take photos before digging in (and don’t forget to grab some napkins!). Drizzle those luscious chipotle hollandaise generously over everything—it’s okay if some drips down onto your plate; consider it sauce love! For added freshness and crunch, garnish with sliced jalapeños and chopped cilantro—the pop of color brightens up your dish visually while adding another layer of flavor complexity that’ll have everyone swooning!
Final Touches: Savor Every Bite
There you have it—the finished masterpiece known as Mexican Eggs Benedict! The vibrant colors alone are enough to make anyone’s mouth water, but once you take that first bite? Oh my goodness—it’s like an explosion of flavors dancing joyfully on your palate! Each element plays its part harmoniously in this symphony of flavors—from smoky chipotle hollandaise enveloping rich yolks bursting forth with liquid sunshine alongside sweet squash mingling effortlessly beneath layers upon layers of textures.
So now I encourage you: gather friends or family around as you serve up these beauties—they’re truly meant for sharing! And remember: don’t rush through enjoying your food; savor every single bite because trust me when I say these moments spent enjoying good food with loved ones? They’re what life is all about! Enjoy making memories as much as indulging in such delectable delights—I promise you’ll find yourself returning again and again for more incredible brunch experiences down the line! Happy cooking!
Storage and Enjoyment Tips for Your Mexican Eggs Benedict
Now that you’ve crafted this vibrant Mexican Eggs Benedict, the moment of enjoyment is just around the corner! I can almost hear the sizzle of that chipotle hollandaise as you drizzle it over your perfectly poached eggs, and the sight of those beautifully stacked butternut squash slices is enough to make anyone’s mouth water. But what happens when you have leftovers? Fear not! Just like a cherished family recipe that keeps on giving, these delightful flavors can be savored another day.
Storing Leftover Mexican Eggs Benedict
To keep your leftover Mexican Eggs Benedict tasting as delicious as the first bite, it’s important to store it properly. Use an airtight container, ideally glass or BPA-free plastic, to minimize any unwanted moisture or odors. If stored correctly in the refrigerator, it should stay fresh for about 2-3 days. Now, here’s a little pro tip: to preserve the texture of your butternut squash slices and prevent them from becoming mushy, place a piece of parchment paper between each layer in your container. Trust me; this small step can make all the difference! The flavors will meld beautifully while stored, creating a slightly different but still utterly delightful dish when reheated. When it’s time to enjoy them again, simply reheat gently in the microwave or enjoy them cold for a refreshing twist!
Freezing Components for Later
If you want to extend the life of your Mexican Eggs Benedict even further, consider freezing some components—like those flavorful grilled butternut squash slices or even the chipotle hollandaise sauce. To freeze properly, make sure everything is thoroughly cooled before transferring to freezer-safe bags or containers. Lay flat if using bags to save space and allow for quicker thawing later on. You can keep them frozen for up to three months without losing too much quality! When you’re ready to indulge again, simply thaw overnight in the fridge and reheat gently on low heat or in a warm water bath for that homemade feel. This makes meal prep a breeze and allows you to enjoy a taste of Mexico any day of the week.
What’s wonderful about these storage tips is that they offer flexibility without sacrificing flavor or enjoyment. So whether you’re savoring your creation today or planning for future feasts, rest assured that every bite will be just as joyous as when you first made it!
Mexican Eggs Benedict

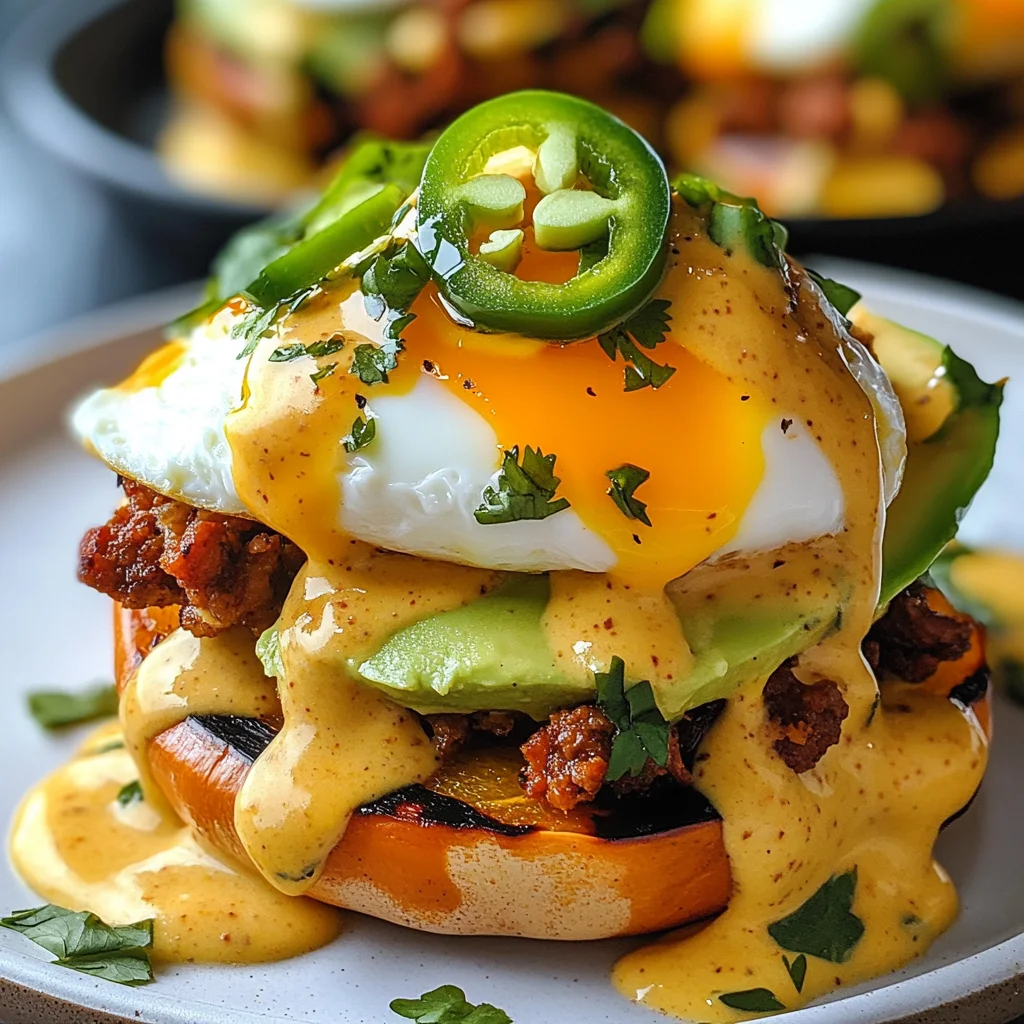
Mexican Eggs Benedict is a vibrant and delightful twist on the classic brunch favorite, perfect for those seeking a unique breakfast experience. This dish features grilled butternut squash slices topped with creamy avocado, savory ground chicken sausage, and perfectly poached eggs, all drizzled with a spicy chipotle hollandaise sauce. Each bite is a celebration of flavors that combine the sweetness of the squash with the richness of the egg yolk and the kick from the chipotle, making it a memorable meal to share with friends or family. Ideal for lazy weekend mornings or any time you crave comfort food with a twist, this recipe invites culinary exploration while remaining easy to prepare.
- Prep Time: 20 minutes
- Cook Time: 30 minutes
- Total Time: 50 minutes
- Yield: Serves 4
- Category: Breakfast
- Method: Grilling/Poaching
- Cuisine: Mexican
Ingredients
- 1 butternut squash
- 1 tablespoon olive oil
- 1 large avocado, mashed
- 170 grams ground chicken sausage
- 4 large eggs
- 1 teaspoon white vinegar
- 1 jalapeño, sliced
- 1 tablespoon chopped cilantro
- 2 egg yolks
- 1 tablespoon lime juice
- 1 tablespoon chipotle paste
- 1/4 cup hot melted butter or ghee
Instructions
- Peel and slice the butternut squash into half-inch rounds. Brush both sides with olive oil and grill on medium-high heat for about 5–6 minutes per side until tender.
- In a blender, combine egg yolks, salt, lime juice, and chipotle paste; blend for about 30 seconds until frothy. Slowly drizzle in hot melted butter while blending until smooth.
- In a skillet over medium heat, cook ground chicken sausage until browned (about 7–10 minutes).
- Poach eggs: Boil water with vinegar, reduce heat to simmer, create a whirlpool, and gently drop in eggs one at a time; cook for about four minutes.
- Assemble by layering grilled squash on plates, topping with mashed avocado, chicken sausage, poached eggs, and drizzle with chipotle hollandaise. Garnish with sliced jalapeños and chopped cilantro.
Nutrition
- Serving Size: 1 plate
- Calories: 482
- Sugar: 3g
- Sodium: 446mg
- Fat: 33g
- Saturated Fat: 11g
- Unsaturated Fat: 20g
- Trans Fat: 0g
- Carbohydrates: 31g
- Fiber: 9g
- Protein: 23g
- Cholesterol: 373mg