Grilled Balsamic Vinaigrette Sandwich Melt: A Flavorful Delight
There’s something utterly enchanting about the way food can transport us to a different time and place, don’t you think? The aromatic waft of grilled chicken mingling with the sweet tang of balsamic vinegar feels like a warm embrace, evoking memories of family gatherings and shared laughter around the dinner table. When I first stumbled upon the concept of a Grilled Balsamic Vinaigrette Sandwich Melt: A Flavorful Delight, it felt like discovering an old recipe tucked away in a beloved cookbook. This isn’t merely a meal; it’s an experience that bridges tradition and modern culinary creativity, making every bite a celebration of flavors. Imagine sinking your teeth into crispy bread enveloping melty cheese, juicy chicken, and fresh herbs – it’s not just food; it’s a symphony of flavors that dances on your palate.
As we prepare to dive into this delightful recipe, I want you to envision the comforting sound of sizzling chicken on the grill and the enticing aroma that fills your kitchen. This sandwich melt is perfect for any occasion – whether you’re hosting friends for dinner, enjoying a cozy night in, or looking for something special to impress your family. The balance of savory, sweet, and herbaceous elements creates an irresistible allure that keeps everyone coming back for more. Trust me when I say that every step in this process is designed to ensure that what you create is not just satisfying but also profoundly memorable.
Ingredients:
Let’s embark on this culinary adventure together! The ingredients we’re using are not only delicious but also vital in crafting the perfect Grilled Balsamic Vinaigrette Sandwich Melt: A Flavorful Delight. Each element plays its part in creating layers of flavor that will have everyone asking for seconds.
- 2 boneless, skinless chicken breasts (about 1 lb), thinly sliced. The chicken is truly the star of this meal; it offers not just protein but also absorbs all those marvelous flavors from our balsamic vinaigrette marinade. Choose fresh chicken breasts with a nice pink hue and no blemishes for optimal tenderness. Thin slices allow for quicker cooking while ensuring each piece is juicy and flavorful—just remember, overcooking can lead to dryness.
- 4 slices provolone cheese. This cheese brings a fantastic creaminess and mild flavor to our sandwich melt! Provolone melts beautifully and creates that gooey sensation we all adore in a grilled sandwich. If you can’t find provolone, consider using fontina or gouda as delightful alternatives that will still give you that luscious melt.
- 4 slices mozzarella cheese. Ah, mozzarella—the classic choice that delivers stretchiness and rich flavor! Fresh mozzarella works wonderfully here if you want something extra creamy, while low-moisture mozzarella provides a firmer texture that’s equally delicious when melted. Both choices harmonize perfectly with the other ingredients.
- 4 hearty sourdough or ciabatta rolls. The type of bread you choose is absolutely paramount to achieving that perfect crunch! Sourdough brings its slightly tangy depth which contrasts beautifully with the sweetness of the balsamic glaze while ciabatta’s airy interior holds up well against all those delicious fillings without getting soggy. Look for rolls with a golden crust; they’ll give us that satisfying crunch we crave!
- 3 Tbsp balsamic vinegar. This ingredient is liquid gold! Balsamic vinegar’s complex sweetness elevates our chicken marinade and adds depth to every bite of our sandwich melt. Opt for high-quality balsamic vinegar; it should be thick and syrupy rather than thin and watery—it’s worth splurging on for this dish!
- 2 Tbsp extra-virgin olive oil, plus more for brushing. Extra-virgin olive oil lends richness to our vinaigrette while helping to achieve that perfect golden-brown crust on our bread during grilling. Always choose an olive oil labeled extra virgin as it signifies quality; it should have vibrant green notes and fruity undertones—this enhances both flavor and health benefits!
- 1 tsp Dijon mustard. Dijon mustard adds a lovely sharpness that balances out the sweetness of the honey (if used) while enhancing overall flavor complexity without overwhelming any one component. It’s crucial in our vinaigrette because it aids in emulsifying the dressing—leading to better coating on our chicken.
- 1 tsp honey (optional). If you opt to add honey, this little touch will enhance sweetness without overtaking other flavors—it marries beautifully with balsamic vinegar’s acidity! If you’re looking for healthier alternatives due to dietary preferences or restrictions, agave syrup could work nicely too!
- 1 clove garlic, minced. Fresh garlic infuses incredible aroma into our marinade—its pungency mellows as it cooks down into sweetness when grilled alongside the chicken—creating such depth in flavor! Make sure you chop finely so it distributes evenly throughout your mixture.
- Salt and freshly ground black pepper, to taste. These two staples may seem simple, but they are absolutely essential! Salt enhances flavors across all ingredients while freshly cracked black pepper adds warmth—a pinch transforms good dishes into great ones!
- 1 Tbsp fresh basil, chopped & 1 Tbsp fresh thyme leaves. Herbs add brightness and freshness! Basil lends an aromatic punch with its sweet notes while thyme introduces earthy undertones; they work together harmoniously here! Always use fresh herbs whenever possible—they’ll elevate your sandwich melt from ordinary to extraordinary!
Equipment You’ll Need:
Before we dive into crafting this delicious sandwich melt, let’s gather some essential equipment! Having the right tools at hand makes everything smoother—and trust me; you’ll appreciate these partners as they help create something truly wonderful.
- Grill pan or skillet: A good-quality grill pan allows us to achieve those beautiful char marks while providing even heat distribution—essential for cooking tender chicken perfectly without burning it! If you don’t have one on hand, any heavy-bottomed skillet works too; just focus on maintaining consistent heat throughout cooking.
- Shallow bowl: For mixing up our marinade smoothly! A shallow bowl allows easy access when coating each slice of chicken evenly—ensuring every piece gets infused with flavor.
- Spatula or tongs: These handy tools are your best friends when flipping your chicken in the pan or transferring sandwiches back onto heat without tearing them apart—essential skills when assembling those glorious melts!
Now that we’ve gathered everything we need let’s get started on preparing our Grilled Balsamic Vinaigrette Sandwich Melt: A Flavorful Delight!
Step 1: Crafting Your Irresistible Marinade
Begin by whisking together 3 tablespoons of balsamic vinegar with 2 tablespoons of extra-virgin olive oil in your shallow bowl—this step is crucial because emulsifying these two creates a luscious dressing that clings beautifully to each piece of chicken! Add in 1 teaspoon of Dijon mustard along with 1 teaspoon of honey if you’re feeling adventurous—a touch of sweetness goes such a long way here! Next comes the minced garlic along with salt and freshly ground black pepper—this combination will captivate your senses as soon as it hits the bowl! Whisk until everything melds together into an inviting blend; trust me—the aroma alone will make you salivate at what’s to come!
Step 2: Marinating Chicken Blissfully
Now it’s time to introduce those thinly sliced boneless skinless chicken breasts into this magical mixture! Toss them gently until they’re completely coated—we want every bite infused with all those tantalizing flavors we’ve created together! Allow them some time at room temperature—about 10–12 minutes—to soak up everything fully before heading over to cook them up on heat later—we’re building layers upon layers here!
Step 3: Toasting Your Bread Like Pros
While your chicken marinates happily away soaking up goodness from its bath, preheat your grill pan over medium-high heat until it’s nice and hot—this ensures beautiful grill marks form quickly while sealing juices inside each piece perfectly during cooking time! Lightly brush both cut sides of each roll with additional olive oil before placing them cut-side down onto warm surfaces; keep an eye out for golden brown color developing—that means they’re ready!
Step 4: Cooking Chicken Until Perfectly Glazed
After you’ve toasted those rolls beautifully golden, remove them from heat momentarily setting aside while adding another drizzle of olive oil back onto your grill pan surface—you want just enough so nothing sticks during cooking phase ahead here! Spread out marinated chicken into an even layer across heated surface then let sit undisturbed initially—we’re aiming for caramelization which adds vibrancy within flavors too after around two-to-three minutes per side depending on thickness observed visually as well till opaque—all done correctly means gorgeous glazed goodness awaits at end result!
Each step builds upon itself like pieces fitting together perfectly within puzzle forming ultimate dining experience awaiting guests gathered around table enjoying delights made from heart warming kitchens flourishing friendships through shared meals filled joy laughter love resilience nourishing souls alike across generations lingering memories always cherished long past moments had been enjoyed fully present today tomorrow forevermore…
Grilling to Perfection: The Art of Melting Cheeses
Step 5: Assemble the Sandwich with Love
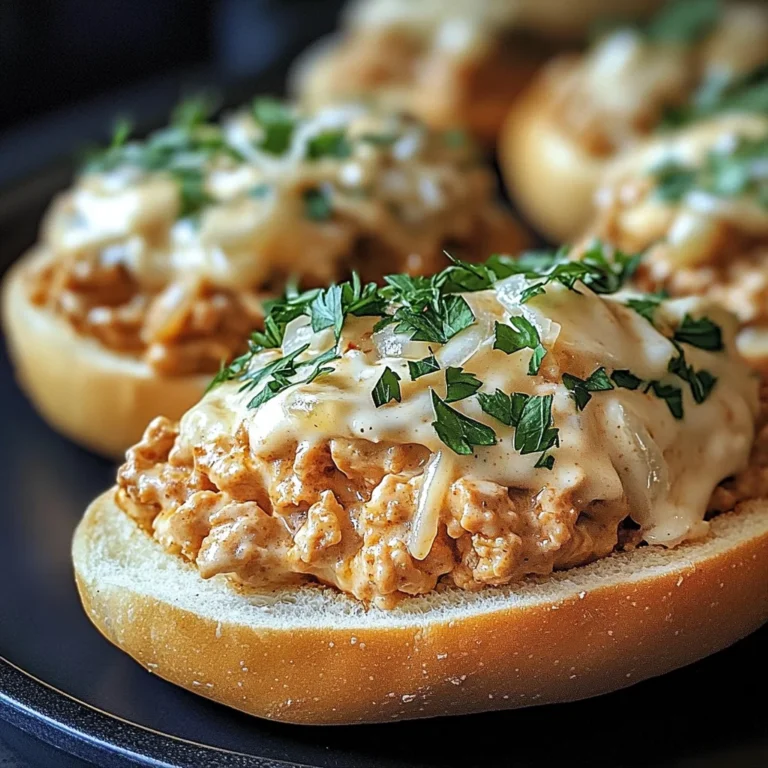
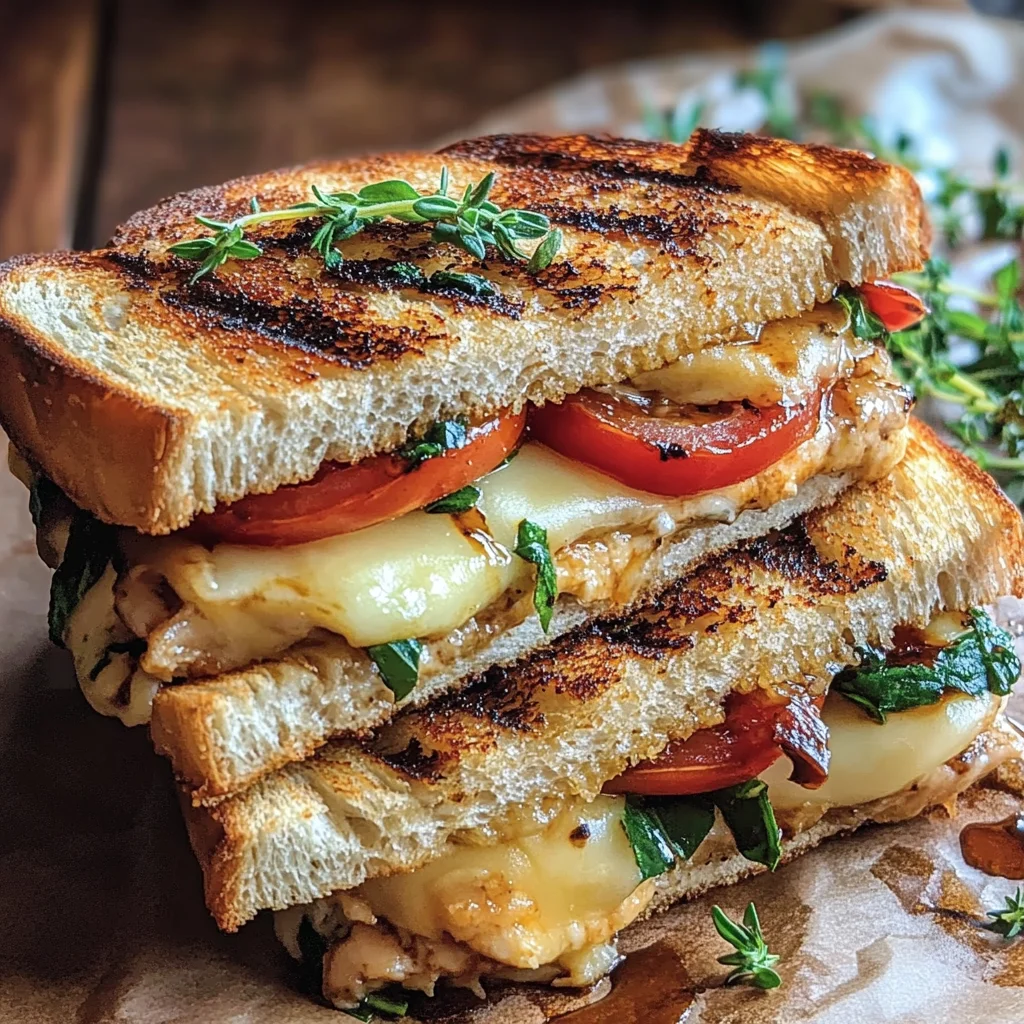
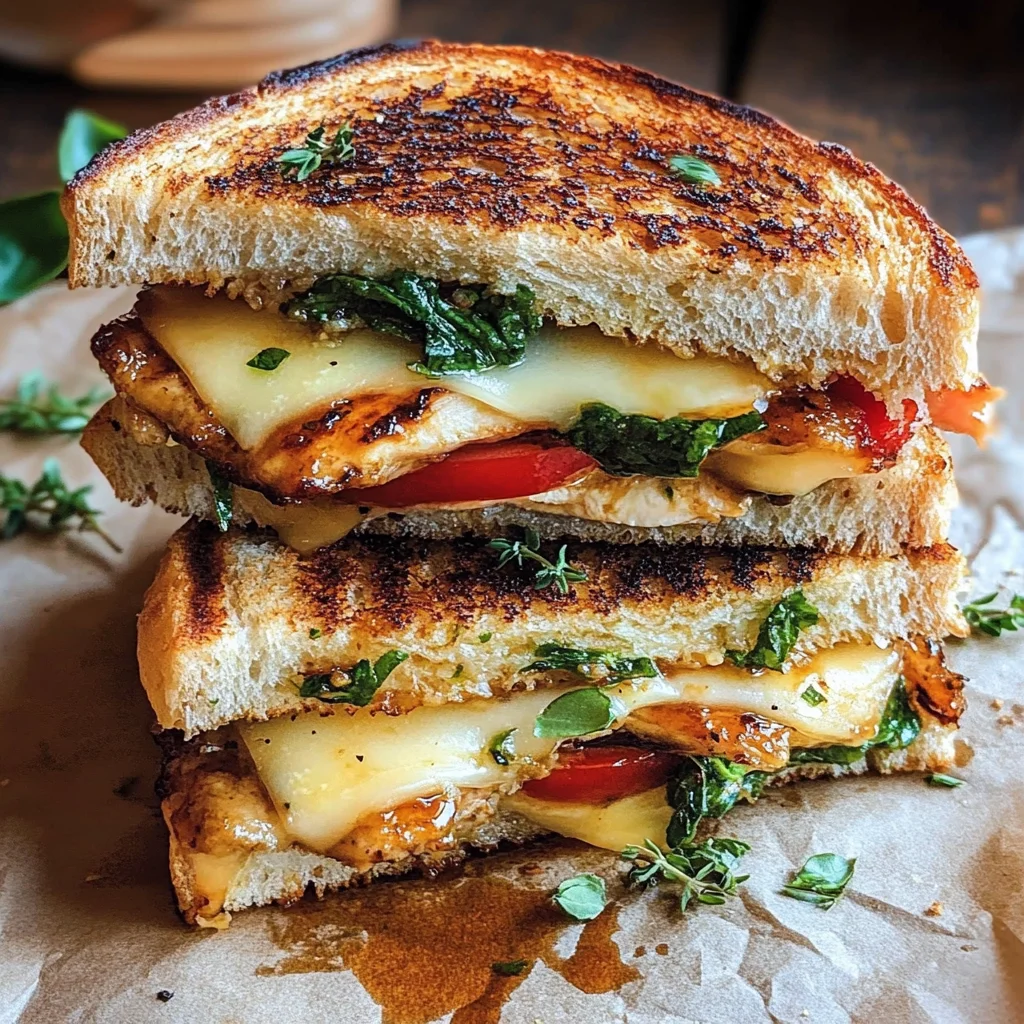
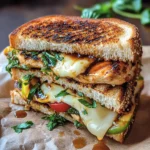
Now that we have our beautifully grilled chicken and gloriously toasted rolls, it’s time for the assembly—a step that truly requires a touch of love and care. Begin by taking each toasted roll and laying down a slice of provolone cheese on the bottom half. This creamy cheese is not just a delicious addition; it acts like a protective layer, preventing the bread from becoming soggy when we add our juicy, glazed chicken. Next, follow with a slice of mozzarella—oh, the magic this cheese brings! It melts into that gooey goodness that you can’t help but get excited about.
Now, here comes the star of our show—the glazed chicken! With its enticing aroma wafting through the kitchen, pile on a generous portion atop the cheese. Trust me when I say that this is where flavor meets texture; each bite will be an explosion of savory delight balanced with the tangy notes from our balsamic vinaigrette. Sprinkle over the fresh basil and thyme; their vibrant colors and fragrances are not just for show—they elevate each bite to a new level of deliciousness. Finally, cap it all off with the top half of your toasted roll. Don’t rush this step; take a moment to admire your creation before returning it to the grill pan. This is crucial for building flavor!
Step 6: The Grilling Technique That Creates Magic
Once you’ve assembled your sandwiches, it’s time to return them to the grill pan for what I like to call “the magic moment.” Heat your grill pan over medium heat again if needed, adding just a light drizzle of olive oil. This step is essential because we want to ensure that our sandwiches achieve that crispy exterior while allowing the cheeses inside to melt beautifully into one another—a symphony of flavors waiting to be unveiled!
Carefully place your assembled sandwiches back onto this preheated surface, ensuring they are snugly fit but not overcrowded; give them space, much like you would with friends at a gathering! Cover them with a lid or another pan if you have one handy—this traps heat and creates steam that’s vital for melting the cheese thoroughly. Cook for about 2-3 minutes on each side until they’re golden brown and crisped to perfection. Keep an eye on them during this process; visual cues are key here! If you see beautiful grill marks forming and hear that satisfying sizzle, you’re right on track.
Step 7: Perfecting the Cheese Melt
As you grill these beauties, take a moment to appreciate how far you’ve come in this culinary journey. This is where patience pays off! After about 2-3 minutes per side, gently press down on each sandwich with a spatula—this helps meld those glorious cheeses together while ensuring even heat distribution throughout. You may notice some melted cheese oozing out—that’s perfectly normal and utterly delightful!
Now, let’s talk about doneness: when you peek beneath your sandwich and see that golden-brown crust forming alongside melted cheese oozing towards the edges, rejoice—you’ve achieved sandwich perfection! A good rule of thumb is to check every minute or so after flipping them over; every stovetop varies slightly in temperature and efficiency. Remember, trust your instincts here—if something looks or smells off (like burning), adjust your heat accordingly.
Step 8: Finishing Touches Before Serving
Once both sides are beautifully crisped and you’re enveloped in an intoxicating aroma of grilled goodness mingled with fresh herbs, it’s time for my favorite part—serving these delightful creations! Carefully remove each sandwich from the grill pan using a spatula; let them rest for just a minute on a cutting board. Why rest? Just like letting steak sit after cooking allows juices to redistribute throughout the meat, resting allows all those flavors in your sandwich to settle beautifully before slicing.
When you’re ready to serve, grab a serrated knife (it’s non-negotiable for clean cuts) and slice each sandwich diagonally—this not only looks impressive but also makes it easier for everyone (including yourself!) to enjoy them without losing any filling along the way. You might hear that satisfying crunch as you cut through—that’s music to my ears! And there you have it: your Grilled Balsamic Vinaigrette Sandwich Melt: A Flavorful Delight is now complete.
Final Touches: Elevating Your Sandwich Experience
With your sandwiches sliced and ready to go, consider what sides could complement this masterpiece beautifully. A simple salad dressed lightly with olive oil and lemon could add brightness; perhaps some crispy sweet potato fries for an added crunch? Trust me; these choices will enhance your meal without overshadowing the star attraction.
As you plate up these gorgeous sandwiches alongside whatever sides you’ve chosen, take a moment to appreciate all your hard work—it truly pays off in flavor! Each bite will transport you into realms of savory heaven as layers of fragrant herbs mingle with luscious melted cheeses and perfectly glazed chicken dance across your palate. I promise you; this isn’t just dinner—it’s an experience you’ll cherish and crave again and again.
So gather around your table with loved ones or enjoy this treat solo—you deserve it! And remember, cooking isn’t just about following recipes; it’s about creating memories filled with laughter and shared joy around food made with love. Enjoy every bite of your Grilled Balsamic Vinaigrette Sandwich Melt: A Flavorful Delight!
Storage and Enjoyment Tips for Your Grilled Balsamic Vinaigrette Sandwich Melt: A Flavorful Delight
Ah, the moment has arrived! Your kitchen is filled with the intoxicating aroma of grilled chicken and melting cheese, and you can hardly wait to dig into your creation. But let’s talk about what happens if you have leftovers—because trust me, you’re going to want to savor every bite of this delightful sandwich. Knowing how to properly store your Grilled Balsamic Vinaigrette Sandwich Melt ensures that you can enjoy it even after that first heavenly meal.
Storing Leftover Grilled Balsamic Vinaigrette Sandwich Melt: A Flavorful Delight
To preserve your scrumptious sandwich for later enjoyment, wrap each sandwich tightly in aluminum foil or place them in an airtight container. This helps lock in moisture and keeps the bread from becoming too soggy. Ideally, you’ll want to pop them in the refrigerator within two hours of cooking, where they can stay fresh for up to three days. One little pro tip? If you’re feeling ambitious, consider placing a slice of parchment paper between the bread and any juicy fillings—this non-negotiable step helps maintain a lovely texture for when you’re ready to indulge again. While the flavors will meld beautifully over time, bringing out a more complex taste profile, I promise you—there’s nothing quite like the original experience right off the grill! When it’s time to enjoy your leftovers, reheat them on a skillet over medium heat for about 5 minutes, flipping halfway through, or if you’re in a rush, just pop them in the microwave for 30-60 seconds until warmed through.
Freezing Chicken for Later
If you find yourself wanting to prepare ahead or simply have too much deliciousness on hand, freezing is a fantastic option! To freeze your sandwiches properly, wrap each one in plastic wrap followed by aluminum foil—this double layer acts as a protective barrier against freezer burn. When stored this way, your sandwiches can last up to three months in the freezer without losing their delightful charm. When you’re ready for some comfort food goodness again, simply remove them from the freezer and let them thaw overnight in the fridge. For an extra touch of warmth and flavor revival, grill or toast them once thawed until golden brown and crispy on the outside. This is a great option that not only saves time but also allows you to enjoy a gourmet experience whenever cravings strike!
With these storage tips under your belt, you’ll never have to settle for anything less than extraordinary when it comes to enjoying your Grilled Balsamic Vinaigrette Sandwich Melt: A Flavorful Delight!
Grilled Balsamic Vinaigrette Sandwich Melt: A Flavorful Delight
Discover the deliciousness of our Grilled Balsamic Vinaigrette Sandwich Melt: A Flavorful Delight—a culinary masterpiece that brings together juicy grilled chicken, melty cheeses, and a tangy balsamic vinaigrette, all enveloped in perfectly toasted rolls. This sandwich is not just a meal; it’s an experience that tantalizes your taste buds and evokes warmth and nostalgia. Each bite offers a perfect balance of savory, sweet, and herbaceous flavors that will have everyone gathering around the table for seconds. Ideal for any occasion—whether it’s a cozy night in or a gathering with friends—this sandwich melt promises to be a crowd-pleaser.
- Prep Time: 15 minutes
- Cook Time: 15 minutes
- Total Time: 30 minutes
- Yield: Serves 4
- Category: Main
- Method: Grilling
- Cuisine: American
Ingredients
- 2 boneless, skinless chicken breasts (about 1 lb), thinly sliced
- 4 slices provolone cheese
- 4 slices mozzarella cheese
- 4 sourdough or ciabatta rolls
- 3 Tbsp balsamic vinegar
- 2 Tbsp extra-virgin olive oil
- 1 tsp Dijon mustard
- 1 clove garlic, minced
- Fresh basil and thyme leaves, chopped
- Salt and pepper to taste
Instructions
- Whisk together balsamic vinegar, olive oil, Dijon mustard, garlic, salt, and pepper in a shallow bowl.
- Marinate the sliced chicken in the mixture for about 10–12 minutes.
- Preheat a grill pan over medium-high heat and lightly toast the cut sides of the rolls until golden brown.
- Cook the marinated chicken on the grill pan for about 6–8 minutes total until fully cooked.
- Assemble each sandwich by layering provolone cheese, mozzarella cheese, glazed chicken, fresh herbs, and topping it off with the other half of the roll.
- Grill each assembled sandwich for about 5–6 minutes until crispy and melted.
Nutrition
- Serving Size: 1 sandwich (200g)
- Calories: 472
- Sugar: 3g
- Sodium: 860mg
- Fat: 22g
- Saturated Fat: 10g
- Unsaturated Fat: 11g
- Trans Fat: 0g
- Carbohydrates: 42g
- Fiber: 2g
- Protein: 30g
- Cholesterol: 74mg