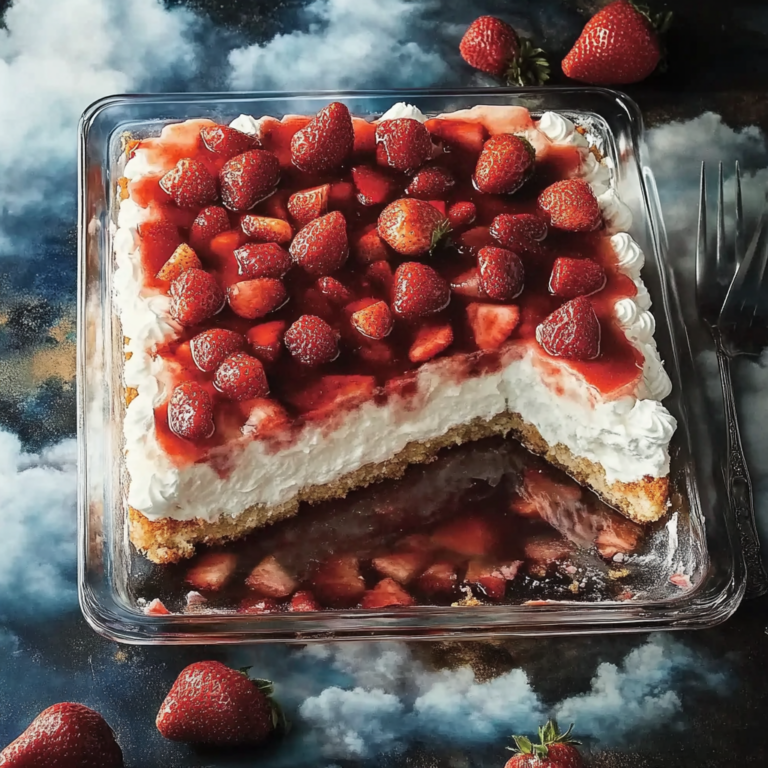
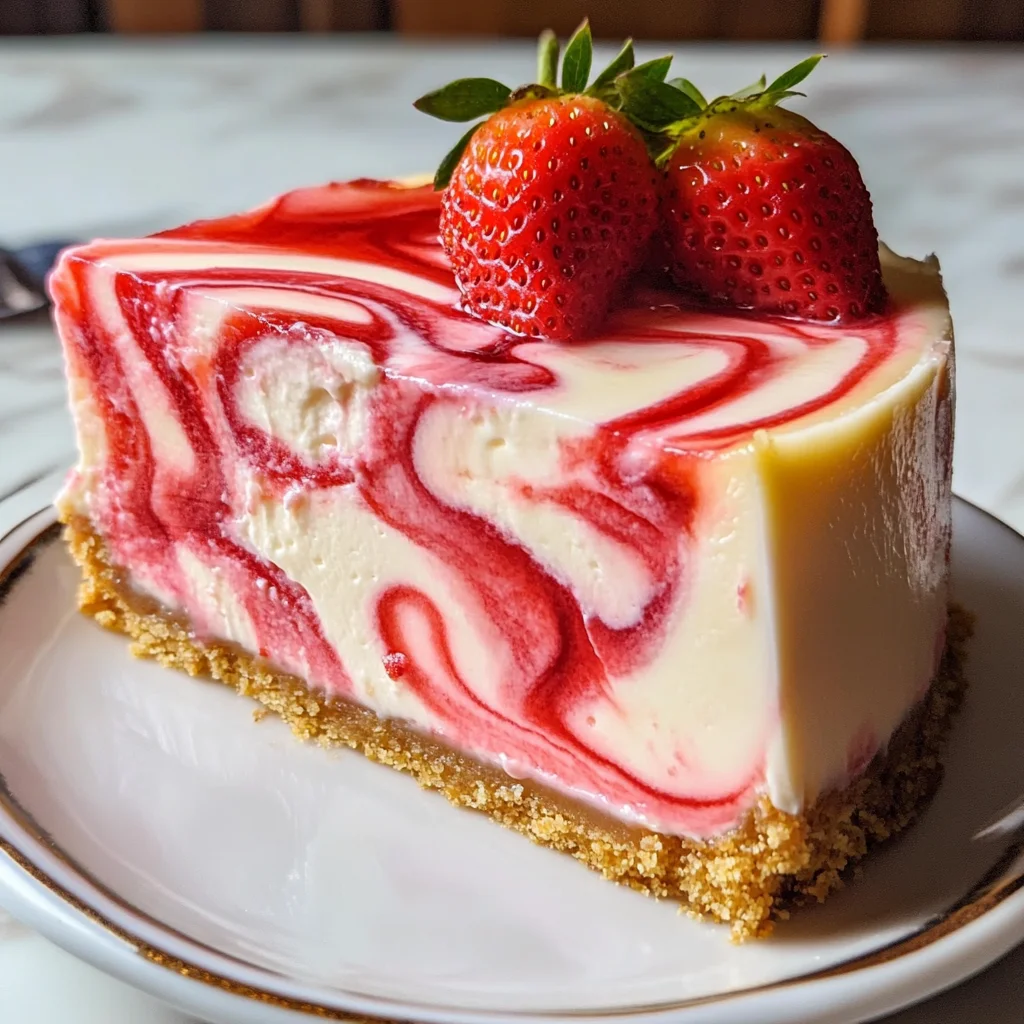
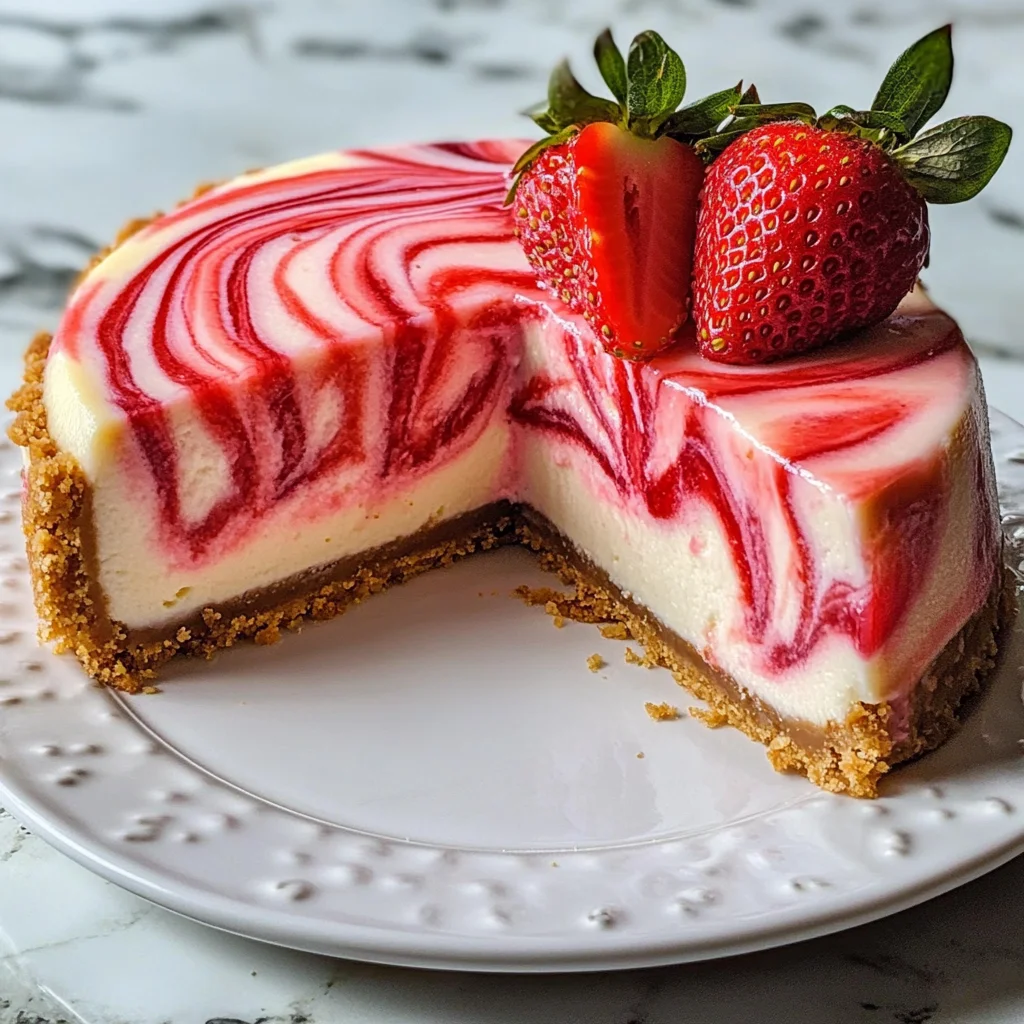
Strawberry Swirl Cheesecake Recipe
There’s something utterly magical about dessert, isn’t there? It’s more than just a sweet finish to a meal; it’s a moment of joy, a cherished memory waiting to be created. The Strawberry Swirl Cheesecake is the epitome of that magic, a delightful fusion of creamy texture and vibrant fruit that dances on your palate. Picture this: a luscious cheesecake filling, rich yet light, enveloped in swirls of bright strawberry sauce that glisten like ruby jewels. Each bite is a symphony of flavors, where the tangy cream cheese meets the sweetness of strawberries—an experience that transcends mere eating and becomes an indulgent celebration! Trust me when I say that this Strawberry Swirl Cheesecake Recipe will make your heart sing.
As you prepare this stunning dessert, you’ll find it’s not just about following steps; it’s about embracing the process, savoring every moment. From the first time I made it, I was captivated by how something so simple could evoke such powerful emotions. This cheesecake has graced countless family celebrations and gatherings at my home, often serving as the centerpiece that draws everyone together. Whether it’s a birthday bash or a cozy dinner with friends, each slice tells a story of love and laughter shared around the table. So grab your apron and let’s dive into this culinary adventure together!
Strawberry Swirl Cheesecake Recipe: A Slice of Heaven
This Strawberry Swirl Cheesecake Recipe is more than just a dessert; it’s an invitation to share sweetness with those you love. With its creamy filling and vibrant strawberry swirls, it’s sure to impress even the most discerning sweet tooth. Let’s embark on this delicious journey together!
Ingredients:
Before we get our hands sticky and our hearts full, let’s gather everything we need for our masterpiece. Each ingredient plays a crucial role in creating this delightful dessert, so let’s take a moment to appreciate what they bring to the table.
- 1 ½ cups fresh or frozen strawberries, hulled. Strawberries are the star of our show! Their natural sweetness paired with just the right amount of tartness brings life to our cheesecake. Fresh strawberries offer vibrant flavor and brightness; however, if they aren’t in season or if you’re short on time, frozen works beautifully too—just make sure they’re hulled and thawed before use. Trust me on this: using quality strawberries will elevate your sauce from good to extraordinary.
- ¼ cup granulated sugar. This humble ingredient acts as our sweetener for both the strawberry sauce and cheesecake filling. It’s essential for balancing flavors without overpowering them. When combined with fruit during cooking, sugar helps draw out moisture and enhance natural sweetness—a beautiful transformation that results in our luscious sauce.
- 1 tablespoon lemon juice. A splash of lemon juice is essential for adding brightness to our strawberry sauce while enhancing its flavor profile. It helps cut through sweetness and brings balance—think of it as music to your flavor symphony! Freshly squeezed is always best; bottled can sometimes lack that zingy freshness we crave.
- 1 tablespoon cornstarch mixed with 1 tablespoon water. This mixture is our thickening agent for the strawberry sauce—it’s what gives it that perfect texture without being gelatinous. Cornstarch works quickly when heated and forms a lovely glossy finish for our sauce, making each swirl look as appetizing as it tastes!
- 1 ½ cups graham cracker crumbs. The crust is often overlooked but trust me—it sets the stage for the entire cheesecake experience! Graham cracker crumbs provide a slightly sweet crunch that’s simply irresistible against the creamy filling. You can buy pre-made crumbs or easily crush whole graham crackers in a food processor; either way works wonders.
- ⅓ cup granulated sugar (for crust). Just like in the filling, sugar here enhances flavor while also contributing to browning during baking—it’s all about building layers of taste!
- ½ cup unsalted butter, melted. Butter binds our crust together while adding richness—it’s absolutely paramount for achieving that desirable texture! Ensure it’s melted but not hot when combining with crumbs; otherwise, you risk losing that crumbly consistency we adore.
- 24 ounces (3 blocks) cream cheese, softened. Ahh, cream cheese—the heart of any great cheesecake! Its rich creaminess creates that smooth texture we crave so much in desserts. Softening allows it to blend effortlessly with sugar and eggs without lumps—a non-negotiable step for achieving cheesecakes’ signature silky mouthfeel.
- 1 cup granulated sugar (for filling). Sugar isn’t merely sweetening here; it plays an essential role in aeration when creamed with cream cheese—helping us achieve fluffiness! Remember not to skimp on quality here; good sugar makes all the difference in texture and taste!
- 3 large eggs. Eggs add structure to your cheesecake while offering richness—their proteins help stabilize everything during baking so you achieve that perfect set without cracks! Be sure they’re at room temperature as they’ll incorporate better into your batter.
- 1 teaspoon vanilla extract. Vanilla adds warmth and depth to your filling; think of it as an aromatic hug for your taste buds! High-quality extract will deliver much richer flavors than imitation varieties—it’s worth every penny!
- 1 cup sour cream. Sour cream provides tanginess that balances sweetness beautifully while also contributing to creaminess—this is crucial for ensuring each bite melts in your mouth! Full-fat sour cream yields best results here.
- ¼ cup heavy cream. Heavy cream adds luxurious richness while helping create that velvety smooth texture we all adore in cheesecakes! Whipping it beforehand isn’t necessary here; simply fold into batter gently after mixing other ingredients—you’ll be amazed at how fluffy it makes things!
Equipment You’ll Need:
Having the right tools makes all the difference between an enjoyable baking experience and one filled with frustration! While these may not be “ingredients,” they are essential partners in creating something truly wonderful.
- 9-inch springform pan – This type of pan is perfect for cheesecakes because its removable sides allow you to release delicate creations without damaging them! It ensures ease during serving—a non-negotiable if you want those beautiful edges intact.
- Mixing bowls (various sizes) – A good set of mixing bowls offers versatility when preparing different components like crusts or fillings independently without causing chaos in your kitchen space!
- Electric mixer (handheld or stand) – An electric mixer saves time and effort while ensuring ingredients blend uniformly—especially important when working with heavy batters like cheesecake mixtures where manual whisking would take far too long!
- Rubber spatula – This handy tool helps ensure nothing goes wasted by scraping down bowls efficiently—and trust me when I say it’s invaluable when folding ingredients together gently so all those lovely air bubbles remain intact!
Now that we’ve gathered everything we need let’s dive into making your very own Strawberry Swirl Cheesecake!
Step 1: Crafting Your Strawberry Sauce
Let’s kick off this delightful journey by creating our vibrant strawberry sauce—that jewel-like swirl we can’t wait to see atop our cheesecake! Start by hulling 1 ½ cups of fresh or frozen strawberries (if using frozen ones ensure they’re thawed first). In a small saucepan over medium heat combine these luscious berries along with ¼ cup granulated sugar and 1 tablespoon lemon juice—this step activates their natural sweetness while infusing them with brightness from citrusy zing! Cook everything together until softens around 5-7 minutes; you’ll start smelling those heavenly aromas wafting through your kitchen—it’s pure bliss already!
Once softened beautifully use either a potato masher or fork (or even an immersion blender if you have one handy) to break down berries into puree form—it doesn’t need to be perfectly smooth unless desired since some texture adds character later on! Now stir in prepared cornstarch slurry (made from mixing cornstarch & water) which will help thicken things up nicely—cook another minute until mixture thickens noticeably before removing from heat completely allowing cooling time ahead!
Step 2: Preparing The Crust
Next up is crafting our graham cracker crust which provides structure beneath all those delicious layers waiting ahead—grab yourself a medium bowl where you’ll mix together 1 ½ cups graham cracker crumbs along with ⅓ cup granulated sugar & ½ cup melted unsalted butter until evenly combined into sandy-like consistency resembling wet sand at beachside fun days past… Ahh nostalgia!
Press firmly into bottom of your springform pan ensuring even distribution across entire surface area—it’s crucial here because any uneven spots could lead uneven baking later on so take care creating level base layer before placing into preheated oven at 325°F (160°C) for about 8–10 minutes until lightly golden brown aroma fills air reminding us why baking truly brings joy into life don’t worry if edges seem crumbly now… They’ll come together once cooled down fully after removal from oven allowing setting up nicely within fridge during chilling phase ahead too!
Step 3: Whipping Up The Cheesecake Filling
With crust ready let’s move onto crafting filling itself which requires utmost attention since its texture depends heavily upon how well ingredients blend together—a little patience goes long way here folks promise me this okay? Begin by beating room-temperature softened cream cheese (24 ounces total) along with remaining sugar (1 cup) using electric mixer on medium speed approximately 2–3 minutes until mixture appears smooth & fluffy no lumps left behind please—this process known as creaming introduces air pockets vital producing lightness desired later once baked inside oven warmth envelops whole thing lovingly like blanket wrap-around hugs after chilly day outside am I right?
One egg at time please added next—not only do they contribute richness but also bind everything cohesively so each slice holds shape upon cutting later down road too nice touch wouldn’t want crumbly mess happening unexpectedly now would we? After incorporating last egg mix vanilla extract (1 teaspoon), sour cream (1 cup), & heavy cream (¼ cup)—gently folding these additions ensures maintaining lightness achieved earlier no rushing needed here my friend remember kitchen patience rewards greatly don’t forget this lesson alright?
Step 4: Marbling That Beautiful Sauce In
Finally comes fun part where artistry meets science—we’re going marbling technique folks drop spoonfuls cooled strawberry sauce directly onto top surface filled cheesecake batter then use knife/skewer swirling gracefully throughout creating mesmerizing patterns trust instincts go wild don’t hold back unleash creativity express yourself through food art isn’t incredible feeling knowing edible canvas awaiting transformation awaits?
Once satisfied place springform pan inside larger baking dish filled hot water up two inches deep making water bath necessary preventing cracks while baking gently surrounding warmth keeps moisture levels consistent throughout entire bake cycle leading ultimate creamy perfection outcome ultimately desired finish line awaits us soon enough just hang tight few more steps left ahead…
I can’t wait for you all to create this masterpiece—I promise it’s worth every minute spent crafting such deliciousness filled moments shared amongst family friends being shared soon enough… Stay tuned dear friend more coming shortly enjoy journey unfolding ahead!
The Joy of Making the Strawberry Swirl Cheesecake Recipe
Step 5: A Whimsical Baking Prelude
Now it’s time to preheat your oven to 325°F (160°C). This step is crucial because the right temperature ensures even baking, which is absolutely paramount for achieving that perfect cheesecake texture. You want a creamy filling that’s light and fluffy but still holds its shape beautifully. While the oven heats up, let’s take a moment to prepare the graham cracker crust, which is the foundation of our dessert. In a medium bowl, combine 1 ½ cups of graham cracker crumbs with ⅓ cup of granulated sugar and ½ cup of melted unsalted butter. The melted butter acts like glue, binding everything together while also adding richness and flavor. Mix everything until you get a sandy texture that holds together when pressed; this signifies you’ve reached the right consistency.
Once it’s well combined, transfer this mixture into your springform pan and press it firmly into the bottom using your fingers or the flat bottom of a measuring cup. Trust me on this—don’t rush this step! Make sure it’s compact and even because an airy crust can crumble apart when you cut into your cheesecake later. Once you’re satisfied with your crust, pop it in the oven for about 8-10 minutes until it’s just starting to turn golden brown. This brief baking period not only firms up the crust but also intensifies its flavor as those sugars caramelize slightly.
Step 6: Crafting the Creamy Cheesecake Filling
While your crust cools down, let’s dive into making that decadent cheesecake filling that dreams are made of! In a large bowl, take your softened cream cheese—24 ounces in total—and beat it with an electric mixer on medium speed for about 2-3 minutes until it becomes smooth and fluffy. This process is essential because incorporating air into the cream cheese helps create that light texture we all adore in cheesecakes. Next, gradually add in 1 cup of granulated sugar while continuing to mix; this will help eliminate any lumps and ensure an even sweetness throughout.
Now, one by one, crack in three large eggs, mixing well after each addition. This step allows each egg to fully incorporate before adding another, ensuring a cohesive batter without overmixing—which can lead to cracks during baking. After incorporating the eggs, gently fold in 1 teaspoon of vanilla extract for depth of flavor, followed by 1 cup of sour cream and a luxurious ¼ cup of heavy cream. The sour cream adds tanginess that balances out the sweetness perfectly while contributing to that heavenly creamy mouthfeel we’re after. Mix until just combined; be cautious not to overdo it here! Overmixing can introduce too much air into the batter and usually results in cracks once baked.
Step 7: Laying Down a Canvas for Strawberry Swirls
With our filling beautifully prepared, it’s time to pour this luscious mixture over your cooled graham cracker crust. Using a spatula or a ladle can make this process smoother and more controlled; gently spread the cheesecake filling evenly across the surface until it reaches all edges of your pan. This creates a lovely canvas for our strawberry sauce swirls later on! Now comes one of my favorite parts—adding those delightful spoonfuls of cooled strawberry sauce onto the top of your cheesecake batter. Don’t hold back here; use generous dollops!
Once you’ve added spoonfuls of strawberry sauce across the surface, grab a knife or skewer and drag it through the filling in swirling motions—this is where you get to unleash your creativity! Think about how you want those beautiful marbled patterns to look; maybe aim for concentric circles or gentle zigzags? Each swirl will be unique! This technique not only makes it visually stunning but also ensures each slice yields that intoxicating blend of sweet strawberries against creamy cheesecake.
Step 8: The Artful Water Bath Method
Now let’s talk about something I consider magical—the water bath technique! It might sound fancy, but I promise you it’s simple and incredibly effective at preventing cracks in our cheesecake as it bakes. To do this, place your filled springform pan inside a larger baking dish or roasting pan before you bake it. Carefully fill that outer dish with hot water until it reaches about halfway up the sides of your springform pan—this provides gentle heat circulation around your cake as it bakes.
Baking time is key here; set your timer for about 55-65 minutes initially while checking on progress around the 50-minute mark. You’ll know it’s done when the edges appear set but there’s still a slight jiggle in the center when shaken gently—it should resemble jello at this stage rather than being completely firm. Why does this matter? The water bath helps regulate temperature around the cake so that it doesn’t experience sudden temperature changes leading to cracks—a common pitfall even seasoned bakers encounter! Trust me on this: patience pays off wonderfully when waiting for our cake to bake.
Final Touches: Allowing Your Creation to Shine
Step 9: Embracing Patience with Cooling
Once you’ve reached that perfect level of doneness, turn off your oven but leave the door slightly ajar—this gradual cooling phase is vital as it allows any remaining heat to escape slowly without shocking our cheesecake into cracking territory. Letting your cheesecake sit in this warm environment for an additional hour will work wonders on its overall texture as well as flavor development. After an hour has passed and you feel like you’ve waited long enough (I get it!), carefully remove your springform pan from its water bath and allow it to cool at room temperature completely before wrapping up with plastic wrap.
But don’t rush off just yet! Once cooled down sufficiently (it might take another hour), refrigerate your masterpiece for at least six hours or preferably overnight if you’re able—this chilling period solidifies flavors while achieving that creamy density we crave in every bite! When ready to serve, run a knife around those edges before releasing from its mold; trust me—it makes serving so much easier!
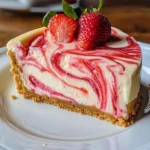
And there you have it—the Strawberry Swirl Cheesecake Recipe promises not just an indulgent dessert but also an unforgettable experience filled with love and creativity from start to finish! Serve slices adorned with fresh strawberries or drizzles more strawberry sauce if desired—each bite will be nothing short of extraordinary! Enjoy every moment spent sharing this blissful creation with friends and family; after all, food brings us together in such magical ways!
Storage and Enjoyment Tips for Your Strawberry Swirl Cheesecake Recipe
Now that your Strawberry Swirl Cheesecake is complete and it’s time to dig in, I can hardly contain my excitement! This dessert isn’t just a feast for the eyes; it’s a celebration of flavors that will dance on your palate. But let’s be honest—there’s often a little leftover cheesecake if you’re not serving an army! So, what do you do with those delectable leftovers? Let’s dive into some tips on how to store and savor every last bite of this creamy delight.
Storing Leftover Strawberry Swirl Cheesecake Recipe
To keep your Strawberry Swirl Cheesecake as fresh as the day you made it, you’ll want to store it carefully. The best way to ensure its creamy texture and delightful flavors are preserved is by placing it in an airtight container or covering it tightly with plastic wrap before refrigerating. It’ll stay good for about 5-7 days in the fridge, which is perfect for when you’re craving a late-night snack or an indulgent slice after dinner. Here’s a little tip from my kitchen: if you place a slice of bread inside the container with the cheesecake, it will help absorb excess moisture and keep your crust from getting soggy! Trust me on this one; it works like a charm. After storage, the flavors meld beautifully, making each bite even more luscious than before—if that’s even possible! When you’re ready to enjoy another slice, simply serve it chilled straight from the fridge or allow it to sit at room temperature for about 15 minutes for that perfect creamy texture.
Freezing Strawberry Swirl Cheesecake for Later
If you want to save some slices for later (and I absolutely encourage this!), freezing your Strawberry Swirl Cheesecake is a fantastic option. To freeze properly, ensure that each slice is wrapped tightly in plastic wrap and then placed inside a freezer-safe container or bag. This double-layer protection helps prevent freezer burn while locking in all that deliciousness. You can freeze your cheesecake for up to three months without losing its delightful taste and texture! When you’re ready to indulge again, simply pull out a slice and let it thaw overnight in the refrigerator or at room temperature for about an hour—trust me, you’ll be amazed at how well it holds up! This is such a convenient option because you can whip up this show-stopping dessert ahead of time and have it ready whenever the mood strikes!
Strawberry Swirl Cheesecake
Indulge in the magic of our Strawberry Swirl Cheesecake Recipe! This delightful dessert combines a rich, creamy filling with vibrant strawberry sauce that creates stunning swirls, making it not just a treat for the taste buds but a feast for the eyes. Perfect for any occasion, this cheesecake captures the essence of summer and invokes memories of laughter and celebration.
- Prep Time: 30 minutes
- Cook Time: 65 minutes
- Total Time: 1 hour 35 minutes
- Yield: Approximately 12 servings 1x
- Category: Dessert
- Method: Baking
- Cuisine: American
Ingredients
- 1 ½ cups fresh or frozen strawberries, hulled
- ¼ cup granulated sugar
- 1 tablespoon lemon juice
- 1 tablespoon cornstarch mixed with 1 tablespoon water
- 1 ½ cups graham cracker crumbs
- ⅓ cup granulated sugar (for crust)
- ½ cup unsalted butter, melted
- 24 ounces cream cheese, softened
- 1 cup granulated sugar (for filling)
- 3 large eggs
- 1 teaspoon vanilla extract
- 1 cup sour cream
- ¼ cup heavy cream
Instructions
- Preheat your oven to 325°F (160°C).
- In a saucepan over medium heat, combine strawberries, sugar, and lemon juice; cook until softened. Stir in cornstarch slurry and cook until thickened. Set aside to cool.
- Mix graham cracker crumbs, sugar, and melted butter until sandy; press into the bottom of a springform pan. Bake for about 8-10 minutes until lightly golden.
- Beat softened cream cheese and sugar until smooth; add eggs one at a time, mixing well after each addition. Fold in vanilla extract, sour cream, and heavy cream until combined.
- Pour cheesecake filling over the crust; dollop cooled strawberry sauce on top and swirl with a knife.
- Place the springform pan inside a larger baking dish filled with hot water (about halfway up the sides) and bake for 55-65 minutes.
- Turn off the oven and allow the cheesecake to cool inside with the door slightly ajar for an hour before refrigerating for at least six hours or overnight.
Nutrition
- Serving Size: 1 slice (approximately 100g)
- Calories: 350
- Sugar: 24g
- Sodium: 210mg
- Fat: 22g
- Saturated Fat: 13g
- Unsaturated Fat: 9g
- Trans Fat: 0g
- Carbohydrates: 32g
- Fiber: 1g
- Protein: 5g
- Cholesterol: 85mg