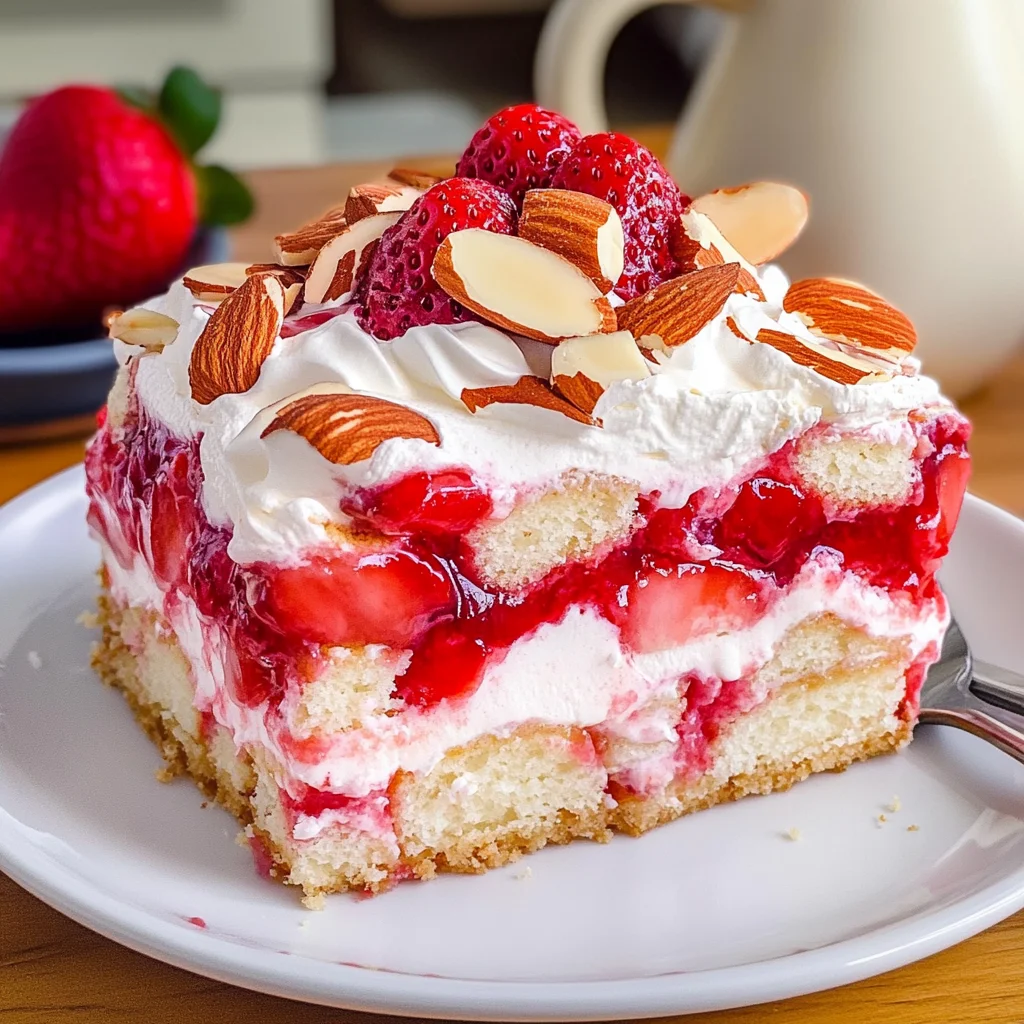
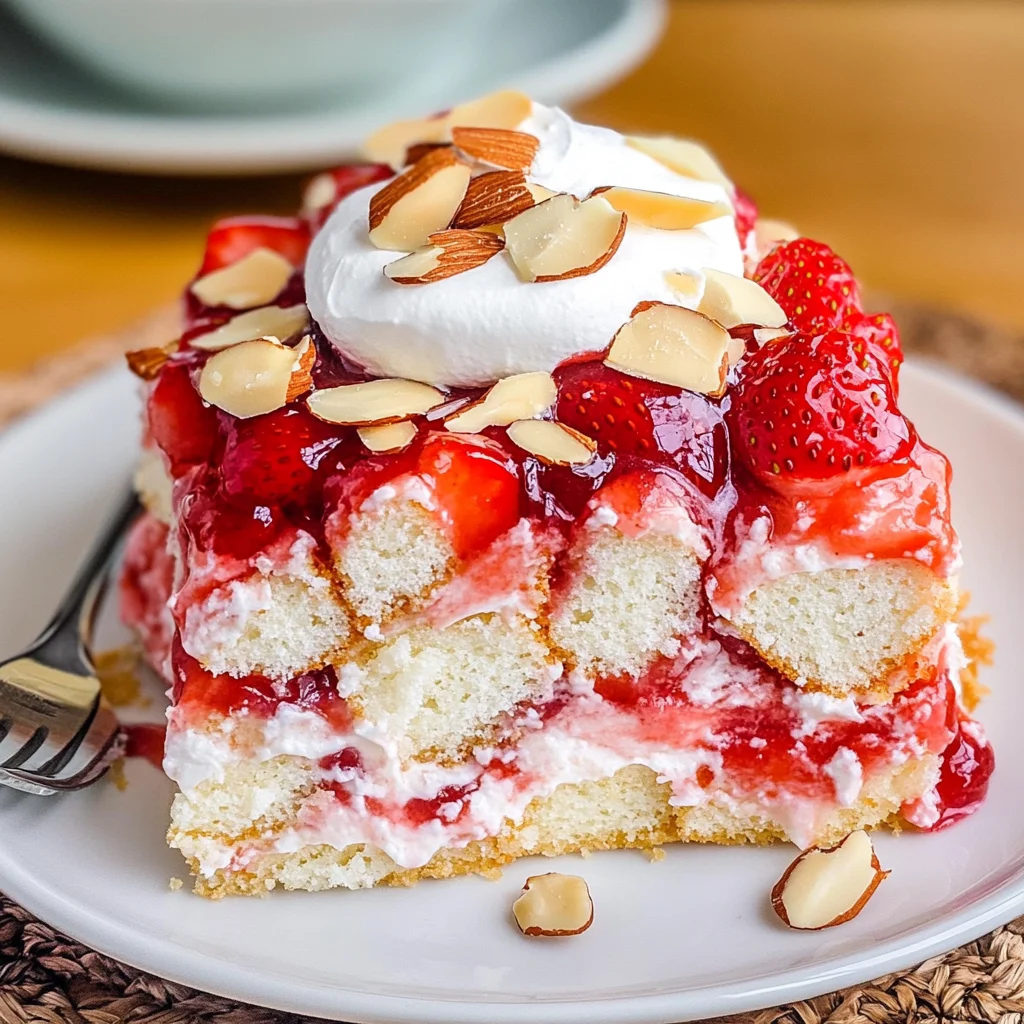
Heaven on Earth Cake
There’s something undeniably magical about the way food can transport us back to cherished memories, and my Heaven on Earth Cake does just that. Picture this: a sunny afternoon, laughter ringing through the air, and the sweet aroma of freshly baked cake wafting through the kitchen. It’s more than just a dessert; it’s a celebration of life, love, and everything that makes our hearts sing. Each bite is a delightful experience—a soft cloud of angel food cake layered with luscious strawberry pie filling and a creamy vanilla pudding that feels like a warm hug from an old friend. This is truly what I call Heaven on Earth Cake, and I promise you, once you take your first bite, you’ll understand why!
What makes this cake special isn’t just its heavenly taste; it’s also incredibly easy to make. The layers come together seamlessly, creating a harmonious blend of flavors that dance on your palate. As you scoop into this dessert, you’re inviting joy to your table—perfect for birthdays, family gatherings, or even just a Tuesday night when you need a little extra sweetness in your life. Trust me when I say that this cake will become one of your cherished recipes—one that you’ll want to pass down to future generations as a reminder of joyous times spent together.
Heaven on Earth Cake: A Slice of Bliss
This Heaven on Earth Cake is not just another dessert; it’s a symphony of flavors and textures that will wrap you in comfort. Made with fluffy angel food cake and rich cream cheese pudding layered with vibrant strawberry pie filling, this dessert is both light and indulgent at the same time. With its effortless preparation and irresistible flavor profile, it’s bound to become your go-to treat for any occasion!
Ingredients:
As we embark on this culinary adventure together, let’s take some time to explore each ingredient that makes this cake so special. You’ll see how each component contributes not only to the flavor but also to the overall experience of making—and enjoying—this delightful dessert.
- 16-ounce box angel food cake mix: Angel food cake serves as the airy foundation for our dish. Its light texture allows it to soak up the strawberry filling beautifully while providing a delicate contrast to the creamy layers above it. When selecting your mix, look for one with simple ingredients—no artificial flavors or preservatives—to ensure you’re getting that pure taste of nostalgia in every bite.
- 21-ounce can strawberry pie filling: This liquid gold is what brings both sweetness and vibrancy to our Heaven on Earth Cake! The luscious strawberries add a burst of flavor while providing moisture throughout the layers. If you’re feeling adventurous, try making your own homemade strawberry filling using fresh berries cooked down with sugar until they’re syrupy—that elevated touch will take this dessert over the top!
- 8-ounce block cream cheese: Cream cheese adds richness and depth to our pudding layer while balancing out the sweetness from the other ingredients. Make sure it’s softened at room temperature before mixing—it’ll blend seamlessly into our pudding mixture instead of leaving clumps behind. If you’re looking for an alternative due to dietary preferences, consider using plant-based cream cheese for similar results.
- 3.4-ounce box Jell-O vanilla instant pudding mix: The instant pudding mix is an absolute game changer here! It thickens our cream cheese mixture effortlessly while infusing it with that classic vanilla flavor we all adore. If you’d like a cleaner option, look for brands without artificial additives or try making your own vanilla custard from scratch—though that’s quite an undertaking!
- 1.5 cups whole milk: Whole milk provides creaminess that supports the pudding’s body while enhancing its overall texture. Using whole milk offers richer flavor than alternatives like skim or low-fat options; however, if you’re dairy-free, almond or oat milk can work well here too—just be mindful of their flavors influencing the final product.
- 8-ounce container Cool Whip whipped topping: Ahh, Cool Whip—the star topping! This light and airy whipped topping lends an indulgent finish to our creation without overwhelming it. If you prefer a homemade version (and I highly encourage trying!), whip heavy cream until soft peaks form and gently fold in powdered sugar for sweetness—trust me; nothing beats homemade!
- Fresh lemon juice (optional): A splash of lemon juice elevates everything by adding brightness and cutting through richness. While optional, I find it absolutely paramount when balancing flavors in desserts like this one.
- Sliced almonds (optional): For those who love a little crunch alongside their creamy desserts, sliced almonds are perfect! They lend not only texture but also nutty notes that pair beautifully with strawberries. You can toast them lightly beforehand if you’re seeking extra depth—just be careful not to burn them as they can go from golden brown to charred in seconds!
Equipment You’ll Need:
Now that we’ve gathered our ingredients let’s chat about some essential tools you’ll need before diving into baking bliss! Having the right equipment makes all the difference between creating something utterly intoxicating versus fumbling through chaos in the kitchen.
- 9×9 inch baking dish: This unassuming dish is crucial for layering all those delectable components together! Opt for glass or ceramic if possible; they conduct heat evenly which helps bake those angel food cakes perfectly without burning edges.
- Mixing bowls: A good set of mixing bowls will be key here—preferably one large enough for combining all ingredients without overflowing! Glass or stainless steel bowls are fantastic choices since they’re easy to clean and won’t stain from strong colors like strawberries.
- Hand mixer or stand mixer: While whisking by hand can be therapeutic (and builds arm strength), having an electric mixer speeds things up significantly! It ensures smooth blending when working with cream cheese or whipping cream—you want those mixtures fluffy without breaking a sweat!
- Rubber spatula: This versatile tool is essential for folding ingredients gently without deflating any bubbles you’ve created during mixing—a critical step in achieving lightness within our layers!
Step 1: Preparing Your Angel Food Cake
Let’s get started by preparing the angel food cake! Follow the instructions on your box carefully—this cake requires gentle handling because we want it fluffy and airy. Typically you’ll begin by mixing water with your dry ingredients until smooth—don’t overmix; just combine until there are no lumps left behind! Once done whisking together until fluffy peaks form before gently pouring into your un-greased baking dish (the lack of grease here allows cakes to cling onto sides while rising). Keep an eye on it in the oven—it usually takes around 20 minutes at 350°F (175°C)—you’ll know it’s ready when it springs back lightly upon touch!
Step 2: Cubing Your Cake
Once baked perfectly golden brown with delightful cracks atop showcasing its height achieved magically within those walls—a sight worth celebrating indeed! Allow cooling completely before removing from pan onto wire rack (if available) as this prevents sogginess underneath later on during assembly phase ahead! When cool enough handle comfortably cut into one-inch cubes—don’t rush this step as these pieces need to soak up all strawberry goodness later without turning mushy!
Step 3: Layering Your Delight
Now comes one of my favorite parts—the layering process! In an un-greased 9×9 inch baking dish (remember why we skipped grease earlier?), place half of those fluffy angel food cake cubes across bottom evenly spread out so every bite receives equal attention later on! Next generously spoon about two-thirds portioned amount from canned strawberry pie filling over top ensuring coverage throughout surface area—you want some juicy bites interspersed among cakes here too!
Step 4: Building Creamy Perfection
With layers set up nicely beneath fruity goodness let’s move onto creating our luxurious cream cheese mixture next! In medium-sized bowl blend softened cream cheese until smooth using hand mixer (or stand mixer if preferred) which will break down any lumps quickly allowing incorporation easily afterwards too—the goal is velvety texture here friends! Add in instant pudding mix followed by whole milk gradually pouring while continuing beat until combined thoroughly—it should look so invitingly luscious at this point but resist temptation just yet—we’re almost done assembling masterpiece now…
Stay tuned as we continue crafting this ethereal dessert together—I promise each step brings us closer to tasting joy itself through every sumptuous bite!
Step 5: Blending the Creamy Dream
Now, let’s dive into creating that utterly intoxicating cream cheese pudding mixture that will blanket our layers of cake and strawberry filling. Begin by taking an 8-ounce block of cream cheese and allowing it to soften at room temperature for about 30 minutes. This step is crucial because softened cream cheese will blend seamlessly into your mixture instead of leaving lumpy bits that can disrupt the creamy texture we’re aiming for. As you unwrap that luscious block of cream cheese, take a moment to appreciate its rich aroma; it’s a precursor to the magic you’re about to create.
In a medium-sized mixing bowl, add the softened cream cheese and use a hand mixer or a whisk to blend it until it’s smooth and velvety—think of it as coaxing out the best qualities of this ingredient. This process should take about 2-3 minutes on medium speed; don’t rush it! You want to ensure there are no lumps because every bite deserves that silky experience. Once your cream cheese is perfectly smooth, gradually sprinkle in the 3.4-ounce box of Jell-O vanilla instant pudding mix along with 1.5 cups of whole milk, and if you’re feeling adventurous, a splash of fresh lemon juice can be added here. The lemon juice isn’t just for flavor; it brightens the entire composition with its acidity, cutting through the sweetness beautifully. Blend these ingredients together until they are fully combined—about another minute should do it. Trust me on this: achieving a homogenous mixture is non-negotiable for that dreamy layer we’re building!
Step 6: Pouring Your Heart Into It
Once your pudding mixture has reached that perfect state of silky smoothness, it’s time to pour this creamy concoction over our carefully arranged layers of angel food cake and strawberry filling. Gently take your bowl and tip it over your layered cake creation in the baking dish; you’ll want to get every last drop of that liquid gold onto those fluffy cubes and fruit below. As you pour, watch how the pudding cascades over the cake like a gentle waterfall, finding its way into every nook and cranny. This step is vital because the pudding not only binds all the flavors together but also infuses moisture into each cake cube, ensuring every bite is profoundly satisfying.
As you spread this mixture evenly across the top with a spatula or even the back of a spoon, take a moment to appreciate how each layer interacts with one another—the lightness of the cake juxtaposed against the lusciousness of the pudding creates such beautiful harmony! Once everything feels balanced and evenly distributed, cover your baking dish securely with plastic wrap—this isn’t just for keeping things tidy; it’s essential for trapping moisture which will help set your dessert as it chills in the fridge later on.
Step 7: The Patient Chill
Ahh, now comes perhaps one of my favorite parts—the waiting game! Place your covered Heaven on Earth Cake in the refrigerator for about 3-4 hours (or even overnight if you can resist!). I know waiting can be tough when something so delightful is just waiting to be devoured, but trust me—this step transforms your layers from merely good to absolutely extraordinary! During chilling, several magical transformations occur: flavors meld beautifully while textures soften and become cohesive.
When you finally unveil your creation after this patience-testing period, you’ll notice how much firmer everything has become; this is because both the pudding and whipped topping need time to set properly. If you try to skip this step or rush it by only chilling for an hour or so, what you’ll end up with is a dessert that’s too soft and messy—not quite what we’re aiming for! So please resist peeking too often; let those layers work their wonders during this crucial time.
Step 8: The Grand Finale—Topping It Off
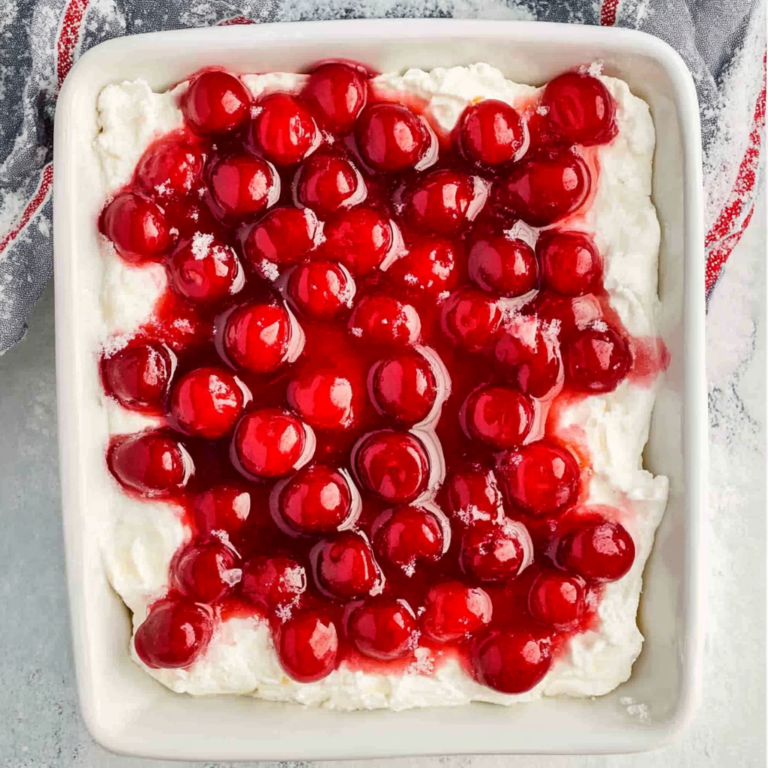
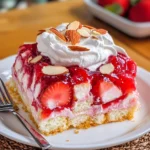
After you’ve given your Heaven on Earth Cake ample time to chill and set beautifully in all its glory, it’s finally time for those finishing touches! Carefully remove the plastic wrap from your baking dish—oh my goodness; look at how well those layers have come together! Now grab your 8-ounce container of Cool Whip whipped topping—it’s best if it’s chilled as well because we want that heavenly fluffiness when spreading it across our dessert.
Using a spatula or an offset knife, gently spread an even layer of Cool Whip over the top of your cake mixture. This fluffy topping not only adds an exquisite visual appeal but also enhances that creamy texture we’re going for while balancing out all those sweet flavors below. Don’t hesitate to pile on enough Cool Whip—it’s what gives this cake its whimsical character! With each swipe, think about how light and airy this will taste against our rich base.
Next comes my favorite part: drizzling on any remaining strawberry pie filling over this cloud-like topping. I tend to go heavy-handed here because who doesn’t love more strawberries? The vibrant color contrasts beautifully with the white topping while adding bursts of sweet-tart juiciness in every bite—a symphony of flavors indeed! If you’d like an extra touch of elegance (and crunch!), consider tossing some sliced almonds on top before serving; they’ll add delightful texture and nutty flavor that elevates everything further.
Conclusion:
As we wrap up our culinary journey through this recipe for Heaven on Earth Cake, I want to express just how much joy this dessert brings to my heart—and I hope that excitement has been contagious for you! From the lightness of the angel food cake to the rich creaminess of the pudding and that perfectly balanced strawberry filling, each bite offers a delightful experience that dances upon your taste buds. The textures blend so beautifully together; it’s like indulging in a cloud made of pure bliss! This cake isn’t just another sweet treat; it’s truly extraordinary.
Why should you make this cake? Well, beyond its captivating flavors and textures lies a simple truth: creating it is an act of love. Whether you’re celebrating a special occasion or just wanting to brighten someone’s day (including your own!), Heaven on Earth Cake fits seamlessly into any scenario—from potlucks and birthday parties to cozy family dinners around a table filled with laughter and warmth. Imagine pulling this beauty out of the fridge after dinner; its ethereal layers glisten under soft lighting as everyone gathers around in anticipation—a moment filled with pure joy.
When it comes time to serve this confectionary masterpiece, consider pairing it with fresh strawberries or perhaps some lightly sugared berries drizzled over top for added freshness. For an afternoon pick-me-up with coffee or tea, nothing beats enjoying one of these decadent slices alongside your favorite brew—it elevates both experiences! And if you’re feeling indulgent, why not accompany your slice with some homemade whipped cream or even a scoop of dairy-free vanilla ice cream? Each combination enhances what is already an enchanting dessert.
Feeling adventurous? This recipe is wonderfully adaptable! You could swap out strawberries for raspberries or blueberries if you’re looking for something different while still keeping that refreshing fruit element intact. Or maybe add zesty lemon zest into your cream cheese mixture for a delightful twist that brightens every bite—endless possibilities await! I invite you to try making this Heaven on Earth Cake, share your experiences with loved ones, and connect with others who appreciate its sweet charm. Let’s spread joy through baking together!
Heaven on Earth Cake
Heaven on Earth Cake is the ultimate dessert, blending airy angel food cake with creamy layers of vanilla pudding and luscious strawberry filling. This delightful treat captures the essence of joyful gatherings and sunny afternoons, making it perfect for any occasion. Each bite offers a harmonious balance of flavors and textures that will transport you to a state of bliss. Not only is this cake visually stunning, but it’s also incredibly easy to prepare, ensuring you can spend more time enjoying sweet moments with family and friends. Trust me, once you take a slice, you’ll understand why it’s called Heaven on Earth!
- Prep Time: 30 minutes
- Cook Time: 20 minutes
- Total Time: 50 minutes
- Yield: Serves about 12 people 1x
- Category: Dessert
- Method: Baking
- Cuisine: American
Ingredients
- 16-ounce box angel food cake mix
- 21-ounce can strawberry pie filling
- 8-ounce block cream cheese (or plant-based cream cheese)
- 3.4-ounce box vanilla instant pudding mix
- 1.5 cups whole milk (or dairy-free alternative)
- 8-ounce container whipped topping (or homemade whipped cream)
- Fresh lemon juice (optional)
- Sliced almonds (optional)
Instructions
- Prepare the angel food cake according to package instructions and allow it to cool completely.
- Cut the cooled cake into one-inch cubes.
- In a mixing bowl, blend softened cream cheese until smooth. Gradually add vanilla pudding mix and milk; mix until well combined.
- In a baking dish, layer half the cake cubes followed by two-thirds of the strawberry pie filling. Pour the cream cheese mixture over the top.
- Cover and refrigerate for 3-4 hours or overnight to let flavors meld.
- Once chilled, spread whipped topping over the dessert and garnish with remaining strawberry filling and sliced almonds if desired.
Nutrition
- Serving Size: 1 slice
- Calories: 280
- Sugar: 22g
- Sodium: 220mg
- Fat: 12g
- Saturated Fat: 5g
- Unsaturated Fat: 6g
- Trans Fat: 0g
- Carbohydrates: 35g
- Fiber: 1g
- Protein: 4g
- Cholesterol: 20mg