High Protein, No Sugar Monkey Bread – A Real Dream
When it comes to baking, there’s something truly magical about the aromas that fill your kitchen, an intoxicating blend of warmth and comfort. It’s as if every ingredient sings together in a sweet symphony, and you, my friend, are the conductor. Today, I’m beyond excited to share a recipe that has captured my heart and taste buds: High Protein, No Sugar Monkey Bread – A Real Dream. This isn’t just any monkey bread; it’s a delightful concoction that fuses health-conscious ingredients with that nostalgic pleasure we all remember from childhood. Imagine pulling apart fluffy pieces of dough, kissed with cinnamon goodness and the soft creaminess of Greek yogurt—utterly divine!
This recipe is a beacon of possibility for anyone who’s been searching for a healthier twist on sweet treats. With no sugar added and packed with protein from Greek yogurt and protein powders, it bridges the gap between indulgent comfort food and nutritious goodness. Whether you’re looking for a breakfast idea that fuels your day or a guilt-free dessert to satisfy your sweet cravings after dinner, this monkey bread will become your go-to option. Trust me; once you take that first warm bite, you’ll be hooked!
High Protein, No Sugar Monkey Bread – A Real Dream: Your New Favorite Bake
Let’s embark on this culinary journey together! As we dive into crafting this delightful High Protein, No Sugar Monkey Bread – A Real Dream, you’ll find that the process is not only easy but incredibly rewarding. The best part? You don’t need any yeast or complicated techniques—just simple ingredients and love.
Ingredients:
Before we get our hands into the dough, let’s gather all the ingredients you’ll need for this scrumptious recipe. Each component plays a crucial role in creating the tender texture and rich flavor profile of our monkey bread.
- 1½ cups (180g) Flour: Flour is the backbone of any baked good; it provides structure and stability to our monkey bread. For this recipe, all-purpose flour works wonderfully because it balances protein content with versatility. If you’re feeling adventurous or need alternatives due to dietary preferences, consider using almond flour or oat flour for a gluten-free option! Just keep in mind that each type of flour absorbs liquid differently, so adjustments may be necessary.
- ½ cup (45g) Vanilla Protein Powder: This ingredient adds both flavor and an extra boost of protein to make our monkey bread even more satisfying. I love using vanilla protein powder because it infuses a light sweetness without needing additional sugars. When selecting your protein powder, look for one with minimal additives—trust me; quality makes all the difference here!
- ½ cup (45g) Unflavored Protein Powder: Similar to vanilla protein powder but without any flavoring, this ingredient ensures we pack in even more protein without altering the taste profile too much. It acts almost like a silent partner in our recipe, lending its strength while allowing those glorious flavors from cinnamon and vanilla to shine through.
- 2 tsp Baking Powder: This leavening agent is absolutely paramount in ensuring our monkey bread rises beautifully in the oven. Baking powder releases carbon dioxide when mixed with wet ingredients and heat, creating those airy pockets we love in baked goods. Make sure your baking powder is fresh—nothing’s worse than flat bread because of old leavening agents!
- ¼ tsp Baking Soda: Working hand-in-hand with baking powder, baking soda helps balance acidity in our mixture (thanks to yogurt). It also contributes to browning during baking which gives our monkey bread its lovely golden hue. Just remember not to skip this step; it’s essential for achieving that perfect lift!
- 2 cups (450g) Non-fat Greek Yogurt: Ahh, the star of our show! Greek yogurt not only adds moisture but also enhances protein content significantly while keeping fat levels low—a win-win! Its tangy flavor complements sweetness beautifully; I promise you won’t even miss traditional sugary glazes! Always opt for plain yogurt without added sugars or flavors.
- 2 Tbsp Almond Milk: This dairy alternative adds just enough liquid to help bind everything together while keeping calories low. You can substitute it with any non-dairy milk you prefer—oat milk or soy milk work beautifully as well! Just ensure whatever you choose is unsweetened to maintain that no-sugar ethos.
- 3 Tbsp Zero Calorie 1:1 Sugar Replacement: To achieve sweetness without guilt, this sugar alternative mimics traditional sugar perfectly while adding no calories! It allows us to enjoy that comforting sweetness we crave in desserts without compromising health goals. Look for products like erythritol or stevia blends—but do check the ratios as some substitutes can be sweeter than sugar.
- 1½ tsp Cinnamon: Ahh cinnamon—the spice of life! Its warm aroma is simply irresistible and brings a cozy depth to our monkey bread. Not only does it elevate flavors but also adds health benefits like antioxidants. Freshly ground cinnamon can enhance flavor even more than pre-ground options—if you can find it at your local market or online!
- Optional: 2 Tbsp Chopped Pecans (28g): If you’re looking to add some crunch and richness to your monkey bread experience, pecans are the way forward! They bring healthy fats into play along with their delightful nutty flavor that pairs perfectly with cinnamon.
Equipment You’ll Need:
Now that we’ve gathered all our ingredients let’s talk tools! Having the right equipment makes all the difference when it comes to enjoying an effortless baking experience. Think of these items as essential partners on your culinary adventure.
- Loaf Pan: This will be your trusty vessel where all the magic happens! A loaf pan creates that iconic shape we expect from monkey bread while ensuring even cooking throughout. If you don’t have one handy, you can use muffin tins instead—just adjust cooking times accordingly!
- Mixing Bowls: A good set of mixing bowls will make combining ingredients so much easier! Opt for glass or stainless steel; they’re durable and won’t retain odors from previous recipes.
- Measuring Cups and Spoons: Precision in measuring is key when baking—this isn’t just art; it’s science too! Using proper measuring tools ensures consistent results every time you bake up this delicious treat.
- Rubber Spatula: This handy tool is perfect for folding ingredients together gently without over-mixing—an absolute must when working with delicate doughs like ours!
With everything at hand—the right ingredients and tools—we’re ready to mix up this delightful recipe!
Step 1: Preheat Your Oven & Prepare Your Loaf Pan
First things first—the anticipation builds as we preheat our oven to 350°F (175°C). This step is crucial because starting off at the right temperature ensures an even bake throughout the entire loaf once we pop it in later on! While that’s happening, lightly butter your loaf pan generously; I love using unsalted butter here as its rich flavor complements our sweet notes beautifully without overpowering them. If you’re looking for an alternative due to dietary restrictions or preferences, feel free to use coconut oil or non-stick spray instead; just ensure it’s evenly coated so nothing sticks later on!
Step 2: Get Whiskin’ Those Dry Ingredients
In a large mixing bowl—a beautiful canvas for what’s about to come—we’ll whisk together our flour, both types of protein powder (vanilla & unflavored), baking powder, and baking soda until fully combined. This process helps aerate these dry components while ensuring no clumps remain—a vital foundation for achieving lightness within those fluffy bites later on! Take care not to rush through this step—the blending helps distribute leavening agents evenly throughout so every piece bakes up perfectly fluffy rather than dense.
Step 3: Combine Wet Ingredients
Next comes one of my favorite moments—the addition of Greek yogurt into our dry mixture! Gently fold it in using your rubber spatula until everything is combined into large shaggy dough clumps—you want sticky yet cohesive dough balls at this stage! Avoid over-mixing here; doing so might toughen those delightful pieces thanks largely due excess gluten formation from proteins present within flour types used earlier on—we’re aiming for tender joy rather than chewy missteps!
Step 4: Form Those Dough Balls
Here comes where things get tactile—and oh-so-fun! Slightly wetting your palms will allow easier handling as you divide dough into about 25 pieces—each roughly resembling two tablespoons worth per ball—and roll them gently between hands until they form smooth spheres reminiscent equally cute little marbles awaiting their grand debut inside buttery embrace within prepared loaf pan earlier created by yourself lovingly… Don’t worry if some stick slightly—you want them moist afterall!
As we progress through these steps together I’m excited just thinking about how deliciously scrumptious they’ll turn out once baked… Stay tuned as we continue assembling flavors leading us closer towards warm slices full blissful memories soon made right there at home alongside loved ones sharing laughter over bites bursting forth joyfully… So let’s keep going onward towards heavenly results ahead!
Step 5: The Art of Shaping Your Dough Balls
Now, let’s dive into the process of shaping those delightful little dough balls that will soon become your High Protein, No Sugar Monkey Bread – A Real Dream. With slightly dampened palms—this step is key to managing the inherent stickiness of our dough—you’ll want to take pieces of the shaggy mixture and divide it into about 25 equal portions, roughly two tablespoons each. Gently roll these pieces between your palms, coaxing them into smooth balls. Trust me on this; the gentle touch here is crucial because overworking the dough can lead to tough bread. Instead, embrace the stickiness! It’s a sign that your dough is packed with moisture and flavor from that luscious Greek yogurt.
As you work through this step, you might find yourself enchanted by the scent wafting through your kitchen—it’s a warm invitation to what’s to come. Keep an eye on the texture of your dough; it should feel slightly tacky but not overly wet. If it sticks too much to your hands, just dampen them again as needed. Each little ball should be charming and rustic rather than perfectly formed; after all, monkey bread is all about that cozy, homemade vibe! Remember, patience is essential here; take your time to shape each piece lovingly—this attention will pay off in every bite.
Step 6: Creating Your Flavor Foundation
Before we send those delightful dough balls into their baking paradise, let’s prepare our loaf pan for their glorious transformation. Take a moment to lightly butter the inside of your pan—this isn’t just for flavor; it ensures a beautiful release once baked and adds a silky richness to every mouthful. If you’re feeling adventurous—or if you simply love a bit of crunch—go ahead and sprinkle those chopped pecans on the bottom of the pan before placing in your dough balls. This optional step may seem small but think of it as giving your monkey bread a delicious surprise layer at the bottom—a little treasure waiting to be discovered!
But why bother with this preparation? Well, good adhesion means no sticky situation when it’s time to serve! We want our bread to slide out effortlessly while keeping all those lovely flavors intact and mingling together beautifully during baking. As you arrange the dough balls in their new home, allow them some space—they’ll expand as they bake, creating that irresistible pull-apart texture we adore so much about monkey bread. This step is all about setting up for success; trust me on this one!
Step 7: The Magic of Baking
With everything now prepped and ready, it’s time for our monkey bread to bask in the warmth of its destiny! Preheat your oven to 350°F (about 175°C) if you haven’t done so already—this temperature is ideal for achieving that golden-brown exterior while ensuring a moist interior. Carefully place your loaf pan in the oven and let the magic begin!
As it bakes for approximately 40 minutes, you’ll notice an intoxicating aroma starting to envelop your kitchen—a comforting reminder that great things are happening within that oven. You want to keep an eye on it during this time; visual cues are essential here! The top should develop a lovely golden hue while also rising beautifully—this is precisely what we’re looking for. A tip I always share with my friends is to gently press down on one ball toward the end of baking; if it springs back lightly without any wetness seeping through, then it’s likely done! Remember that every oven behaves differently, so don’t fret if yours takes a couple of extra minutes or comes out slightly earlier.
Step 8: Cooling – The Sweet Reward for Patience
Once you’ve achieved that perfect golden color and springy texture, it’s time for a critical step—cooling! Remove your monkey bread from the oven and allow it to rest in its pan for about 10-15 minutes before attempting to turn it out onto a plate or serving platter. This waiting period may feel like an eternity when all you can think about is indulging in that warm goodness—but trust me, this patience pays off tremendously.
Why cool before removing? Well, during this brief interlude, steam continues cooking the interior gently while allowing any residual moisture to escape without creating sogginess. As you wait, imagine how amazing each pull-apart piece will taste when infused with cinnamon and sweetness without being overly heavy or dense. When you’re finally ready to flip it out onto your serving dish (and oh boy will you be!), do so with confidence—your beautiful creation is ready to shine!
Conclusion:
As we come to the end of our culinary journey with this High Protein, No Sugar Monkey Bread – A Real Dream, I can’t help but feel excited about all the flavors and textures we’ve explored together! From the fluffy dough infused with protein power to that delicate hint of cinnamon swirling through each bite, this recipe is more than just a dish—it’s a celebration of health and indulgence harmoniously coexisting. I hope my enthusiasm has sparked something within you because this recipe truly embodies comfort food at its finest while keeping those dietary concerns in mind.
This is a must-try not only because it tastes divine but also because making it can be such an enjoyable experience! Imagine gathering your friends or family around as the dough comes together under your hands; feel the warmth radiating from the oven as it bakes. Whether served warm as breakfast or enjoyed as an afternoon pick-me-up with coffee, this monkey bread fits perfectly into any occasion—from cozy brunches on lazy weekends to festive gatherings where everyone will marvel at your baking prowess!
And let’s not forget how versatile this recipe can be! Imagine savoring one piece with a drizzle of honey or maple syrup for an extra touch of sweetness. For an afternoon pick-me-up, pair it with a dollop of nut butter or yogurt—oh my goodness! If you’re feeling adventurous, consider adding chocolate chips or dried fruit into the mix; these additions will elevate each bite into something utterly extraordinary. This recipe is wonderfully adaptable and encourages creativity—so go ahead and make it your own! I invite you all to try this delicious concoction in your kitchen and share your experiences; let’s connect over our love for wholesome baking!
High Protein, No Sugar Monkey Bread – A Real Dream

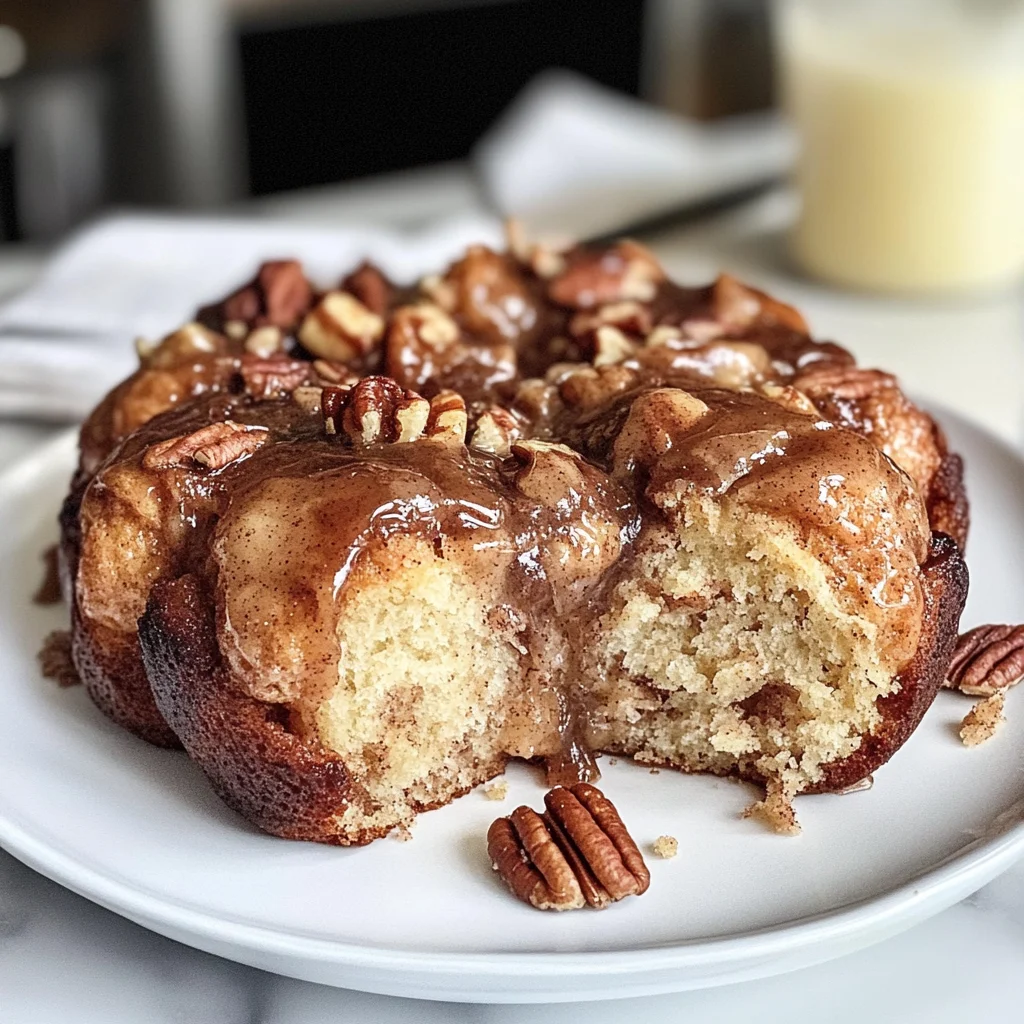
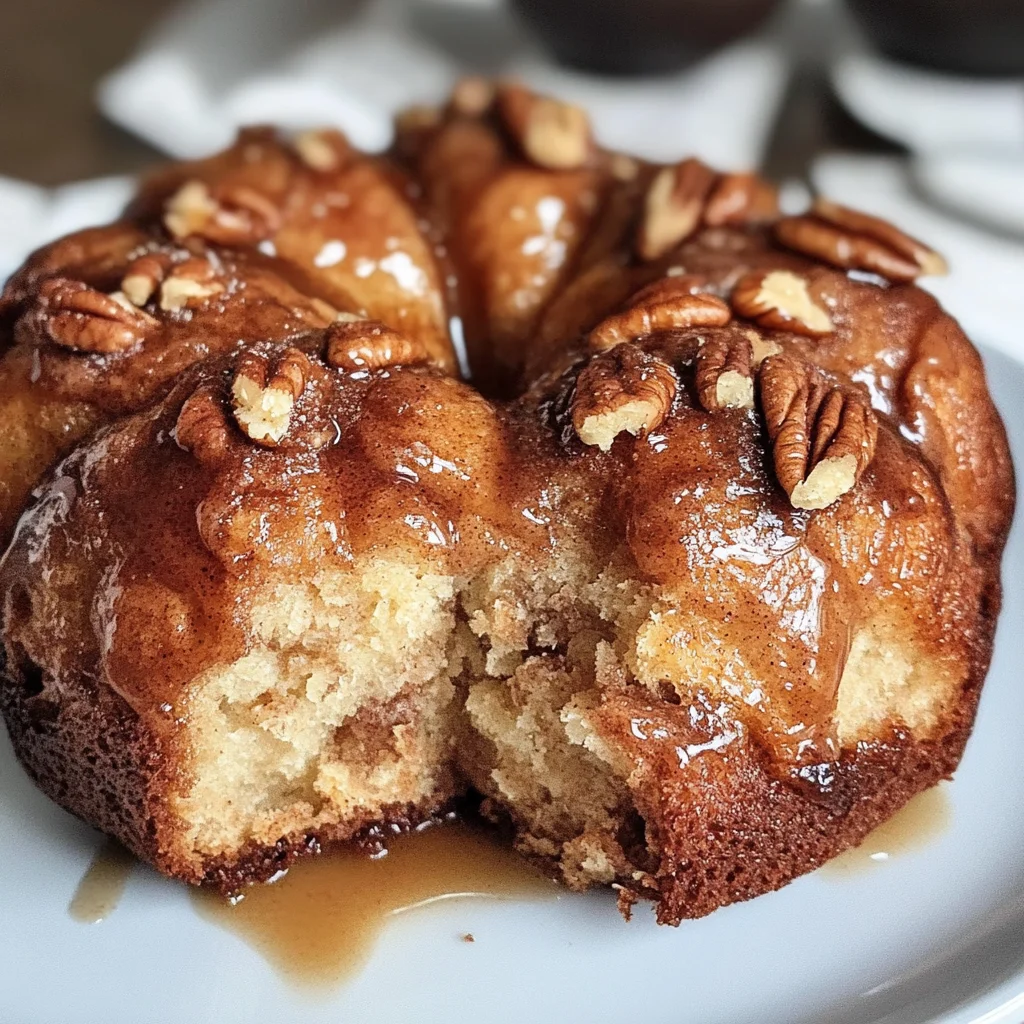
High Protein, No Sugar Monkey Bread – A Real Dream is a delightful twist on a childhood favorite, combining the joy of sweet, pull-apart bread with health-conscious ingredients. This guilt-free treat is packed with protein thanks to Greek yogurt and protein powders while keeping sugar levels at bay. The warm, cinnamon-kissed dough creates an irresistible aroma that fills your kitchen, making it perfect for breakfast or as an after-dinner dessert. With no complicated techniques required, this recipe ensures everyone can enjoy a healthier indulgence without sacrificing taste. Once you pull apart that first fluffy piece, you’ll know you’ve found your new favorite bake.
- Prep Time: 15 minutes
- Cook Time: 40 minutes
- Total Time: 55 minutes
- Yield: About 25 servings 1x
- Category: Dessert
- Method: Baking
- Cuisine: American
Ingredients
- 1½ cups all-purpose flour (or almond/oat flour)
- ½ cup vanilla protein powder
- ½ cup unflavored protein powder
- 2 tsp baking powder
- ¼ tsp baking soda
- 2 cups non-fat Greek yogurt
- 2 Tbsp almond milk (or other non-dairy milk)
- 3 Tbsp zero-calorie sugar replacement
- 1½ tsp cinnamon
- Optional: 2 Tbsp chopped pecans
Instructions
- Preheat your oven to 350°F (175°C) and prepare a loaf pan by lightly buttering it.
- In a large mixing bowl, whisk together the flour, both protein powders, baking powder, and baking soda until well combined.
- Gently fold in the Greek yogurt and almond milk until a sticky dough forms.
- Divide the dough into about 25 pieces and roll them into balls using damp hands.
- Arrange the dough balls in the prepared loaf pan, sprinkling optional chopped pecans on top if desired.
- Bake for approximately 40 minutes or until golden brown and springy to the touch.
- Allow to cool for about 10-15 minutes before serving.
Nutrition
- Serving Size: 1 piece (approx. 30g)
- Calories: 100
- Sugar: 1g
- Sodium: 120mg
- Fat: 2g
- Saturated Fat: 0g
- Unsaturated Fat: 1g
- Trans Fat: 0g
- Carbohydrates: 12g
- Fiber: 3g
- Protein: 9g
- Cholesterol: 5mg