Peach Cookies
There’s something utterly enchanting about baking cookies, especially when they are as delightful as these Peach Cookies. They are not just any dessert; they are a celebration of flavors and a feast for the eyes! The moment you take a bite, you’re greeted with a soft cookie that cradles an apricot dulce de leche cream, evoking the sweet warmth of summer peaches. As you savor each mouthful, you can’t help but feel wrapped in a cozy blanket of nostalgia and joy. The vibrant colors and delightful presentation make these cookies not only delicious but also the perfect treat for gatherings or just a special afternoon at home. Trust me when I say that this recipe is more than just food; it’s an experience that bridges tradition with creativity, inviting everyone to indulge in its charm.
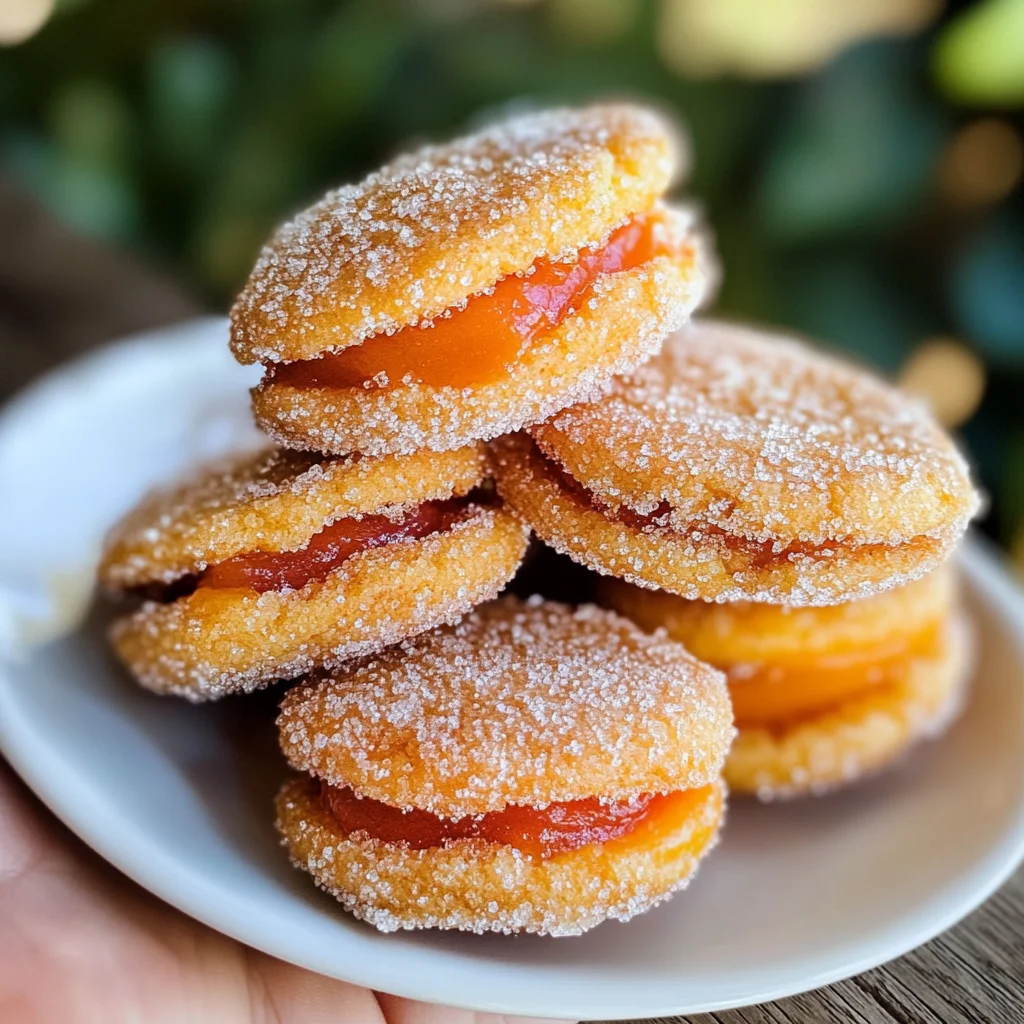
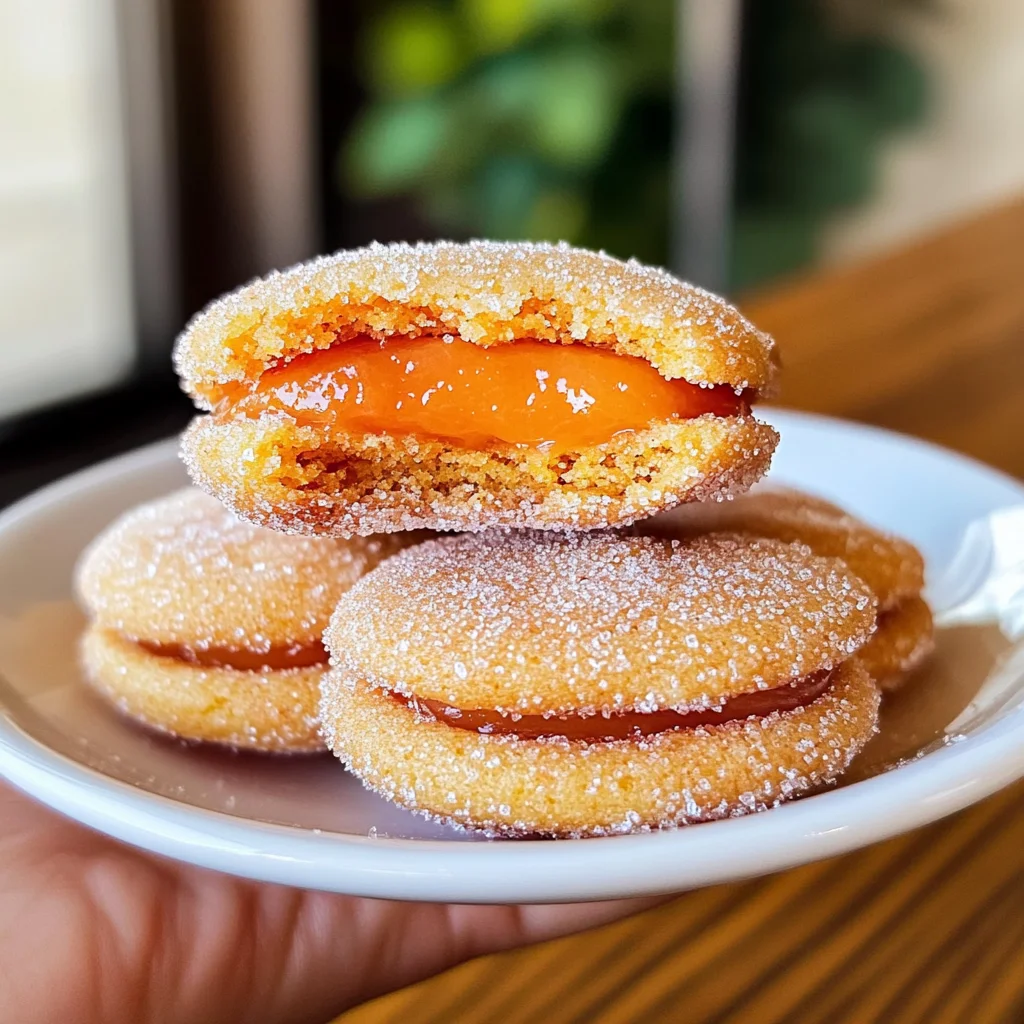
What makes these Peach Cookies so extraordinary is their beautiful appearance and the delightful surprise hidden within. Picture this: two soft cookie halves joined together, resembling the fuzzy skin of a fresh peach, filled with a creamy filling that dances on your taste buds. This dessert is deeply rooted in Ukrainian culinary traditions but carries a contemporary twist that makes it accessible to all. Whether you celebrate with family during holidays or simply want to impress friends at a casual get-together, these cookies bring smiles and satisfaction to every table. So grab your apron, roll up your sleeves, and let’s embark on this delicious journey together!
Peach Cookies: A Sweet Summer Dream
These Peach Cookies are not just treats; they’re little bites of joy! The moment you hold one in your hand, you can feel the love that goes into crafting them. With their stunning peach-like appearance and luscious filling, they’re sure to become a favorite in your household. Let’s dive right into making these beauties!
Ingredients:
As we set off on this culinary adventure, let’s gather our ingredients. Each component plays a vital role in crafting our dreamy peach cookies, so pay attention—I promise you’ll appreciate how each element contributes to the final masterpiece.
- 2 large eggs. Eggs serve as the binding agent in our cookie dough—they bring everything together beautifully while providing moisture and richness. When selecting eggs, look for those with bright yolks; they usually indicate freshness and better flavor. Room temperature eggs incorporate more easily into the batter, ensuring even mixing.
- 1 cup granulated sugar. Sugar is not just for sweetness; it also plays an essential role in creating texture and color. This ingredient helps our cookies spread slightly while baking and gives them that golden-brown hue we all adore. To measure accurately, scoop it into your measuring cup without packing it down—this ensures the perfect balance between sweetness and structure.
- 8 tablespoons softened butter. Butter provides richness and flavor to our cookies while also contributing to their tender texture. It’s crucial that your butter is softened to room temperature so that it can cream properly with sugar—this step creates air pockets that help our cookies rise beautifully in the oven.
- 2 heaping tablespoons sour cream. This tangy ingredient adds moisture and tenderness to our dough while lending a subtle depth of flavor. If you’re unable to find sour cream, feel free to substitute it with plain yogurt—it will work wonders just as well!
- 1 heaping tablespoon mayonnaise. You might be surprised by this addition! Mayonnaise adds richness due to its oil content while keeping our cookies moist and fluffy—trust me on this one! Using mayonnaise instead of additional eggs or oil creates an intriguing flavor profile without overwhelming sweetness.
- 1 teaspoon baking powder. This leavening agent is essential for helping our cookies rise perfectly during baking without making them overly cake-like. It reacts with moisture within the dough to create carbon dioxide bubbles—resulting in those lovely puffy shapes we all crave.
- 4 cups all-purpose flour. Flour provides structure to our cookies; however, too much flour can lead to dryness. Sifting it before measuring will aerate it slightly, ensuring we use just the right amount for our ideal texture.
- 1 heaping teaspoon baking soda diluted in 1 tablespoon of lemon juice. This dynamic duo acts as another leavening powerhouse! Baking soda needs an acid (like lemon juice) to activate its rising action—this step ensures our cookies have both height and tenderness while imparting a delightful hint of citrus flavor.
- 2 ounces cream cheese. Adding cream cheese enriches the filling further by introducing smoothness and tanginess—a match made in heaven! Be sure it’s softened before mixing; otherwise, you’ll end up with lumps instead of creamy goodness.
- 2 tablespoons softened butter (for filling). Just like before, using softened butter here ensures easy incorporation into our cream filling while maintaining that rich flavor we love so much.
- 5 ounces dulce de leche. Oh my goodness—this liquid gold is where our cookie magic happens! Its caramel-like sweetness perfectly complements the fruity notes from apricot jam within our filling—a combination that’s simply irresistible!
- 2 tablespoons apricot jam. This fruity gem adds bright notes alongside the dulce de leche while enhancing both flavor complexity and texture within our creamy concoction—it’s truly transformative!
- 3 ounces cool whip. For fluffiness galore! Cool whip lightens up our filling mixture beautifully without compromising its body or stability—ensuring every bite feels airy yet decadent.
Decoration:
- 1 cup milk—to dilute the dyes.
- Red food coloring, a few drops. This creates vibrant hues reminiscent of freshly picked peaches.
- Orange food coloring, a few drops. This brings out that gorgeous sunset shade we associate with ripe fruit!
- ¾ cup sugar—for dredging post-dyeing; it adds an extra sparkle that’ll make these cookies shine like jewels on your dessert platter.
Equipment You’ll Need:
Before we dive headfirst into creating these scrumptious peach cookies, let’s talk about some essential tools you’ll want by your side during this process! Having the right equipment makes everything smoother—so think of these tools as trusty companions on this delightful journey.
- Mixing bowls (various sizes) – These are crucial for combining ingredients effectively without spillage or messiness occurring! Opt for glass or stainless steel bowls—they’re durable and can handle heat if needed later on during baking tasks.
- Measuring cups and spoons – Precision matters when baking; having accurate measurements ensures consistent results every time! A set with clear markings will work wonders whether you’re scooping flour or pouring vanilla extract.
- Baking sheet lined with parchment paper – Using parchment prevents sticking while promoting even browning across all cookie surfaces—the result? Perfectly baked goodies ready for decoration!
- Whisk & spatula – Whisks allow us to incorporate air into mixtures like eggs or creams effortlessly; meanwhile spatulas ensure no batter goes un-scraped from bowls—they’re indispensable partners throughout this entire process!
Now that we’ve gathered all our ingredients and tools let’s dive into making those Peach Cookies that’ll leave everyone asking for seconds!
Step 1: Whisk Together Your Base
Begin by grabbing a large mixing bowl where you’ll whisk together those two beautiful large eggs alongside one cup of granulated sugar until it’s lightened in color—a process known as aerating—which introduces air bubbles into your mixture creating fluffiness down the line when baked! Next comes eight tablespoons of softened butter followed closely by two heaping tablespoons of sour cream—this combination yields unparalleled moisture levels throughout each bite allowing them melt-in-your-mouth vibes once baked perfectly golden brown!
As you add one heaping tablespoon of mayonnaise along with diluted baking soda into this mix—the bubbling reaction indicates success already underway—you’ll notice how fragrant everything begins smelling divine too! It’s essential at this juncture not only because flavors unite but also because thorough blending ensures an even distribution throughout leading towards beautifully harmonious finished products ahead!
Step 2: Combine Dry Ingredients
Now let’s stir together one teaspoon baking powder along four cups all-purpose flour until evenly combined—this step is key since unevenly mixed flour could yield dense results instead soft pillowy treats we dream about enjoying later on after cooling completely upon completion…so don’t rush through here either please!
Next slowly fold dry ingredients into wet ones gently until fully incorporated resembling soft play-dough consistency which brings forth nostalgic memories reminding us why childhood days were cherished full-on sweet indulgences back then—the ultimate joy from simple pleasures shared amongst loved ones celebrating life itself together through food experiences created over time…
Step 3: Bake Your Cookie Dough
Preheat your oven now at three hundred fifty degrees Fahrenheit before rolling dough into heaping teaspoon-sized balls placing them onto lined baking sheets spaced apart adequately allowing room for expansion whilst baking—that warm aroma wafting through soon enough will take over kitchen bringing smiles instantly upon first whiff alone trust me friends!
Bake them up well rounded edges show after about fifteen minutes checking periodically till golden brown appears around perimeter edges indicating readiness signifying happy moments approaching ahead…don’t forget though—while still warm carve-out bottom centers gently using small round cutter revealing hollow pockets ready awaiting sumptuous fillings waiting patiently thereafter…
Step 4: Prepare Your Creamy Filling
As those delicious little rounds cool completely let’s whip up luscious crème concoction blending two ounces cream cheese alongside two tablespoons more softened butter until smooth achieving desired consistency swiftly transitioning next adding five ounces rich dulce de leche followed closely behind two tablespoons fruity apricot jam—we want everything harmonizing well together forming silky blend showcasing vibrant colors reflecting sunlight inviting eager tastebuds awaiting satisfaction shortly thereafter…
Now fold three ounces cool whip gradually folding gently until fluffy light mixture emerges welcoming laughter-filled moments around tables everywhere once served proudly sharing freely amongst friends who may wish indulge themselves thoroughly tonight celebrating life through delectable bites enjoyed endlessly relishing every morsel savored lovingly prepared amongst familiar faces gathered round cheering joys shared forevermore…
Step 5: Creamy Dream Filling
Now, let’s dive into the heart of these peach cookies—the luscious cream filling that makes them truly special. In a medium bowl, take your softened butter and cream cheese, and beat them together with an electric mixer or a whisk until they become beautifully smooth and creamy. This step is where the magic begins! The combination of butter and cream cheese creates a rich base that will hold our dulce de leche and apricot jam beautifully. I promise you, the texture should be velvety—almost like a cloud inviting you in for a taste!
Next, add in the dulce de leche, which is essentially liquid gold in dessert form. This sweet caramel-like sauce will infuse your filling with an utterly intoxicating sweetness that pairs perfectly with the tartness of apricot jam. Mix this in until fully incorporated, and then fold in the cool whip. This addition lightens the mixture, giving it that airy quality that contrasts so delightfully with the dense cookie exterior. You’ll know it’s ready when it looks light and fluffy—about a minute of beating should do it! Trust me on this step: achieving that perfect consistency is absolutely paramount for creating a filling that feels indulgent but not overly heavy.
Step 6: Assemble Your Peach Cookies
Now comes the fun part—assembling your peach cookies! Once your cookies have cooled slightly from baking (you don’t want to burn your fingers!), gently fill each hollowed-out cookie half with that dreamy cream mixture we just whipped up. It’s best to use a piping bag or even just a spoon if you’re feeling adventurous; either way, be generous but not too messy! Don’t rush this step; savor it as you watch those little cookie halves transform into decadent treats.
After filling one half, press another cookie half on top, creating a delightful sandwich that resembles a cute little peach! The gentle pressure allows the filling to peek out just a bit from between the two halves—this visual cue is what makes them irresistible! Once assembled, it’s crucial to chill these beauties in the refrigerator for at least two hours or until they are firm enough to handle when decorating. Why chill? Well, chilling solidifies those layers so they hold their shape better during decoration and enhances the flavor melding within those cookie sandwiches. So exercise some patience—your future self will thank you for waiting!
Step 7: Get Ready for Vibrant Decoration
While your peach cookies are chilling out in the fridge, let’s prepare for their stunning transformation into eye-catching delights! In separate bowls, dilute half a cup of milk with your chosen food dyes—red and orange—to create vibrant colors reminiscent of fresh peaches. This part is incredibly rewarding because you can adjust the shades according to your preference; aim for a medium orange and red hue that captures attention without overwhelming the senses. A little goes a long way when mixing food coloring; I’ve learned through trial and error that starting with just one drop can yield surprising vibrancy!
Once you’ve achieved those gorgeous colors, it’s time to dip! Gently take one half of each chilled cookie and dip it into the orange dye, followed by dipping the other half into red dye. Make sure to allow any excess dye to drip off before placing them on paper towels or wire racks to set—a crucial step that prevents unwanted pooling at the base of our beautiful cookies. As they dry, they’ll develop that stunning peach-like appearance we all adore! For an extra touch of sweetness and sparkle, dredge them in sugar after dying; this final coat adds both texture and sweetness while elevating their visual appeal.
Step 8: The Sweet Final Touch
Now it’s time for the pièce de résistance: finishing off your peach cookies with one last flourish! After allowing them to dry thoroughly (about 30 minutes), take each cookie once more into consideration—the sugar-coated surface should glisten invitingly under light! If you’re feeling extra ambitious (and who wouldn’t be?), consider giving them another quick dredge in sugar for an even more crystallized coating; it’s not just about aesthetics but also about enhancing flavor.
At this stage, you’ll want to refrigerate your completed peach cookies for about another hour before serving. This chilling period is vital because it ensures everything holds together beautifully when bitten into—those luscious layers should meld together harmoniously while still offering distinct flavors with every bite. As you prepare to share these delightful treats with family or friends (or perhaps indulge yourself!), think about how satisfying it is to create something so visually stunning yet profoundly delicious. Each bite is not just dessert; it’s an experience filled with love and nostalgia—a true labor of joy.
Conclusion:
As we conclude our delightful journey through the world of Peach Cookies, I hope you’ve felt my excitement resonate through each step of this recipe. From the moment we mixed together those simple ingredients into a harmonious dough to the final whimsical touches of color and sugar, it’s been nothing short of magical. What makes this recipe truly special is not just its aesthetic appeal but the exquisite balance of flavors—the creamy dulce de leche mingling beautifully with apricot jam creates an utterly intoxicating experience that envelops your senses like a warm hug on a chilly day.
Now, let me tell you why making these Peach Cookies is an absolute must-try! It’s not just about throwing together ingredients; it’s about creating something extraordinary that brings joy to both the maker and those who get to enjoy it. Whether you’re celebrating a special occasion or simply looking for an afternoon pick-me-up, these cookies shine brightly in any scenario. Picture yourself pulling them from the oven—golden brown edges glistening against that vibrant hue—and watch as friends gather around, drawn in by their enchanting aroma. It’s moments like these that make baking so profoundly satisfying.
Imagine savoring one with a cup of tea as you take a quiet moment for yourself or sharing them with loved ones during gatherings where laughter fills the air. For a truly decadent experience, try pairing these cookies with vanilla ice cream or even drizzling some extra dulce de leche on top for good measure! The creamy richness complements the fruity notes perfectly while creating an indulgent delight that everyone will adore.
Feeling adventurous? This recipe is wonderfully adaptable! You could swap out apricot jam for peach preserves or even experiment with raspberry filling instead—each variation opens up new realms of flavor while keeping true to that quintessential cookie structure we all love. And trust me when I say that every iteration is bound to spark joy and inspire creativity in your kitchen! So go ahead: try this recipe today, share your experiences along the way, and let’s connect over our shared passion for baking delicious treats.
Peach Cookies

Peach Cookies are a delightful, vibrant treat that combines the nostalgic flavors of summer peaches with a creamy filling that will leave you wanting more. These charming cookies are not only visually captivating with their peach-like appearance but also bursting with flavor thanks to the luscious apricot dulce de leche cream inside. Perfect for gatherings, celebrations, or a sweet afternoon snack, these cookies promise to bring joy and satisfaction to every table. With easy-to-follow instructions, you’ll enjoy creating these delectable bites that bridge tradition with creativity. Get ready to impress your friends and family with this fun baking adventure!
- Prep Time: 30 minutes
- Cook Time: 15 minutes
- Total Time: 45 minutes
- Yield: Approximately 24 cookies 1x
- Category: Dessert
- Method: Baking
- Cuisine: Ukrainian
Ingredients
- 2 large eggs
- 1 cup granulated sugar
- 8 tablespoons softened butter
- 2 heaping tablespoons sour cream (or plain yogurt)
- 1 heaping tablespoon mayonnaise
- 1 teaspoon baking powder
- 4 cups all-purpose flour
- 2 ounces cream cheese (softened)
- 5 ounces dulce de leche
- 2 tablespoons apricot jam
- 3 ounces cool whip
Instructions
- Preheat your oven to 350°F (175°C).
- In a large mixing bowl, whisk together the eggs and sugar until light in color.
- Add softened butter, sour cream, and mayonnaise to the egg mixture; blend well.
- Mix in baking powder and flour until combined.
- Roll dough into tablespoon-sized balls and place on a lined baking sheet, spacing them apart.
- Bake for about 15 minutes or until golden brown around the edges; let cool.
- Prepare the filling by beating together softened cream cheese and butter until smooth; mix in dulce de leche and apricot jam.
- Fold in cool whip until fluffy.
- Fill hollowed cookie halves with the cream mixture and sandwich them together.
- Chill for at least two hours before decorating with food coloring.
Nutrition
- Serving Size: 1 serving
- Calories: 150
- Sugar: 10g
- Sodium: 50mg
- Fat: 6g
- Saturated Fat: 3g
- Unsaturated Fat: 2g
- Trans Fat: 0g
- Carbohydrates: 22g
- Fiber: 1g
- Protein: 2g
- Cholesterol: 35mg