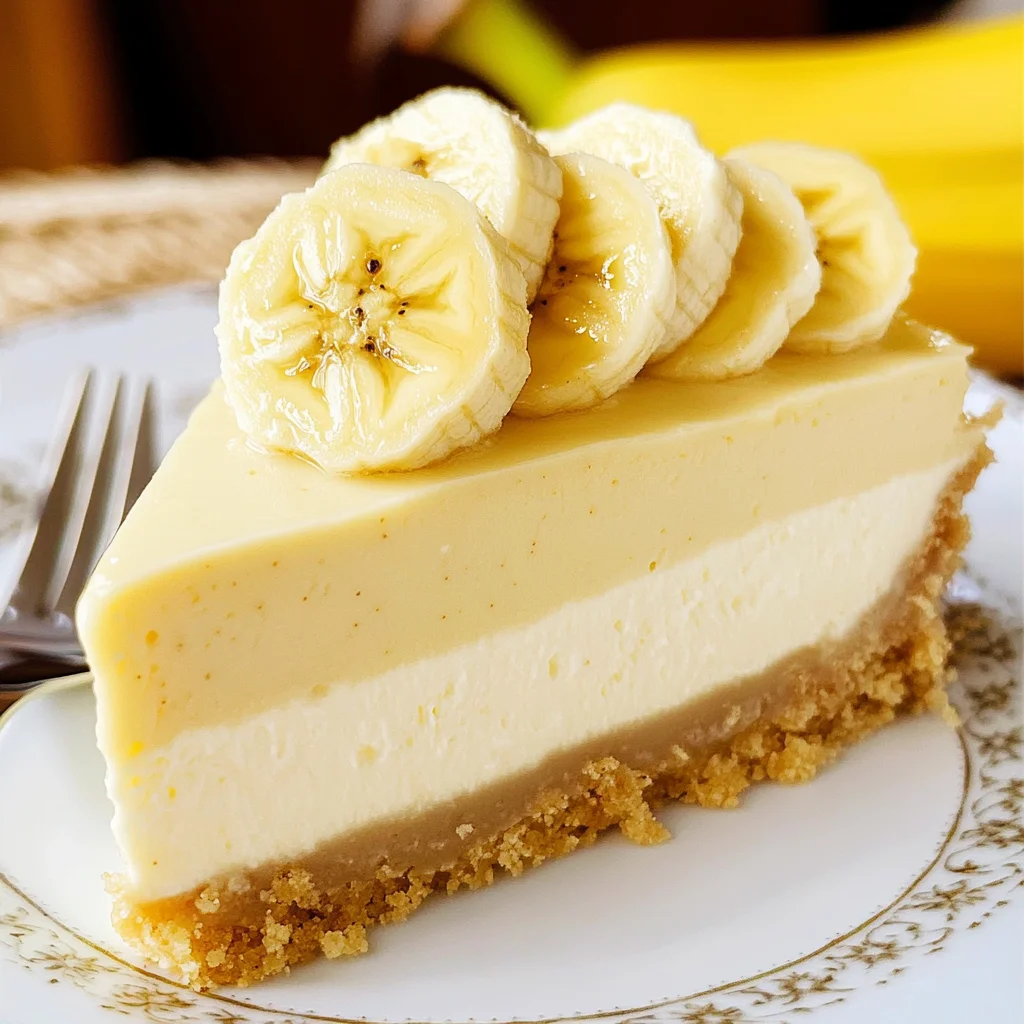
Banana Cream Cheesecake
There’s something utterly enchanting about desserts that bring a sense of nostalgia, especially when they’re crafted from simple yet richly comforting ingredients. The Banana Cream Cheesecake is one such creation that not only tantalizes your taste buds but also wraps you in a warm embrace reminiscent of sunlit afternoons spent sharing laughter and stories over sweet treats. Each slice of this cheesecake offers a symphony of flavors, blending the lusciousness of ripe bananas with the creamy decadence of cheesecake, all nestled atop a buttery crust made from vanilla wafers. It’s an experience that transcends mere eating; it’s about savoring each bite, feeling the creaminess melt on your tongue, and letting the sweet aroma transport you to cherished memories.
As you embark on this culinary journey to create your very own Banana Cream Cheesecake, I promise you it will become more than just a dessert. It’s a celebration — perfect for birthdays, family gatherings, or simply as a delightful indulgence after dinner on a quiet evening. Imagine presenting this stunning cheesecake at your next gathering; the reactions from friends and family will be priceless as they dive into its creamy depths topped with fresh banana slices and the lightest Bavarian cream. It’s truly extraordinary how this dessert bridges tradition with innovation, transforming humble ingredients into an unforgettable masterpiece.
Banana Cream Cheesecake: A Slice of Happiness
This Banana Cream Cheesecake is not just another dessert; it’s an invitation to indulge in the comforting embrace of banana flavor wrapped in smooth cheesecake perfection. As we delve into this recipe together, I encourage you to take your time, enjoy each step, and truly immerse yourself in the process. The combination of flavors and textures here is not only delicious but also incredibly satisfying — trust me when I say that each bite will leave you longing for more!
Ingredients:
Embarking on this culinary adventure requires gathering some essential ingredients that come together to create pure magic. Let’s explore each one and understand their role in crafting our beautiful Banana Cream Cheesecake.
- 2 1/4 cups (302g) vanilla wafer crumbs. These little beauties form the foundation of our cheesecake crust! Their sweet, buttery flavor adds a delightful crunch that perfectly complements the creamy filling. When choosing your vanilla wafers, look for those made with real vanilla for an authentic taste. If you’re feeling adventurous, you could even substitute them with graham cracker crumbs or crushed digestive biscuits for a slightly different flavor profile.
- 10 tbsp (140g) salted butter, melted. This is crucial for binding our crust together while imparting rich flavor. The salt in the butter enhances sweetness and balances the overall taste of the dessert. Make sure your butter is fully melted before mixing it with the crumbs; otherwise, you’ll end up with a crumbly base instead of a cohesive crust.
- 3 tbsp (39g) sugar. A touch of sugar helps to elevate the sweetness in our crust’s flavor profile without overpowering it. It’s essential because we want just enough sweetness to balance out the richness of the cheesecake filling later on.
- 24 ounces (678g) cream cheese, room temperature. This is where we find our cheesecake’s heart and soul! The creamy texture and tangy flavor are what define any great cheesecake. Be sure to allow it to reach room temperature before mixing; this ensures that it blends smoothly without lumps – trust me, there’s nothing worse than biting into a chunk of cold cream cheese!
- 1 cup (207g) sugar. This ingredient sweetens our filling beautifully while also contributing to its creamy texture when blended well with other components like eggs and cream cheese.
- 3 tbsp (24g) all-purpose flour. This acts as a stabilizer for our filling by providing structure while keeping it light and fluffy as it bakes; it’s absolutely paramount to have just enough without making it dense.
- 1/4 cup (58g) sour cream, room temperature. Sour cream adds an incredible depth of flavor while lending moisture to our cheesecake filling — it’s like giving your cake a cozy hug! Just like cream cheese, make sure it’s at room temperature so it can incorporate seamlessly into the mixture.
- 4 tsp banana extract. This is where we really amplify that banana essence! It’s non-negotiable if you’re aiming for that intense banana flavor throughout every layer of this dessert — trust me on this one!
- 1 cup (240ml) pureed banana (2 medium-sized bananas). Using ripe bananas not only boosts flavor but also adds natural sweetness; they should be spotty brown for maximum sweetness! Pureeing them will give us that smooth consistency we desire as part of our cheesecake base.
- 3 large eggs, room temperature. Eggs are vital for binding all our ingredients together while adding richness — ensuring they’re at room temperature helps achieve an even mixture during blending.
- 1 tsp powdered vegan gelatin. This alternative thickener helps stabilize our Bavarian cream topping without using animal-derived products — ensuring everyone can enjoy this delightful treat!
- 2 tbsp (30ml) milk. Milk hydrates our mixture while adding additional creaminess; whole milk works wonders here but feel free to use any plant-based milk if preferred!
- 2 egg yolks. These lend richness to our Bavarian cream topping while also acting as an emulsifier — helping blend everything smoothly without separation.
- 1/2 cup (120ml) heavy whipping cream (for Bavarian cream). This liquid gold is what makes our topping luxuriously creamy! Whipping until soft peaks form creates airiness and volume.
- 2 tbsp (26g) sugar (for Bavarian cream). Added here for sweetness – don’t worry; it won’t overpower but will instead enhance everything beautifully!
- 3/4 tsp vanilla extract & 1/4 tsp banana extract (for Bavarian cream). These extracts are key players in building layers upon layers of flavor in both creamy elements – use quality extracts for best results.
- 2/3 cup (160ml) heavy whipping cream, cold, & 5 tbsp (36g) powdered sugar & 1/2 cup heavy whipping cream, cold, & 1/4 cup powdered sugar, & 1/2 tsp vanilla extract – All these elements combine harmoniously to create clouds of whipped goodness that’ll crown your cheesecake with elegance! Ensure everything remains cold until ready to whip up those dreamy peaks!
- Fresh sliced bananas – To garnish your finished creation! They add visual appeal and enhance those lovely banana flavors beautifully — plus who can resist fresh fruit?
Equipment You’ll Need:
Having the right tools at hand transforms cooking from chore into joy! While these items may not be ingredients themselves, they play essential roles in ensuring everything goes smoothly as we create something truly wonderful together.
- 9-inch springform pan: This magical kitchen gadget allows us to easily remove our finished cheesecake without damaging its delicate structure — absolutely paramount when serving up such beauty!
- Mixing bowls: A good assortment ranging from small to large will help keep things organized as we tackle various components separately before merging them into divine deliciousness!
- Electric mixer or stand mixer: You could whisk by hand if you’re feeling strong but having an electric mixer makes life so much easier when creaming butter or whipping up those clouds of heavy cream!
- Rubber spatula or wooden spoon: Perfect tools for scraping down sides during mixing – ensuring every bit gets evenly incorporated while also folding gently when combining whipped toppings later on.
As we prepare ourselves mentally and physically for creating this delectable Banana Cream Cheesecake masterpiece together—each step unfolding like pages from an enchanting story—I hope you’re feeling excited because we’re about to dive deep into crafting something truly extraordinary!
Step 1: Preparing Your Crust
Let’s kick things off by creating that delicious crust which lays down the groundwork for all that creamy goodness ahead! Begin by preheating your oven to 350°F (175°C); this temperature ensures even baking throughout once we assemble everything later on. In a medium bowl, combine those vanilla wafer crumbs with melted salted butter and sugar until you have a sandy mixture that holds together when pressed – think beach sand rather than dry dirt! This process fosters those delightful crispy edges once baked up beautifully golden brown—the contrast against soft filling will send shivers down anyone’s spine upon tasting! Once combined perfectly—press firmly into bottom—and slightly up sides—of your springform pan using either hands or measuring cup—making sure it’s packed tightly without crumbling away during baking time ahead!
Step 2: Baking That Crust
Now comes my favorite part—baking time! Slide that pan into your preheated oven carefully—set timer for around 10 minutes—just enough time for flavors meld while setting properly within their crumbly shell before moving onto next stages ahead! Keep an eye on those edges though; they should turn lightly golden—not dark brown—as too much color can lead towards bitterness instead—a fate no one deserves after all this hard work done thus far! Once done baking—remove from oven—and let cool completely before adding any filling atop—it’s crucial since hot crust could melt down mixtures layered above which would lead us astray toward disaster instead divine delight!!
Step 3: Mixing Up Your Cheesecake Filling
With cooled crust awaiting eagerly beneath—let’s shift focus towards creating luscious filling destined fill every inch lovingly nestled within crust below!! Grab yourself large mixing bowl—and add softened cream cheese first along with granulated sugar—to start off this heavenly blend known as creaming process which helps aerate mixture yielding fluffier end result overall—not something you’d want missing out at final presentation!! Beat using electric mixer until smooth sans lumps—this typically takes around three minutes tops—but don’t rush through—you want silky-smoothness akin luxurious silk fabric draping across surface effortlessly inviting everyone nearby wanting grab fork dive right into scrumptiousness waiting inside!!
Step 4: Folding In Additional Ingredients
Once you’ve achieved desired smoothness—it’s time introduce other components gradually—we’re talking flour followed by sour cream then pureed bananas alongside extracts here now too!! Each addition builds upon previous layering flavors enhancing overall depth as well—a true testament showcasing artistry involved throughout entire baking process ahead!! Remember fold gently rather than stirring vigorously so air bubbles formed earlier stay intact providing light airy texture ultimately desired once finished baking completes course ahead—no one wants dense cheesecakes after all!! Continue beating until just combined thoroughly ensuring everything melds seamlessly leaving no traces behind remaining separate—the final result should present itself looking beautiful glistening inviting anyone nearby wanting partake slice immediately themselves!!
Step 5: Create the Dreamy Crust
Now that your ingredients are ready and waiting, it’s time to put together the crust of your Banana Cream Cheesecake, which is truly the foundation of this dessert. Start by preheating your oven to 350°F (175°C). While the oven warms up, grab a mixing bowl and combine 2 1/4 cups (302g) of vanilla wafer crumbs, 10 tbsp (140g) of melted salted butter, and 3 tbsp (39g) of sugar. The melted butter is crucial here; it binds the crumbs together and gives them that delightful, rich flavor that perfectly complements the creamy filling.
Once you’ve mixed these ingredients until they resemble wet sand – trust me, you’ll know it when you see it – pour the crumb mixture into a 9-inch springform pan. Now, here’s where you get to channel your inner pastry chef: press the mixture firmly into the bottom and up the sides of the pan using either your fingers or a flat-bottomed measuring cup. This helps ensure that every bite of cheesecake has a bit of that buttery crunch. It’s paramount that you pack it tightly enough so it doesn’t crumble apart later. Once you’re satisfied with your crust, pop it in the oven for about 10 minutes until it’s set and fragrant. You want it just golden enough to hint at its potential without over-baking it – no one wants a burnt crust! After 10 minutes, let it cool while you prepare the filling.
Step 6: Crafting the Creamy Filling
Now for the pièce de résistance: creating that velvety banana cheesecake filling! In a large mixing bowl, beat 24 ounces (678g) of cream cheese until it’s perfectly smooth and creamy; this process usually takes about 2-3 minutes on medium speed. It’s vital to use room-temperature cream cheese because cold cream cheese can lead to lumps in your batter – we want smoothness for that luxurious texture! Gradually add in 1 cup (207g) of sugar, followed by 3 tbsp (24g) of all-purpose flour; these add sweetness and stability to our filling. Mix until everything is well incorporated and fluffy.
Next, stir in 1/4 cup (58g) of sour cream, which adds a subtle tanginess that beautifully balances out the sweetness of the bananas. Then comes my favorite part: adding 4 tsp of banana extract along with 1 cup (240ml) of pureed banana made from two medium-sized bananas. This step infuses our cheesecake with an intoxicating banana flavor that will have everyone asking for seconds! Finally, gently incorporate three large eggs, one at a time, ensuring each egg is fully mixed before adding the next. This careful addition helps maintain that airy texture we crave in our cheesecake. Remember—the goal here is to mix just until combined; overmixing can lead to cracks during baking due to too much incorporated air!
Step 7: Baking Your Banana Cream Cheesecake
With your heavenly banana cheesecake filling ready to go, it’s time for baking! Pour this luscious mixture into your cooled crust—look at how beautiful and creamy it already looks! Now place your springform pan onto a baking sheet; this not only makes moving it around easier but also catches any drips that might escape during baking—trust me on this one! Bake in your preheated oven at 350°F (175°C) for approximately 55 minutes to 1 hour, or until the center is just slightly jiggly when you give it a gentle shake.
This is where patience becomes essential—don’t rush this step! The cheesecake needs time to set properly. You’re looking for a slight golden hue around the edges while keeping that creamy center intact. If you start seeing cracks form on top before it’s set, reduce your oven temperature slightly; every oven behaves differently as all kitchens have their little quirks! When done, turn off the oven but leave your cheesecake inside with the door ajar for another hour—this gradual cooling process prevents sudden temperature changes which can also cause cracks. It’s not just about cooking; it’s about crafting perfection!
Step 8: Chilling for That Perfect Texture
Once your cheesecake has cooled in the oven for an hour, it’s time for one more vital step before indulging: chilling! Transfer your cheesecake to the refrigerator and allow it to chill for at least 4 hours, though overnight is even better if you can wait—trust me when I say this is non-negotiable! This chilling phase allows flavors to meld beautifully and helps solidify that creamy texture we all adore.
What happens during this magical waiting period? The cooling process firms up our cheesecake while enhancing its flavors as they develop further over time—it transforms from delicious to utterly extraordinary! While you’re waiting (and I know how hard that can be), take some time to daydream about serving this dessert at your next gathering or family dinner; imagine everyone’s faces lighting up as they take their first bite!
Next Major Phase – The Banana Bavarian Cream Topping
Ahh…we’re almost there! Now let’s create an enchanting topping—Banana Bavarian Cream—that will crown our Banana Cream Cheesecake with elegance and flair.
Step 9: Whipping Up Your Exquisite Bavarian Cream
The final flourish brings us joy unmatched by any other layer—a luscious Banana Bavarian Cream! In a small saucepan over low heat, combine 2 tbsp (30ml) of milk with 2 egg yolks and whisk continuously until smooth and slightly thickened; this typically takes about 3-5 minutes. By using low heat here, we’re making a custard without scrambling those precious eggs—you want silky smoothness not scrambled bits!
Once thickened, remove from heat and stir in 1/4 tsp banana extract along with some additional flavor boosts like vanilla extract if desired—this will deepen your cream’s complexity wonderfully. Next comes another key ingredient: sprinkle in 1 tsp powdered vegan gelatin while whisking vigorously until completely dissolved—it acts as our stabilizer here so we don’t end up with a runny topping later on. Allow this mixture to cool completely before folding in softly whipped cream made from whipping together 1/2 cup heavy whipping cream with 2 tbsp sugar until soft peaks form—just look at those billowy clouds form!
Finally, gently fold half of your cooled custard into this whipped cream before incorporating everything together until uniform—don’t rush through this part either; being gentle preserves all those airy bubbles we’ve worked hard for! Spoon or pipe this dreamy Bavarian Cream generously over each slice when serving alongside fresh sliced bananas as a garnish—the visual appeal alone will make hearts flutter!
And there you have it—the most glorious Banana Cream Cheesecake topped with luscious Bavarian goodness ready to steal hearts at any gathering or cozy night in. Enjoy every blissful bite!
Storage and Enjoyment Tips for Your Banana Cream Cheesecake
Now that your Banana Cream Cheesecake is ready to take center stage, I can hardly contain my excitement for you to dive into this creamy, dreamy dessert! Whether you’re celebrating a special occasion or simply indulging in a well-deserved treat, this cheesecake is sure to bring smiles and satisfied sighs. But what if there are leftovers? Let’s talk about how to keep this masterpiece fresh and delightful so that every bite remains as heavenly as the first.
Storing Leftover Banana Cream Cheesecake
To preserve the luscious delight of your Banana Cream Cheesecake, it’s essential to store it properly. I recommend placing any leftover cheesecake in an airtight container; this is absolutely crucial to keeping it fresh and preventing any unwanted odors from invading its sweet space in your fridge. If you don’t have an airtight container handy, wrapping it tightly with plastic wrap will do the trick—just make sure it hugs the cheesecake lovingly! In the refrigerator, your cheesecake will stay delicious for about 4-5 days. Trust me on this: if you find yourself with some left over after a gathering, you’ll want every last slice to taste just as incredible as when it was freshly made. A little pro tip I love is to place a slice of bread in the container with your cheesecake; this helps maintain moisture and keeps the crust from getting too soggy. After a few days, while the flavors may mellow slightly, the exquisite creaminess and that unmistakable banana essence will still shine through beautifully. When you’re ready to enjoy another slice, just pull it out of the fridge, let it rest at room temperature for about 15 minutes, and savor that divine flavor!
Freezing Banana Cream Cheesecake for Later
If you’re looking to save some joy for later (and who wouldn’t want a slice of happiness stashed away?), freezing your Banana Cream Cheesecake is an excellent option! To do so properly, first ensure that it’s completely cooled down. Then wrap individual slices tightly in plastic wrap or aluminum foil before placing them into a freezer-safe container—this step is non-negotiable if you want to lock in that creamy goodness! Your cheesecake can be frozen for up to 2 months without losing its charm. When you’re ready for a sweet reunion with this delectable dessert, simply transfer a slice from the freezer to the fridge overnight or let it thaw at room temperature for about an hour before digging in. The convenience of having a slice of banana bliss waiting for you during those busy weeks or surprise gatherings adds such joy to everyday life; truly, it’s like having your very own treasure trove of sweetness right in your freezer!
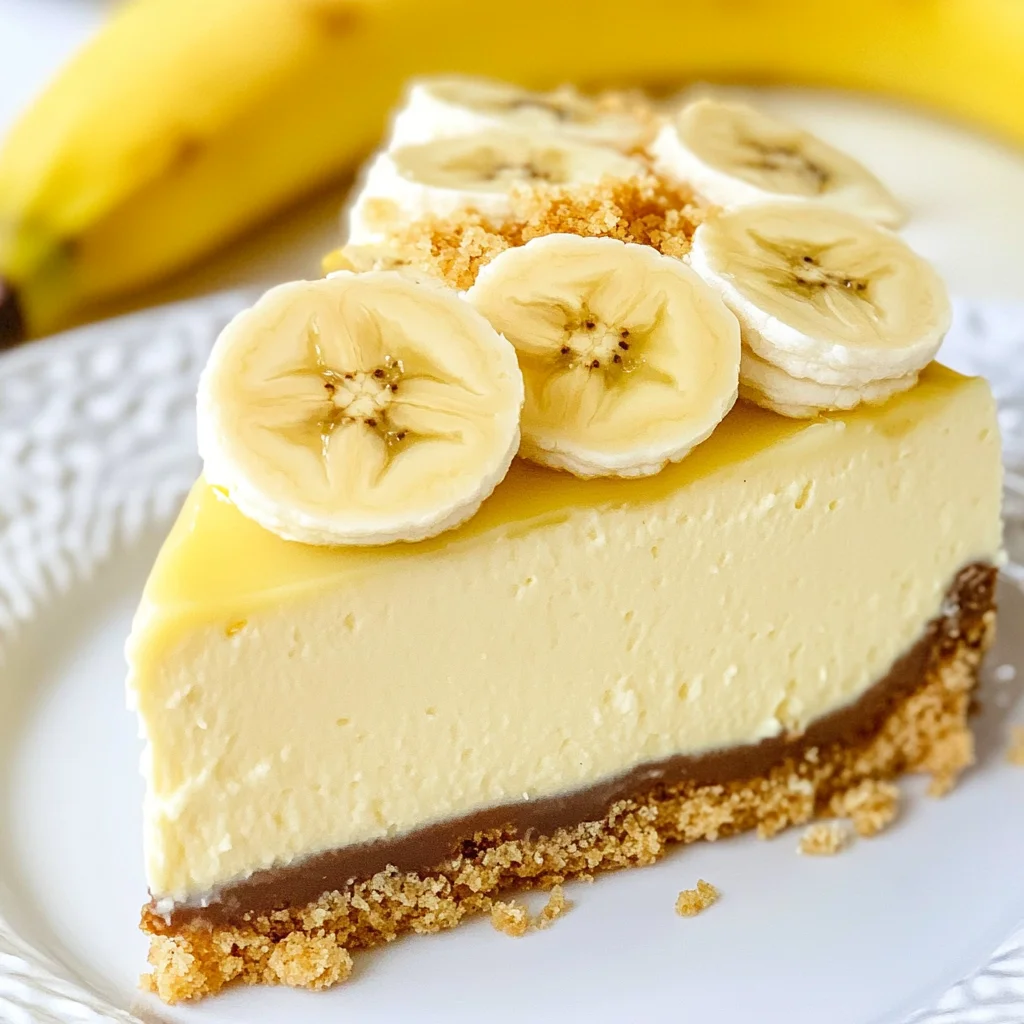
Banana Cream Cheesecake
Indulge in the delightful flavors of our Banana Cream Cheesecake, a creamy dessert that perfectly balances the sweetness of ripe bananas with a luxurious cheesecake filling. This recipe invites you to create a stunning dessert that not only delivers on taste but also brings joy to any gathering. With its buttery vanilla wafer crust and airy Bavarian cream topping, each slice is an experience to savor. Imagine sharing this treat with friends and family, as the rich aroma fills your kitchen and hearts alike. Perfect for birthdays or cozy evenings at home, this cheesecake is sure to become a beloved favorite in your dessert repertoire.
- Prep Time: 30 minutes
- Cook Time: 1 hour
- Total Time: 1 hour 30 minutes
- Yield: Serves approximately 12 slices 1x
- Category: Dessert
- Method: Baking
- Cuisine: American
Ingredients
- 2 1/4 cups vanilla wafer crumbs
- 10 tbsp salted butter, melted
- 3 tbsp sugar (for crust)
- 24 ounces cream cheese, softened
- 1 cup granulated sugar (for filling)
- 3 tbsp all-purpose flour
- 1/4 cup sour cream
- 4 tsp banana extract
- 1 cup pureed banana (2 medium bananas)
- 3 large eggs
- 1 tsp powdered vegan gelatin
- 2 tbsp milk
- 2 egg yolks
- 1/2 cup heavy whipping cream (for Bavarian cream)
- 2 tbsp sugar (for Bavarian cream)
- 3/4 tsp vanilla extract
- 1/4 tsp banana extract (for Bavarian cream)
- 2/3 cup heavy whipping cream, cold
- 5 tbsp powdered sugar
- 1/2 cup heavy whipping cream, cold
- 1/4 cup powdered sugar
- 1/2 tsp vanilla extract (for whipped cream)
- Fresh sliced bananas for garnish
Instructions
- Preheat oven to 350°F (175°C). In a bowl, combine vanilla wafer crumbs, melted butter, and sugar until sandy. Press mixture firmly into the bottom and sides of a 9-inch springform pan.
- Bake crust for about 10 minutes until set; let cool.
- In a mixing bowl, beat cream cheese until smooth. Gradually add sugar and flour, mixing well.
- Stir in sour cream, banana extract, and pureed bananas. Beat in eggs one at a time until blended.
- Pour filling into crust and bake for 55 minutes to an hour until slightly jiggly in center. Turn off oven; let it cool inside for an hour before refrigerating for at least 4 hours or overnight.
- For Bavarian cream, whisk milk and egg yolks over low heat until thickened; stir in banana extract and powdered vegan gelatin until dissolved. Let cool.
- Fold whipped cream into cooled custard gently until combined.
- Spread Bavarian cream over chilled cheesecake; garnish with fresh banana slices.
Nutrition
- Serving Size: 1 slice
- Calories: 320
- Sugar: 21g
- Sodium: 210mg
- Fat: 22g
- Saturated Fat: 12g
- Unsaturated Fat: 8g
- Trans Fat: 0g
- Carbohydrates: 28g
- Fiber: 2g
- Protein: 4g
- Cholesterol: 70mg