Cheesy Hawaiian Roll Garlic Bread
There’s something so magical about the act of cooking; it’s not just about the ingredients or the final dish, but rather the entire experience that unfolds in our kitchens. When I first stumbled upon the Cheesy Hawaiian Roll Garlic Bread on TikTok, my heart skipped a beat. The idea of transforming those sweet, fluffy Hawaiian rolls into something utterly intoxicating with garlic and gooey cheese felt like an epiphany! Each bite is a perfect balance of savory and sweet, like a warm hug from an old friend. As you melt into the rich flavors and delightful aromas wafting through your kitchen, you’ll understand why this recipe has taken the internet by storm. It’s not merely food; it’s a celebration—an invitation to gather, share stories, and indulge in something truly extraordinary.
When I share this recipe with you, I’m not just handing over a list of ingredients and instructions; I’m inviting you into my kitchen and sharing a piece of my culinary heart. Picture yourself pulling those golden-brown rolls out of the oven, their tops glistening with melted butter and flecks of green from the parsley. It sparks joy and nostalgia—a reminder of family gatherings and cozy nights in. This Cheesy Hawaiian Roll Garlic Bread has become more than just a viral sensation; it’s a bridge between old traditions and contemporary cravings. Perfect for gatherings or as a comforting side to any meal, this bread is sure to bring smiles all around.
Cheesy Hawaiian Roll Garlic Bread: A Cheesy Dream Come True!
Let’s dive right into creating this heavenly addition to your dining table! Whether you’re looking for an appetizer that dazzles or a snack that warms the soul, this cheesy delight will be your go-to recipe. Trust me, once you serve this at your next gathering or enjoy it during a cozy movie night at home, you’ll find it hard to resist making it time and time again!
Ingredients:
As we embark on this culinary journey together, let’s take a moment to appreciate each ingredient that contributes to making our Cheesy Hawaiian Roll Garlic Bread so special. Each one plays an integral role in crafting those unforgettable flavors we’re aiming for!
-
12-16 count Hawaiian rolls (2 slits cut into the top of each): The star of our show! These soft, slightly sweet rolls serve as the perfect canvas for our cheesy masterpiece. Their texture is fluffy yet sturdy enough to hold all that delightful filling without falling apart. When choosing your rolls, look for ones that are fresh—those with a subtle sheen on the crust are often the best! Cutting slits halfway through each roll allows us to stuff them generously with cheese later on, ensuring every bite is packed with flavor.
-
1 stick salted butter (softened): Ah, butter—the liquid gold that brings everything together! Softened butter is non-negotiable here; it spreads beautifully across our rolls and helps create that luscious garlic topping we all crave. If you’re feeling adventurous, try using European-style butter for an even richer flavor profile! Remember, if your butter is too cold or melted, it won’t spread evenly—aim for that perfect room temperature where it’s soft but still holds its shape.
-
1 tbsp chopped fresh parsley (washed thoroughly): Fresh herbs elevate any dish from ordinary to extraordinary! Parsley adds a vibrant pop of color and freshness against all that richness of cheese and garlic. Make sure to wash it thoroughly before chopping—it not only enhances its flavor but also ensures you’re getting rid of any grit from the leaves. If you don’t have parsley on hand, feel free to substitute with fresh basil or even chives for a unique twist!
-
2 1/2 tbsp minced garlic: Garlic is truly one of life’s simple pleasures—it transforms ordinary dishes into exceptional ones! The robust aroma and flavor of freshly minced garlic will infuse our buttery mixture with its incredible essence. Trust me when I say: don’t skimp on garlic here; it’s what makes this bread irresistibly fragrant and comforting!
-
1 tbsp grated Parmesan cheese: This little gem adds depth with its nutty flavor while complementing our main cheese beautifully. Use freshly grated Parmesan if possible; pre-packaged versions can lack that intense taste we’re after. Just imagine how amazing it will be as it melts into each roll!
-
1 1/2 cups shredded mozzarella cheese: Now we arrive at perhaps the most crucial ingredient—the mozzarella! Known for its glorious melting properties, mozzarella creates those dreamy strings when you pull apart each roll. Aim for freshly shredded mozzarella if you can; packaged varieties often contain anti-caking agents which can affect melting quality. The combination of all these cheeses will ensure every bite is oozing with cheesy goodness!
Equipment You’ll Need:
Having the right tools handy makes cooking so much smoother—and trust me when I say they’re essential partners in creating something wonderful! While they may not be ingredients themselves, they certainly contribute significantly to your success in creating this delightful Cheesy Hawaiian Roll Garlic Bread.
-
9×13 inch baking dish: This classic baking dish is perfect for gathering all those beautiful rolls together during baking! Its size allows for even cooking while providing ample space for our deliciously stuffed creations without overcrowding them.
-
Small mixing bowl: We need something handy to whisk together our flavorful garlic butter mixture! A small mixing bowl is perfect here—just big enough to combine everything without making too much mess.
-
Whisk or fork: You might think any utensil would work here—but using a whisk really helps blend all those flavors beautifully! A fork can also do the trick if that’s what you have available; just make sure everything is combined well.
Preparing the Cheesy Hawaiian Roll Garlic Bread
Step 1: Arranging Your Rolls
Begin by preheating your oven to 400°F (200°C). It’s vital we get that heat going early because we want everything ready when we start assembling our bread duo—you’ll thank me later when it’s time to enjoy these warm rolls fresh out of the oven! Take your buttered 9×13 inch baking dish and carefully place your prepared Hawaiian rolls inside—two slits cut into each one should reveal their fluffy interiors eagerly waiting for their cheesy filling!
Step 2: Stuffing Your Rolls
It’s time for some fun—let’s stuff those slits with deliciousness! Gently pull apart each slit on top of every roll (don’t worry if they seem tight; they’ll open up nicely). Then grab your shredded mozzarella cheese and pack it generously inside each slit until overflowing slightly—this is where all that gooey goodness comes from! As you do this step, savor how exciting it feels knowing soon enough you’ll enjoy melty bites filled with cheesy happiness.
Step 3: Mixing Up That Flavorful Butter
Now let’s create magic in our small mixing bowl by adding softened butter along with minced garlic and chopped parsley—oh boy does my kitchen smell divine already! Using either a whisk or fork (whatever feels comfortable), mix everything well until fully combined—you want every bit coated in garlicky goodness because trust me—it makes all the difference when spread atop those stuffed rolls later on!
Step 4: Spreading That Heavenly Mixture
Once mixed thoroughly (and maybe sneaking in a little taste…I won’t tell!), use a spatula or spoon to dollop generous amounts over each stuffed roll until they’re gleaming with buttery bliss—you want them glistening like treasure before heading into their warm embrace within the oven! Don’t rush through spreading; take time ensuring every nook gets covered because this step elevates flavors beyond belief—your taste buds will thank you profusely once baked!
As we move forward through these simple yet satisfying steps together toward creating incredible Cheesy Hawaiian Roll Garlic Bread perfection… stay tuned because there’s much more cheesy joy ahead!
Step 5: Layering the Cheesy Goodness
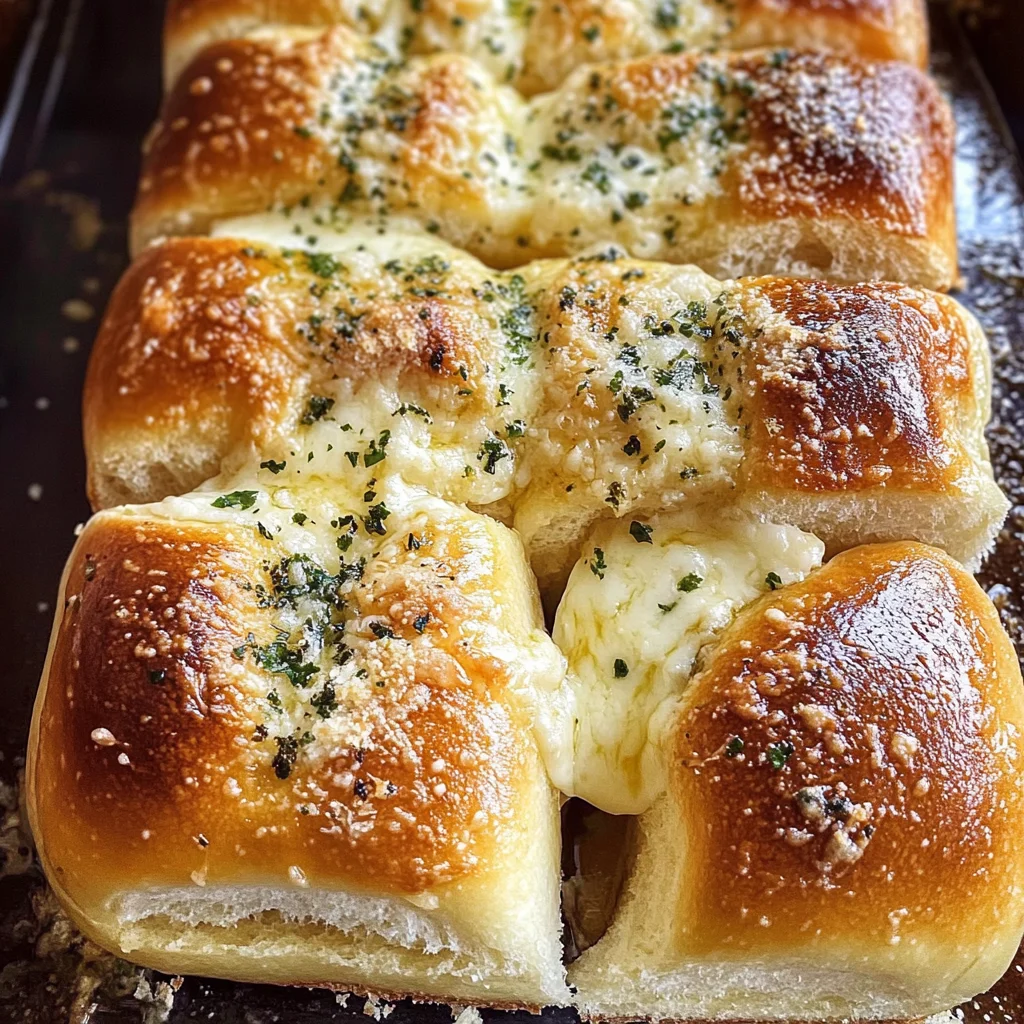
Now that we’ve got our Hawaiian rolls nestled snugly in that buttered baking dish, it’s time to bring on the cheese! Imagine each roll as a little treasure chest waiting to be filled with flavor. Using your hands or a small spoon, gently stuff each slit you made earlier with a generous amount of shredded mozzarella cheese. Don’t be shy here; this is where the magic happens! The mozzarella will melt into gooey perfection, creating that utterly intoxicating stretch when you pull apart a roll later. Just think about it—the warm, melted cheese mingling with the sweet undertones of the rolls—it’s nothing short of heavenly.
As you’re layering in the mozzarella, take a moment to appreciate how this step transforms ordinary ingredients into something extraordinary. This isn’t just about taste; it’s about texture and experience. The way the rolls become a vessel for that melty goodness is crucial for achieving the ideal cheesy Hawaiian roll garlic bread. Make sure to pack in as much cheese as comfortably fits without tearing the rolls apart. Trust me on this: every bite filled with warm cheese will leave your guests begging for more.
Step 6: Whipping Up the Garlic Butter Bliss
Now comes one of my favorite parts—the garlic butter! In a small mixing bowl, combine your softened stick of salted butter, freshly chopped parsley, and minced garlic. I always find it fascinating how simple ingredients can come together to create such depth of flavor. Use a whisk to blend everything until it’s beautifully combined; this helps ensure that each roll gets an even coating of that buttery goodness. The aroma at this stage is simply divine—garlic wafting through your kitchen like an invitation to indulge.
Why is this step so important? Well, think of it as preparing a luxurious bath for those rolls. The garlic not only enhances the flavor profile but also infuses every nook and cranny with its aromatic essence, while the butter acts as a rich base that binds everything together. When spread over our stuffed rolls, it seeps into every crevice, ensuring no bite goes uncelebrated. And don’t forget about that parsley—it adds a fresh pop of color and brightness that balances out all that savory richness.
Step 7: Drenching in Flavor
Once your garlic butter is ready and your heart is aflutter with anticipation, it’s time to lavishly spread that mixture over the cheese-stuffed Hawaiian rolls. Use a spatula or even your fingers (yes, it’s perfectly okay!) to ensure every single roll gets generously coated with that glistening liquid gold. Don’t rush this step; take your time to really make sure every roll feels loved and covered in flavor. You want to see little puddles of garlicky goodness pooling around them—this is what makes them so profoundly satisfying!
As you layer on this seasoned butter, you’ll notice how it begins to soak into both the bread and cheese below—this interaction creates a beautiful symphony of flavors during baking that will have everyone swooning at first bite. There’s something truly magical about watching those rolls transform from simple bread into an aromatic masterpiece destined for enjoyment! Remember: this step is absolutely paramount; it’s what elevates these rolls from good to utterly unforgettable.
Step 8: Baking Your Cheesy Masterpiece
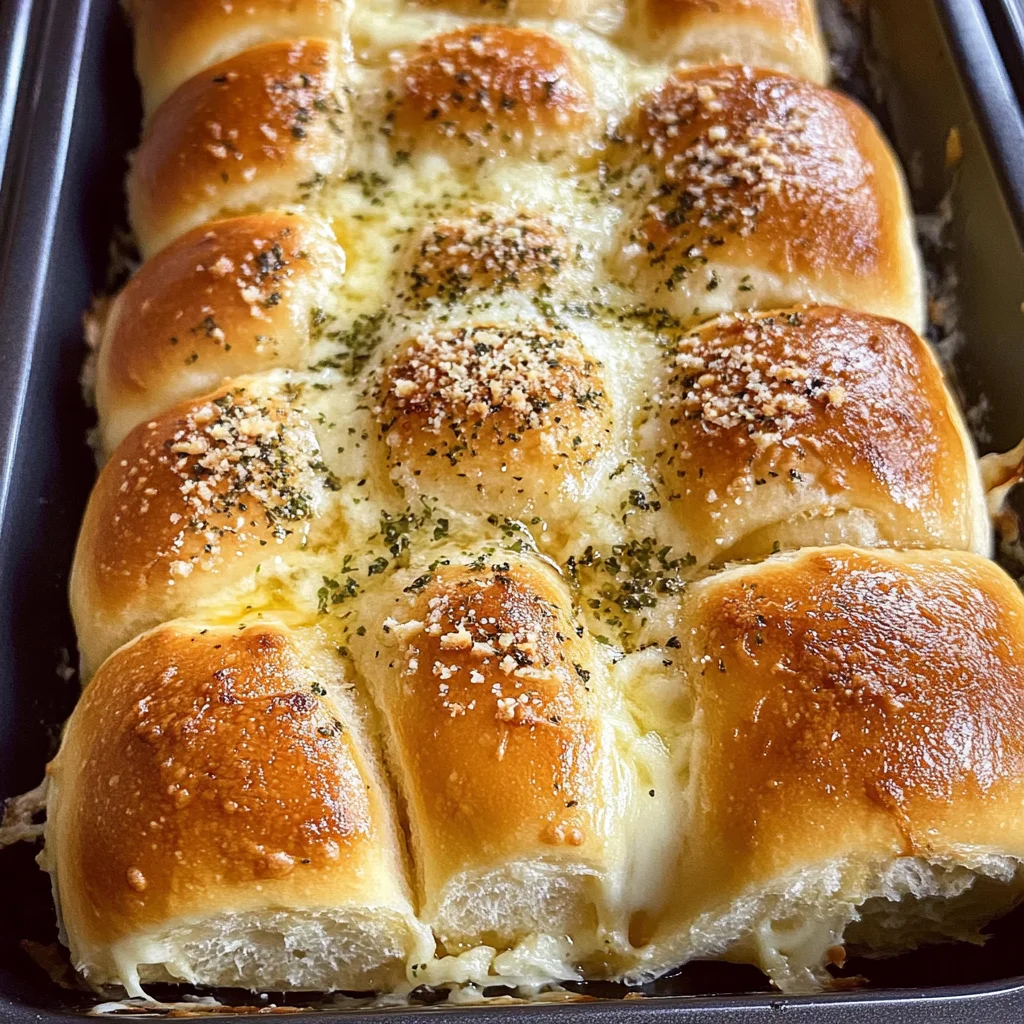
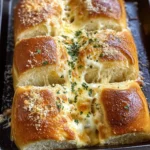
Now we arrive at what I consider one of the most exciting moments—the baking! Preheat your oven to 400°F (200°C), and once it’s ready, place your assembled dish inside for about 9-11 minutes. Keep an eye on those precious rolls as they bake because things happen fast in there! You’ll know they’re done when the cheese has melted into gloriously gooey strings and the tops turn golden brown—a visual cue signaling not just doneness but deliciousness!
During these few minutes in the oven, science works its magic: heat causes those sugars in the Hawaiian rolls to caramelize slightly while melting cheese creates that lovely stretchy texture we all crave. But here’s where patience pays off—if you let them go too long, they might dry out or burn on top! So set your timer and check them after 8 minutes if you’re anxious (yes, I get it!). Once they’re beautifully browned and bubbling with excitement, pull them out carefully—you want to capture all that warmth before anyone else gets their hands on them!
Conclusion:
As we reach the end of our flavorful journey together, I hope you’re feeling as excited about this recipe as I am! Creating your own Cheesy Hawaiian Roll Garlic Bread isn’t just about bringing together sweet rolls and savory garlic butter; it’s about crafting an experience that tantalizes your taste buds and warms your heart. The way those slightly sweet rolls cradle oozing cheese and aromatic garlic creates a symphony of flavors that elevates even the simplest meal into something profoundly satisfying. It’s truly extraordinary how just a handful of ingredients can come together to create such magic!
This recipe is an absolute must-try not only because it tastes divine but also because it brings joy into the kitchen. Whether you’re whipping it up for a cozy dinner with loved ones or serving it at a lively gathering with friends, there’s something undeniably special about watching those rolls disappear within moments. Just imagine taking them out of the oven: golden brown on top, gooey cheese peeking through slits, and that intoxicating aroma wrapping around everyone—it’s more than food; it’s an invitation to connect over good flavors and laughter.
When it comes to serving suggestions, consider enjoying these delightful rolls alongside a fresh garden salad drizzled with tangy vinaigrette or pairing them with a hearty bowl of homemade soup. Imagine savoring one with a rich tomato basil soup—each bite enhances your dining experience as flavors mingle beautifully together! For an afternoon pick-me-up, why not enjoy these rolls with brunch? They pair wonderfully with eggs or even spread with cream cheese and herbs for something truly decadent.
Feeling adventurous? This recipe is wonderfully adaptable! You could experiment by adding different cheeses like pepper jack for heat or mixing in some sun-dried tomatoes for added sweetness—a twist on tradition that will leave everyone craving more! And don’t forget about herbs; fresh basil or oregano would lend themselves beautifully to this dish! I invite you to take this recipe and make it your own—share your experiences and variations with me because cooking is so much more than just following steps; it’s about making memories together.
Cheesy Hawaiian Roll Garlic Bread
Indulge in the delightful experience of Cheesy Hawaiian Roll Garlic Bread, a perfect blend of sweet and savory that will elevate any meal or gathering. This crowd-pleaser transforms fluffy Hawaiian rolls into a cheesy, garlicky treat that’s impossible to resist. As you pull apart each roll, you’ll enjoy the stretchy mozzarella paired with aromatic garlic butter, creating a warm embrace for your taste buds. Whether served as an appetizer or alongside your favorite soup, this recipe is destined to become a staple in your kitchen. Easy to prepare and utterly satisfying, it’s a celebration of comfort food that invites family and friends to share in the joy of good flavors.
- Prep Time: 15 minutes
- Cook Time: 10 minutes
- Total Time: 25 minutes
- Yield: About 16 servings 1x
- Category: Appetizer
- Method: Baking
- Cuisine: American
Ingredients
- 12–16 count Hawaiian rolls (2 slits cut into the top of each)
- 1 stick salted butter (softened)
- 1 tbsp chopped fresh parsley (washed thoroughly)
- 2 1/2 tbsp minced garlic
- 1 tbsp grated Parmesan cheese
- 1 1/2 cups shredded mozzarella cheese
Instructions
- Preheat oven to 400°F (200°C).
- Place Hawaiian rolls in a buttered 9×13 inch baking dish, making two slits in each roll.
- Stuff each slit generously with shredded mozzarella cheese.
- In a small mixing bowl, combine softened butter, minced garlic, and chopped parsley; mix well.
- Spread the garlic butter mixture evenly over the stuffed rolls.
- Bake for 9-11 minutes until cheese is melted and tops are golden brown.
- Allow cooling slightly before serving.
Nutrition
- Serving Size: 1 roll (40g)
- Calories: 145
- Sugar: 2g
- Sodium: 260mg
- Fat: 8g
- Saturated Fat: 5g
- Unsaturated Fat: 3g
- Trans Fat: 0g
- Carbohydrates: 15g
- Fiber: <1g
- Protein: 4g
- Cholesterol: 15mg