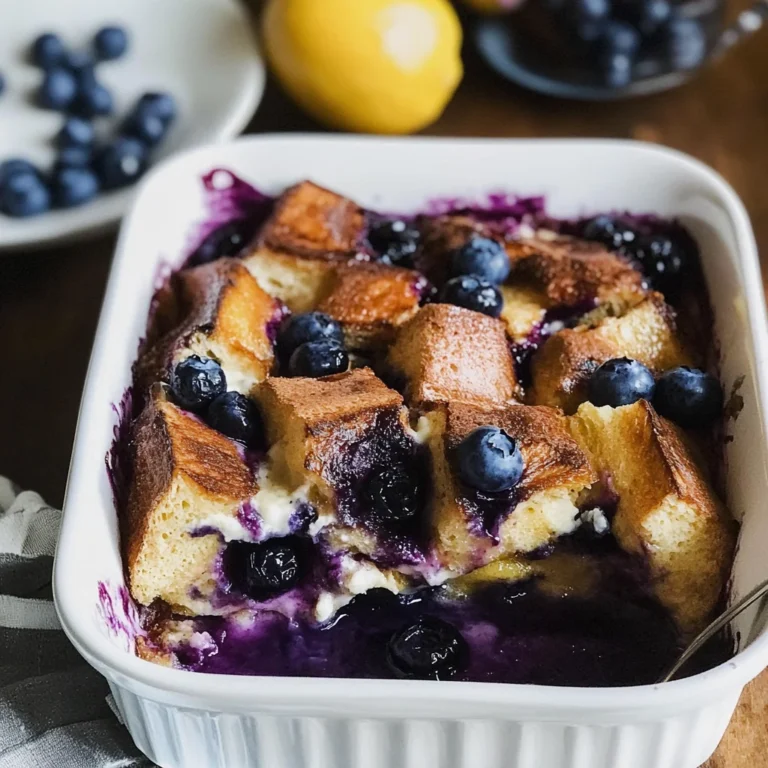
Crème Brûlée French Toast
There’s something utterly intoxicating about the combination of creamy custard and crispy sugar that draws us into the world of desserts, and it has always fascinated me how a simple dish can evoke such deep emotions. This Crème Brûlée French Toast is not just a breakfast item; it’s a comforting embrace on a chilly morning, an indulgent treat for those lazy Sundays, or even a delightful surprise for brunch guests who think they’ve seen it all. Imagine slicing into that golden-brown crust, only to reveal a soft, luscious interior that tastes like it was made with pure love. Each bite is a reminder of family gatherings, laughter around the table, and moments that matter most. I promise you, this recipe will become your go-to for creating unforgettable memories.
What truly sets this Crème Brûlée French Toast apart from traditional French toast is its luxurious custard base that transforms everyday bread into something extraordinary. The marriage of rich brioche or challah with a silky mixture of eggs, cream, and vanilla creates a symphony of flavors that dances on your palate. As it bakes, the top becomes beautifully caramelized, providing that delightful contrast of textures—soft yet crisp. Whether you’re serving it topped with fresh berries or drizzled with maple syrup, this dish offers an experience that’s both decadent and heartwarming. It’s perfect for special occasions or simply to treat yourself because let’s face it—everyone deserves to indulge every now and then!
Crème Brûlée French Toast: A Decadent Morning Delight
I can’t wait for you to dive into this delightful recipe! It’s not just about following steps; it’s about embracing each ingredient with love and care to create something truly magnificent. So grab your apron and let’s embark on this culinary journey together!
Ingredients:
As we gather our ingredients for this enchanting Crème Brûlée French Toast, remember that each one plays an essential role in crafting the final masterpiece. Let’s take a moment to appreciate them.
- 1 loaf of brioche or challah bread (12-14 slices). The choice between brioche and challah might feel daunting at first, but trust me when I say that both are excellent options! Brioche is known for its buttery richness and soft texture, making it ideal for soaking up the custard without falling apart. Challah, on the other hand, has a slightly sweeter profile and boasts beautiful braided aesthetics that add charm to your dish. When selecting your bread, look for loaves that are fresh; if possible, day-old bread works wonders as it absorbs more liquid without becoming mushy.
- 4 large eggs. Eggs serve as the backbone of our custard base in this recipe; they provide structure while enriching the flavor profile beautifully. I recommend using large eggs as they yield more volume than smaller sizes—this step is crucial! The proteins in eggs will help set your mixture as it bakes, creating that perfect custardy texture we all crave. Make sure to whisk them well so they’re fully incorporated into the liquid gold we’re about to create.
- 1 cup whole milk (or almond/oat milk for dairy-free). Milk adds creaminess and depth to our custard while helping balance out the sweetness from sugar. While whole milk provides richness that’s hard to beat, I completely understand if you’re looking for dairy-free alternatives! Almond or oat milk can easily step in here without sacrificing much flavor—but do check labels for added sugars if you’re aiming for purity in taste.
- 1/2 cup heavy cream (or half-and-half). Heavy cream takes our custard to another level by introducing velvety smoothness—it’s what makes every bite feel luxurious! If you’re aiming for something lighter but still want some creaminess, half-and-half is a lovely alternative; however, don’t skip this step altogether! This ingredient creates that indulgent mouthfeel we often associate with crème brûlée itself.
- 1/2 cup granulated sugar (or brown sugar). Sugar does more than sweeten our dish; it caramelizes beautifully during baking and bruleeing processes! Granulated sugar will give you a classic taste while brown sugar adds hints of molasses—both are delicious options worth exploring based on your preference. Just keep in mind how each choice affects flavor; brown sugar will lend deeper notes while granulated keeps things straightforwardly sweet.
- 1 tablespoon vanilla extract (or vanilla bean paste). Vanilla acts as an aromatic enhancer here; it’s what elevates our dish from ordinary to extraordinary! Pure vanilla extract offers vibrant flavor that’s unmatched by synthetic varieties—if you can find vanilla bean paste instead (with those beautiful specks), go for it! This tiny addition makes all the difference when combined with our other ingredients.
- 1/2 teaspoon ground cinnamon (or nutmeg). Spices bring warmth and depth into any dish—cinnamon brings cozy undertones reminiscent of autumn while nutmeg offers an intriguing twist with its earthy aroma. Both add complexity without overpowering other flavors; I suggest starting small and adjusting based on personal taste preferences!
- Pinch of salt. While salt might seem like an afterthought in dessert recipes, it’s actually non-negotiable here as it helps balance sweetness effectively! Just a pinch enhances all other flavors present in our mixture—it’s amazing how something so small can make such profound impact!
Equipment You’ll Need:
Before we dive headfirst into making this decadent delight, let’s gather some essential tools that will support you throughout this cooking adventure! Having the right equipment makes everything smoother—and trust me when I say these pieces are invaluable partners in bringing your creation to fruition.
- Baking dish – A large baking dish is crucial because we want enough space not just for soaking but also allowing heat circulation around each slice while baking evenly! Ideally, opt for one that’s at least 9×13 inches deep enough to accommodate all slices comfortably without overcrowding—which could lead some pieces not receiving proper cooking time!
- Mixing bowl – A good-sized mixing bowl allows ample room when whisking together our custard ingredients effortlessly! Choose one with high sides so nothing splashes out during mixing sessions—it’ll save you cleanup time later!
- Whisk – A sturdy whisk helps combine eggs smoothly into our dairy mixture until everything melds perfectly together without lumps forming—a crucial step indeed since lumpy custard won’t yield desirable results!
- Spatula – You’ll need a spatula handy for scraping down any stubborn bits stuck along edges of bowls ensuring no ingredient goes unappreciated during preparation stages—every morsel matters!
- Kitchen torch or broiler pan – For achieving that signature brûléed finish on top once baked—a kitchen torch gives better control over caramelization than broiler settings do alone—but both methods yield similar results if used correctly!
Preparing the Crème Brûlée French Toast
Step 1: Prepare Your Bread
To set ourselves up for success right from the start, let’s begin by cutting our beautiful loaf of brioche or challah into thick slices about 1-inch thick—and trust me when I say thicker slices absorb more deliciousness than thinner ones ever could! Arrange these slices neatly within your greased baking dish like soldiers ready to be transformed into culinary glory—the way they fit snugly together plays an important role later when pouring over custard mixture evenly across surfaces too! Don’t rush through this process; take a moment to admire how inviting they look as you lay them side by side—it’ll only heighten anticipation leading up toward tasting later!
Step 2: Make Your Custard
Now let’s move on to creating our glorious custard base—it should be rich yet light enough not overwhelm each slice beneath its embrace! Grab that mixing bowl again because we’re going full-on whisking mode here: combine those four large eggs alongside one cup whole milk plus half cup heavy cream alongside granulated sugar followed by generous splash vanilla extract finally finishing off with ground cinnamon (or nutmeg if preferred) plus pinch salt too—all remarkable ingredients coming together harmoniously within one vessel expressing pure love through their union! Whisk vigorously until everything appears well blended but don’t fret if slight lumps remain—they’ll dissolve beautifully during soaking process ahead providing more texture overall once baked properly.
Step 3: Soak Your Bread
This part is where magic unfolds—pouring your luscious custardy mix directly over those arranged slices feels almost ceremonial doesn’t it? Gently press down upon each slice ensuring they soak properly without losing shape entirely—it’s absolutely paramount everyone gets equal attention here otherwise some may end up dry whilst others drown under excess moisture instead which isn’t ideal outcome whatsoever! Cover tightly using plastic wrap before placing inside refrigerator allowing minimum thirty minutes’ rest period although overnight option remains best bet yielding ultimate results—we want maximum absorption after all leading toward perfectly decadent final product bursting forth flavors galore!
Step 4: Preheat Your Oven
While waiting patiently (and trust me—you’ll want patience!), take advantage of this downtime by preheating oven temperature setting at 350°F (175°C). This ensures even cooking throughout entire batch once ready hits hot surface allowing crust forms nicely atop whilst maintaining softness inside during baking journey ahead afterward which enhances overall eating pleasure immensely—it really makes difference knowing temperatures consistent throughout duration means no surprises lurking behind closed doors later on either!
Stay tuned as we delve deeper into completing those remaining steps soon—you’re doing wonderfully already just by preparing these foundational elements necessary elevating dish toward sublime heights awaiting us shortly ahead!
Step 5: Baking to Golden Perfection
Now that you’ve lovingly soaked your brioche or challah in that luscious custard, it’s time for the magic to happen in the oven. Preheat your oven to 350°F (175°C) because we want to create a warm, inviting environment that will coax the flavors from our mixture while transforming the bread into a delightfully fluffy texture. As you place your baking dish into the preheated oven, take a moment to appreciate the anticipation building in your kitchen. There’s something unmistakably comforting about the aroma of vanilla and cinnamon wafting through the air; it’s like a warm hug on a chilly morning.
Bake the French toast for about 25-30 minutes, but don’t just set a timer and walk away! This is where you need to engage with your creation—watch closely as it transforms. You’ll know it’s ready when the top is beautifully golden brown and puffs up ever so slightly, indicating that those custard-soaked layers have cooked through brilliantly. The custard should be set but still tender; if you poke it gently with a fork, it should feel firm yet springy. If you’re feeling adventurous, you can turn on the broiler for an extra 2-3 minutes at this stage. Just remember to keep your eyes glued to it because things can go from perfectly caramelized to burnt in an instant! Trust me on this—achieving that crispy top is absolutely paramount for replicating the delightful texture of traditional crème brûlée.
Step 6: Brûlée-ing Your Way to Sweet Bliss
Ah, here comes one of my favorite parts—the brûlée! This step is where we pay homage to its namesake dessert and create that iconic crunchy topping that makes every bite of your Crème Brûlée French Toast feel like an indulgence. Once you’ve taken your masterpiece out of the oven and allowed it to cool just slightly—about five minutes—you’re ready for this delightful transformation. First things first: sprinkle a thin layer of granulated sugar evenly over the top. Aim for just enough sugar to cover without clumping; think of it like dusting fairy sparkle across a beautiful canvas.
Now comes the fun part! If you have a kitchen torch, this is where it shines—pun intended! Hold it about six inches from the surface and move it back and forth, watching as the sugar begins to melt into a glossy liquid gold before turning into that crispy crust we adore. It should take just one or two minutes, but keep an eye on it—the goal is caramelization without burning. Alternatively, if you don’t have a torch handy (and I get it; they’re not exactly kitchen staples), you can achieve similar results by placing your dish under the broiler for about one minute. But be cautious! The broiler can be fierce; so stand by with vigilance as you watch that sugar bubble and turn into its glassy glory.
Step 7: The Perfect Plating
Once you’ve achieved that glorious brûléed crust, let your Crème Brûlée French Toast cool for just a few moments more before serving—it helps set those flavors while keeping everything wonderfully warm when plated. Now is where we elevate this dish from delicious breakfast fare into something truly extraordinary! As you cut into those thick slices, notice how each piece holds its shape beautifully while still being tender inside; this is exactly what we want!
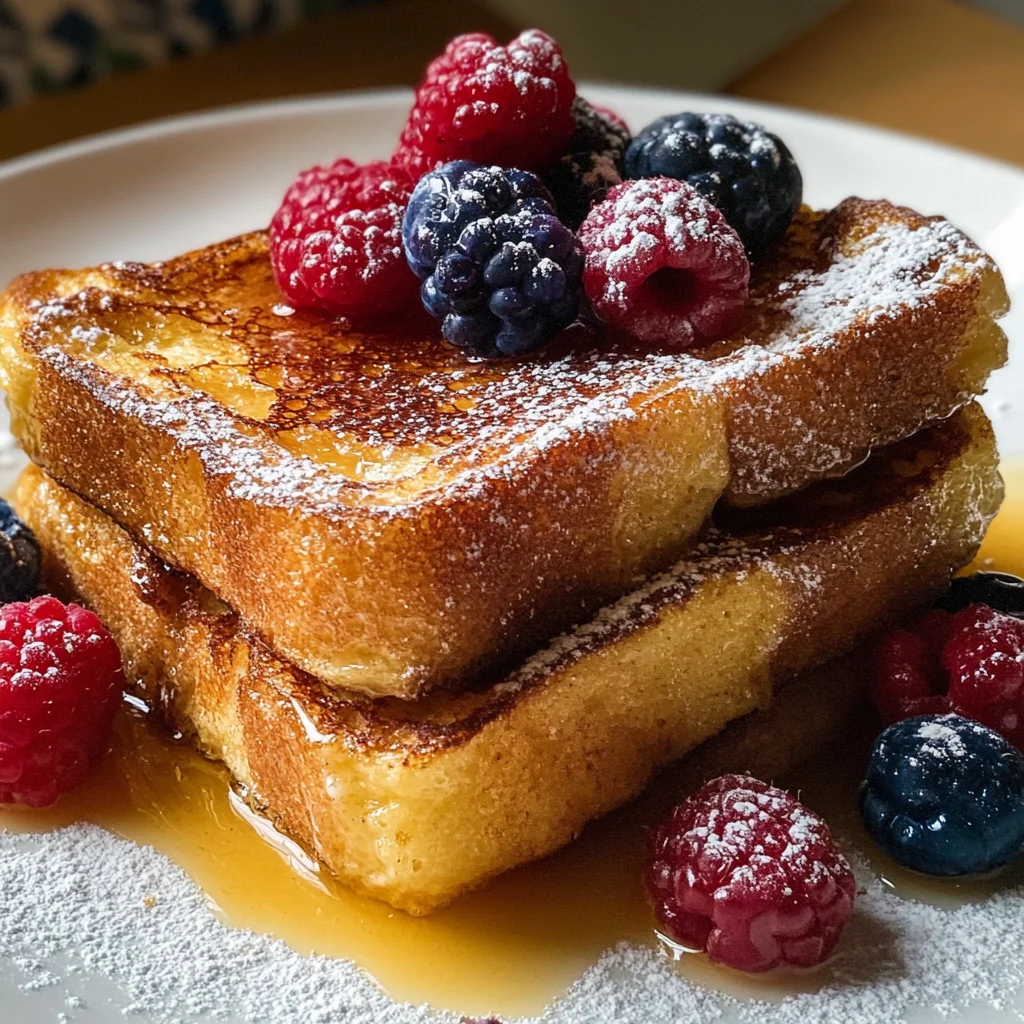
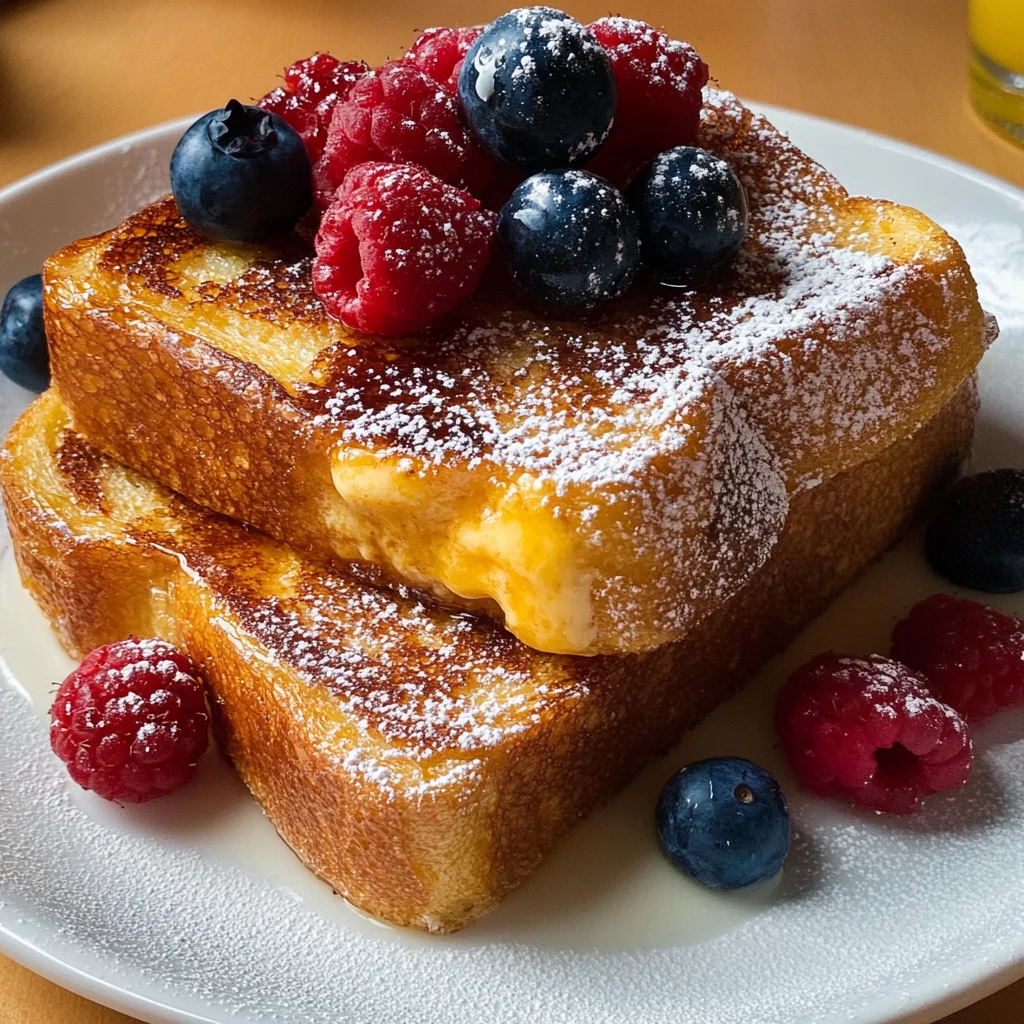
To serve, consider presenting each slice on individual plates or family-style in one big dish—the choice is yours! Garnish generously with fresh berries; their vibrant colors will pop against that creamy golden backdrop and add a refreshing burst of flavor with every bite. A dusting of powdered sugar can give it an elegant touch—imagine fine snowfall atop winter trees—and if you’re feeling generous (which I hope you are!), drizzle some pure maple syrup over everything for that heavenly sweetness which complements the rich custard perfectly. This finishing touch isn’t just decorative; it’s essential for balancing out flavors—sweetness meets creaminess meets tartness in every bite!
Step 8: The Grand Finale – Enjoying Every Bite
And there you have it—your Crème Brûlée French Toast is ready to shine as the star of any brunch table or cozy dinner gathering! But before we dig in, let’s take one last moment to appreciate what you’ve created; each layer represents careful attention and love poured into every step from start to finish. Remember this: food isn’t just about sustenance; it’s about connection and joy shared around tables filled with laughter and warmth.
As you indulge in each mouthwatering bite topped with those beautiful fresh berries and syrupy goodness, relish in how all those elements come together—a symphony of flavors wrapping around your taste buds like old friends catching up over coffee. I promise you; once you’ve had this Crème Brûlée French Toast, you’ll find yourself dreaming about making it again soon! So gather your loved ones around, serve them up generous portions, and watch how smiles light up their faces as they savor every delicious morsel you’ve crafted with such care.
Now go ahead—embrace this culinary adventure fully! There’s no rush here; take your time enjoying each bite because good food deserves nothing less than our full attention. Happy cooking!
Storage and Enjoyment Tips for Your Crème Brûlée French Toast
Ah, the moment we’ve all been waiting for! Your Crème Brûlée French Toast is baked to golden perfection, with that delightful sugar crust shimmering like a treasure. But what happens if you have leftovers? Fear not, my friend! This recipe is as versatile as it is delicious, and knowing how to store it will ensure you can enjoy its magic even days later.
Storing Leftover Crème Brûlée French Toast
To preserve your delectable French toast, let it cool completely before transferring it to an airtight container. I recommend using a glass or plastic container with a tight-fitting lid to keep those flavors fresh. If you’ve got multiple slices, consider placing parchment paper between them to prevent sticking—this little trick makes reheating a breeze! Stored properly in the refrigerator, your Crème Brûlée French Toast will stay delicious for up to three days. Now, I must tell you: while the fresh version is undeniably divine, there’s something so comforting about enjoying leftovers too. The custard flavors deepen overnight, creating a rich taste experience that’s both familiar and exciting. When you’re ready to indulge again, simply pop it in the oven at 350°F (175°C) until warmed through or give the microwave a whirl for quick satisfaction.
Freezing Crème Brûlée French Toast for Later
If you want to plan ahead or just can’t resist the thought of having this delight on hand at all times, freezing is an excellent option! Once your French toast has cooled completely, slice it into portions and wrap each piece tightly in plastic wrap. Then place them in a freezer-safe bag or container. This way, they’ll be well-protected from freezer burn and can last up to two months—yes, two months of sweet anticipation! When you’re ready to enjoy a piece from frozen, simply thaw it in the refrigerator overnight or pop it straight into the oven from frozen; just add a few extra minutes to your baking time. Trust me on this—it makes those bustling weekday mornings feel like a luxurious treat without any fuss!
Now that you’ve got some great tips for storing and freezing your masterpiece, I hope you’re as excited as I am about relishing every morsel of this crème brûlée-inspired indulgence!
Conclusion:
As we wrap up our delicious journey through making Crème Brûlée French Toast, I can’t help but feel an overwhelming sense of joy. It’s not just about whisking together eggs and cream; it’s about creating moments filled with warmth and laughter around the breakfast table. Each bite sings with that sweet harmony of creamy custard and crispy caramelized sugar—a truly extraordinary balance that elevates this dish beyond mere breakfast fare into something profoundly satisfying. I hope my excitement has inspired you because this recipe is genuinely one for the ages!
Now why should you make this recipe? Well, first off, it’s accessible—perfect for both novice cooks and seasoned pros alike. Imagine pulling that shimmering dish out of the oven, the intoxicating aroma wafting through your kitchen while friends gather around in eager anticipation. Picture the joy on their faces as they take their first bites—the crunch of the brûléed top giving way to soft, fluffy bread soaked in rich custard. It’s not just food; it’s an experience meant to be shared during cozy weekend brunches or special celebrations where laughter fills the air.
When it comes to serving suggestions, think about what pairs beautifully with this decadent dish. Imagine savoring one slice alongside freshly whipped cream topped with juicy berries for a burst of freshness—what a delightful contrast! For an afternoon pick-me-up that feels truly indulgent, serve it with a steaming cup of coffee or fragrant chai tea; they complement each other perfectly. And if you’re feeling adventurous—how about drizzling some rich chocolate sauce over the top? The possibilities are endless!
Feeling adventurous? This recipe is wonderfully adaptable! You could swap out classic brioche for cinnamon-raisin bread or even try adding layers of sliced bananas or strawberries nestled within those custardy slices before baking—a delightful twist! Maybe experiment with different flavor extracts like almond or hazelnut instead of vanilla; each variation brings its own unique flair while maintaining that signature crème brûlée essence we adore so much. So go ahead—try these adaptations and let your creativity shine! And don’t forget to share your experience with me; I can’t wait to hear how your version turns out!
Crème Brûlée French Toast

Indulge in our rich Crème Brûlée French Toast recipe that’s easy and utterly scrumptious. Perfect for breakfast or brunch—give it a try today!
- Prep Time: 15 minutes
- Cook Time: 30 minutes
- Total Time: 45 minutes
- Yield: Serves approximately 8 people 1x
- Category: Breakfast
- Method: Baking
- Cuisine: American
Ingredients
- 1 loaf brioche or challah bread (12–14 slices)
- 4 large eggs
- 1 cup whole milk (or almond/oat milk)
- 1/2 cup heavy cream (or half-and-half)
- 1/2 cup granulated sugar (or brown sugar)
- 1 tablespoon vanilla extract
- 1/2 teaspoon ground cinnamon (or nutmeg)
- Pinch of salt
Instructions
- Preheat your oven to 350°F (175°C).
- Cut the brioche or challah into thick slices (about 1-inch) and arrange them in a greased baking dish.
- In a mixing bowl, whisk together the eggs, milk, heavy cream, sugar, vanilla extract, cinnamon, and salt until well combined.
- Pour the custard mixture evenly over the arranged bread slices, ensuring they are well-soaked.
- Cover with plastic wrap and refrigerate for at least 30 minutes or overnight for best results.
- Bake for 25-30 minutes until golden brown on top.
- Once baked, sprinkle granulated sugar over the top and use a kitchen torch to caramelize until crispy.
Nutrition
- Serving Size: 1 slice (approximately 70g)
- Calories: 300
- Sugar: 18g
- Sodium: 250mg
- Fat: 13g
- Saturated Fat: 7g
- Unsaturated Fat: 6g
- Trans Fat: 0g
- Carbohydrates: 36g
- Fiber: 1g
- Protein: 8g
- Cholesterol: 160mg