Old Fashioned Pancakes
There’s something profoundly comforting about a stack of pancakes, isn’t there? The mere thought brings back memories of lazy Sunday mornings where the aroma of warm batter fills the kitchen, harmonizing with laughter and shared stories. Each fluffy bite is more than just food; it’s an experience that wraps you in warmth and nostalgia. These Old Fashioned Pancakes are not just a breakfast option; they are a canvas for creativity, a celebration of simplicity blended with tradition. Imagine the golden edges, the soft, pillowy centers, and that satisfying sizzle as they cook to perfection on the griddle. I promise you, once you learn this recipe, it will become a cherished part of your morning routine—a reminder that some of life’s greatest joys can be found in the simplest pleasures.
Now, let’s take a moment to appreciate what makes these pancakes truly special. Originating from age-old traditions passed down through generations, they have stood the test of time due to their delightful texture and versatility. Whether you love them topped with fresh fruit, drizzled with maple syrup, or adorned with a dollop of yogurt, these pancakes invite you to experiment and express your culinary flair. They are perfect for any occasion – from a cozy breakfast-for-dinner night to celebratory brunches with friends. This recipe strikes the ideal balance between classic comfort and modern adaptability, making it a staple in any kitchen.
Old Fashioned Pancakes: A Timeless Delight
Today, I’m excited to share my go-to recipe for Old Fashioned Pancakes—fluffy, satisfying, and utterly delightful! Each bite is like a warm hug on a plate, and trust me when I say that mastering this dish will elevate your breakfast game to new heights.
Ingredients:
As we embark on this delicious culinary journey together, it’s essential to start with high-quality ingredients that will bring your pancakes to life. Each component plays an integral role in achieving that fluffy texture and mouthwatering flavor we all crave.
- 1 cup (120g) all-purpose flour. This is the foundation of our Old Fashioned Pancakes; it provides structure and body. When choosing flour, opt for unbleached all-purpose flour as it has not undergone harsh chemical treatments that can alter flavor. The fine texture ensures that our pancakes will rise beautifully while maintaining their tender crumb. If you’re looking for gluten-free alternatives, you could also try almond or oat flour for a unique twist.
- 2 tablespoons granulated sugar. This humble sweetener does more than just add sweetness; it caramelizes during cooking to create those lovely golden edges we all adore. If you’re feeling adventurous or want to cut down on refined sugars, consider using coconut sugar or honey as alternatives—each offering its distinctive flavor profile while still enhancing the overall taste.
- 1 tablespoon baking powder. This magical ingredient is absolutely paramount in our pancake recipe! It acts as a leavening agent that gives our pancakes their airy fluffiness by producing carbon dioxide bubbles during cooking. Always check your baking powder’s expiration date—an expired batch can lead to flat pancakes which is something we want to avoid at all costs!
- 1/2 teaspoon salt. Don’t underestimate salt! It enhances flavors and balances sweetness beautifully in our pancakes, creating depth in every bite. Use fine sea salt for better distribution throughout your batter — it dissolves quickly and won’t leave gritty pockets behind.
- 1 cup (240ml) milk. Dairy adds moisture and richness while activating the baking powder for fluffier results. Whole milk works best here thanks to its fat content which contributes creaminess; however, feel free to substitute with almond milk or oat milk if you prefer dairy-free options—just know that each choice will impart its own character into the final dish!
- 1 large egg. Eggs are essential for binding our ingredients together while adding richness and flavor; they also provide structure through protein coagulation when cooked! Make sure your egg is at room temperature—it helps create an emulsion that leads to evenly mixed batter without lumps.
- 2 tablespoons melted butter plus more for cooking. Butter brings a delightful richness and flavor that’s hard to replicate with substitutes! When melted beforehand, it mixes seamlessly into our batter without creating clumps—leading us directly towards pancake perfection! For cooking purposes, using additional butter ensures those crispy edges everyone loves while preventing sticking on the griddle.
- 1 teaspoon vanilla extract (optional). While optional, vanilla extract elevates these pancakes from ordinary breakfast fare into something truly extraordinary! Its aromatic essence envelops each bite in warmth and nostalgia reminiscent of homemade sweets from childhood—making it worth including every time!
Equipment You’ll Need:
Before we dive into making magic happen on our stove top, let’s chat about some essential tools that will make this process much smoother! Having the right equipment can transform cooking from a chore into an enjoyable experience—a truth I’ve come to cherish over my years in the kitchen.
- Mixing bowls – A set of medium-sized mixing bowls is vital for separating wet and dry ingredients effectively while allowing ample room for whisking without spills! Choose bowls made from glass or stainless steel—they’re durable and easy to clean afterward.
- Whisk – An essential tool when combining dry ingredients or emulsifying wet mixtures like eggs and milk together smoothly without any lumps ruining our pancake ambitions! Look for one with comfortable handles so whisking feels effortless as opposed to strenuous work.
- Griddle or non-stick skillet – A quality non-stick surface allows us perfectly browned pancakes without worrying about them sticking stubbornly when flipping them over halfway through cooking! If using traditional cast iron skillets instead: ensure they are well-seasoned beforehand so they behave similarly!
- Ladle or measuring cup – For pouring out perfect portions of batter onto our sizzling hot griddle! Measuring cups provide consistency across batches; alternatively using ladles gives us artistic freedom over how large each pancake can be—go big or stay cozy!
Now that we’ve gathered everything we need let’s move forward into creating those dreamy Old Fashioned Pancakes step by step—the anticipation is palpable!
Step 1: Mix Dry Ingredients
Begin by whisking together the all-purpose flour, granulated sugar, baking powder, and salt in one mixing bowl until they’re fully combined—this ensures even distribution across every pancake during cooking so no single bite feels bland compared with others when served up later alongside toppings like syrup or berries! It’s crucial not just because uniformity matters but also because this process aerates flour allowing more air pockets within resulting batter leading directly toward fluffy textures upon completion!
Step 2: Combine Wet Ingredients
In another bowl (yes—we need two!), whisk together milk (room temperature!), egg (also at room temp!), melted butter (cooled slightly) along with vanilla extract if using until well combined—this mixture should look smooth without any visible clumps remaining behind resembling liquid gold ready for incorporation into dry components shortly after!
Step 3: Bring It All Together
Once both bowls are prepared separately it’s time combine them—they deserve their moment too after all effort spent prepping beforehand right? Gently pour wet contents into dry mixture while folding carefully using spatula rather than vigorous stirring which risks developing gluten strands leading us away from desired tenderness we crave so dearly… Trust me here: being gentle pays off big dividends later down line!
Step 4: Preheat Your Griddle
Now onto one final preparatory stage before diving headfirst into cooking heaven itself—preheating griddle over medium heat setting allows us achieve optimum temperatures required browning properly without burning edges prematurely ruining aesthetic appeal alongside flavor profiles alike… You’ll know griddles ready once droplets flicked onto surface dance around vividly instead sinking sluggishly instead… What happens next? Pure pancake joy awaits!
Stay tuned as we continue exploring further steps towards crafting these incredible Old Fashioned Pancakes together—because honestly nothing beats sharing good food made lovingly amongst friends & family alike!
Step 5: Pouring the Batter – The Art of Flipping Magic
Now that you’ve masterfully combined your wet and dry ingredients, you’re on the brink of pancake perfection. Preheat your griddle over medium heat; this step is utterly crucial because a perfectly heated surface ensures that your pancakes cook evenly and develop that beautiful golden-brown crust we all crave. I recommend using a non-stick griddle or skillet to make flipping a breeze—trust me, there’s nothing more disheartening than watching your masterpiece cling stubbornly to the pan! Once the griddle is hot enough, you can test it by flicking a few drops of water onto it; if they sizzle and evaporate almost immediately, you’re ready to go.
Now comes the moment of joy where we pour the batter. Using a measuring cup or ladle, pour about 1/4 cup of batter onto the griddle for each pancake. This portion is important because it allows them to cook through without burning on the outside—after all, no one wants an undercooked center! As you pour, take a moment to admire how the batter spreads slightly before it begins to bubble. Don’t rush this step; let those bubbles form naturally! It’s these little pockets of air that will help create light and fluffy pancakes. Watch closely as they start to bubble after about 2-3 minutes; once those bubbles have popped and left tiny holes on top, it’s time for the flip. The anticipation builds here—what’s more satisfying than flipping a pancake perfectly?
Step 6: Flipping with Confidence – The Golden Moment
Flipping pancakes can feel like an art form, and I promise you, with just a bit of practice, you’ll become a flipping pro! When those bubbles have formed beautifully and the edges begin to look set (this means they’re no longer shiny), gently slide a spatula under the pancake and lift it slightly to check its color. You want to see that lovely golden hue peeking through—a sign that your patience has paid off. It’s essential not to rush this step either; if you flip too soon, you risk tearing the delicate structure you’ve built up.
Once you’re confident in its readiness, quickly but carefully flip that pancake over! You’ll notice how it puffs up slightly as it cooks on the other side; this transformation happens when steam gets trapped inside. Let it cook for another minute or two until it’s golden brown on both sides—be careful not to get distracted by thoughts of syrup yet! Keep an eye out for any signs of burning; every stovetop has its quirks, so adjust the heat as necessary. Remember, cooking is all about tuning in to the food; use your senses as guides!
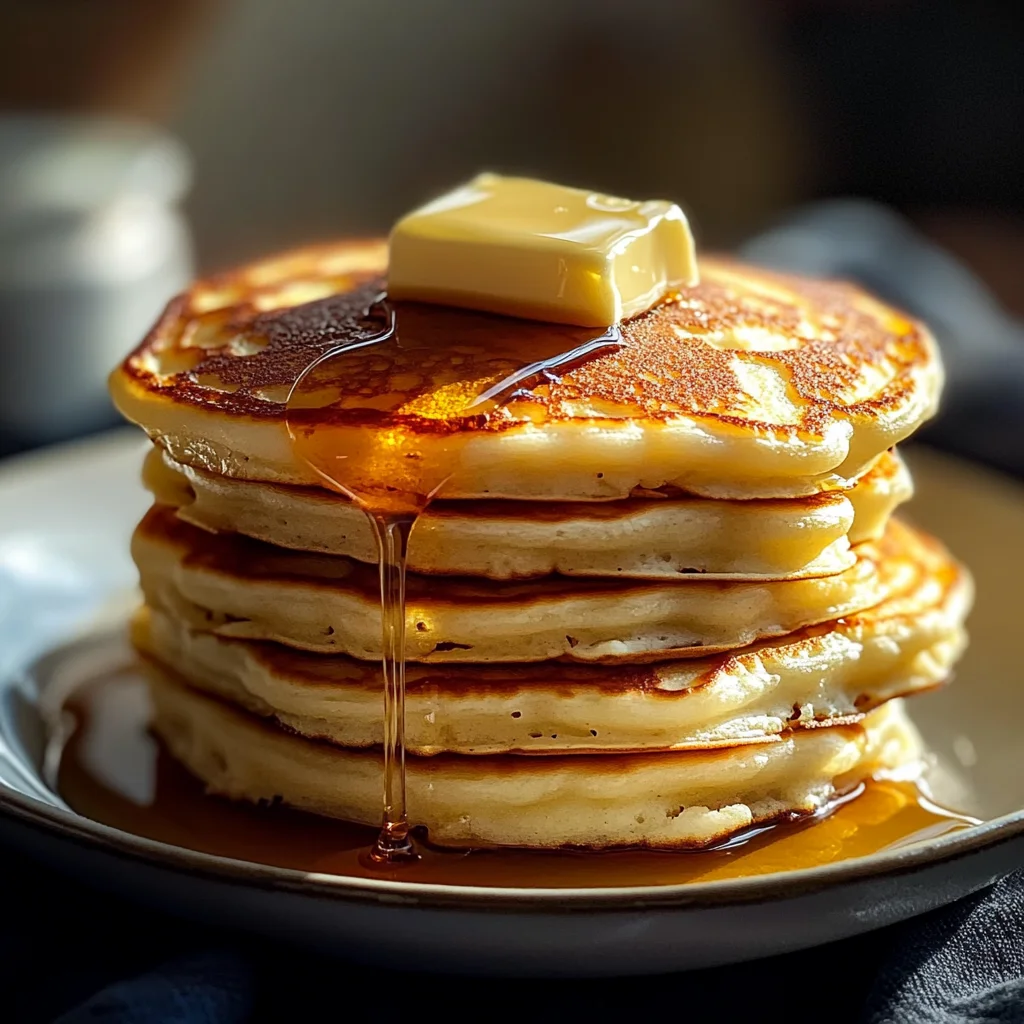
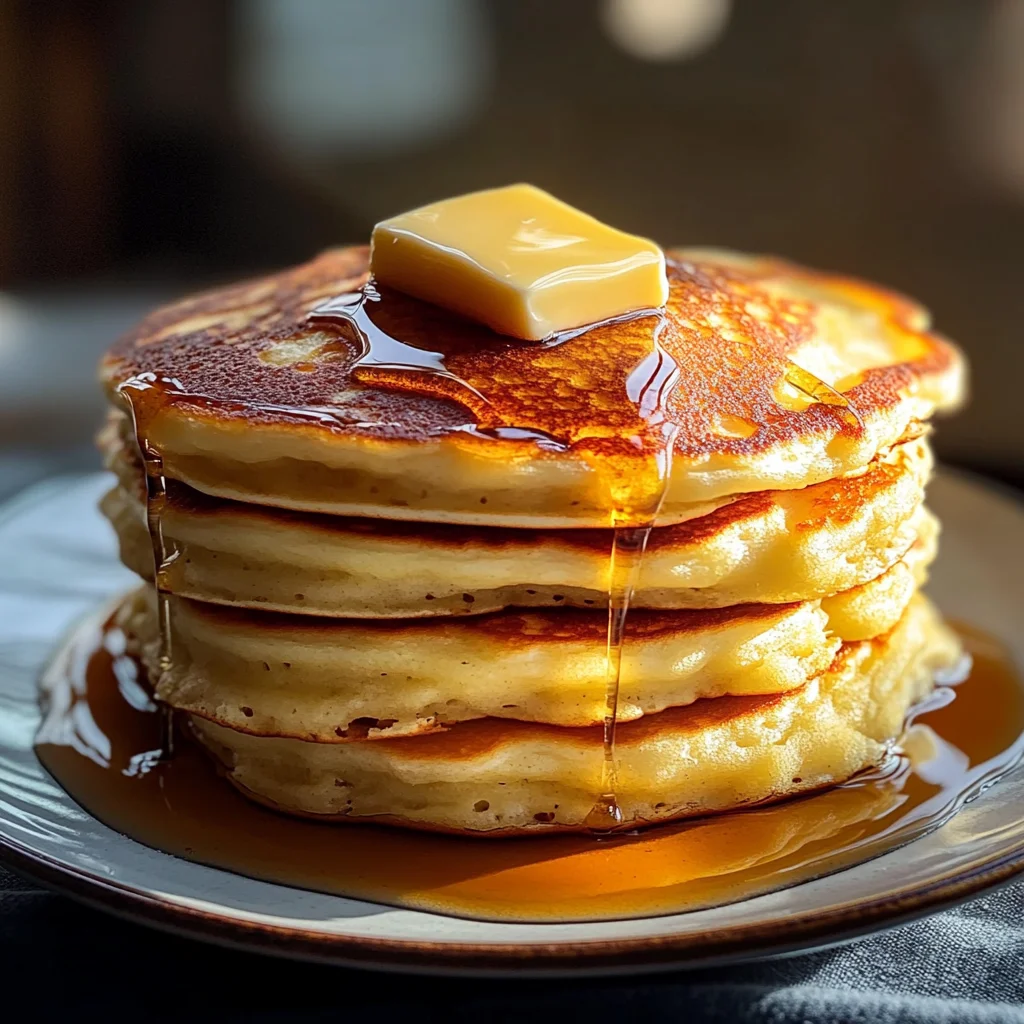
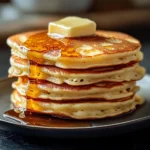
Step 7: The Grand Reveal – Stack ‘Em High!
Once your pancakes are perfectly golden on both sides, it’s time for what I like to call “The Grand Reveal.” Carefully remove them from the griddle and place them on a warm plate while you continue cooking the rest of your batch. If you’re serving guests or family (or even just treating yourself!), keeping them warm is key—nobody wants cold pancakes at breakfast! To keep them cozy while they wait for their turn in syrup heaven, simply cover them with a clean kitchen towel or pop them into an oven set at low heat (around 200°F works beautifully).
As you stack these fluffy delights high on your plate—perhaps three or four at a time—you’ll be rewarded with their delightful aroma wafting through your kitchen like an embrace from childhood memories. This sensory experience is part of what makes homemade pancakes truly special—the smell creates an atmosphere filled with warmth and anticipation. Feel free to play with presentation too! A tall stack looks stunning drizzled with maple syrup or adorned with fresh berries that will burst with flavor in each bite.
Step 8: Dressing Your Pancakes – The Sweet Symphony
Finally comes one of my favorite parts: dressing your pancakes! While they are absolutely delicious served simply with butter and syrup straight off the griddle, why not take this opportunity to elevate your breakfast experience? You might choose fresh fruits like juicy strawberries or blueberries sprinkled atop for bursts of sweetness and vibrant color; they not only enhance visual appeal but also add wonderful textures contrasting against those fluffy cakes. You could also consider dolloping some Greek yogurt or plant-based alternatives if you’re aiming for creaminess without going dairy-heavy—a real game changer!
Another non-negotiable touch—maple syrup! There’s something utterly intoxicating about pouring liquid gold over your stack; it seeps into every crevice and creates a perfect sweet accompaniment. But don’t stop there! A sprinkle of powdered sugar can add elegance while giving just enough sweetness without overwhelming all those glorious flavors you’ve developed throughout cooking. As you sit down to enjoy these old fashioned pancakes with family or friends (or even just treat yourself), each bite should transport you back in time—a symphony of flavor dancing on your palate.
Conclusion:
As we wrap up this delightful journey through making old fashioned pancakes, I can’t help but feel excited about sharing such a cherished recipe with you! The beauty of these pancakes lies not only in their airy texture and rich flavor but also in the memories they create around the breakfast table. Each bite is like a warm embrace—the sweet aroma wafting through your kitchen is utterly intoxicating. With every flip and sizzle on the griddle, you’re not just cooking; you’re creating moments that linger long after the plates are cleared.
This recipe truly deserves a spot in your culinary repertoire because it’s more than just delicious—it’s about experience. From lazy Sunday brunches to celebratory weekends with family and friends, making these old fashioned pancakes is an occasion unto itself. The joy that comes from mixing simple ingredients into something so profoundly satisfying is unmatched. Imagine flipping that golden brown pancake over—how can one resist? You’ll find yourself reveling not only in the taste but also in the process—a meditative dance between batter and skillet that leaves behind fragrant memories.
When it comes to serving suggestions, let your creativity soar! Picture savoring one pancake piled high with luscious sliced bananas drizzled with honey for an afternoon pick-me-up or perhaps layering them with fresh berries and dollops of whipped coconut cream for a truly decadent experience. And let’s not forget about nut butter—spread some creamy almond or peanut butter on top before adding sliced fruits for an energizing breakfast that’s both nutritious and indulgent.
Feeling adventurous? This recipe is wonderfully adaptable! For those who love experimenting in the kitchen, consider adding spices like cinnamon or nutmeg right into your batter for an aromatic twist that elevates these traditional pancakes into something extraordinary. You might even swap out half of the flour for whole wheat or oat flour for added nutritional benefits without sacrificing flavor. And if you’re feeling bold, try tossing in some chocolate chips or blueberries right before cooking—you’ll be rewarded with pockets of sweetness that melt into each fluffy bite! I invite you to take this recipe into your hands, try it out yourself, then share it with loved ones; let it become part of your own story just as it has become part of mine.
Old Fashioned Pancakes
Old Fashioned Pancakes are a delightful way to start your day, enveloping you in warmth and nostalgia with every fluffy bite. Perfectly golden and inviting, these pancakes are a canvas for your culinary creativity, allowing for endless toppings like fresh fruits or maple syrup. They’re not just a breakfast option; they’re a comforting embrace on lazy mornings or celebratory brunches. With this easy-to-follow recipe, you’ll master the art of pancake-making in no time, ensuring that these traditional delights become a cherished part of your culinary repertoire.
- Prep Time: 10 minutes
- Cook Time: 15 minutes
- Total Time: 25 minutes
- Yield: Makes about 4 servings (approximately four pancakes) 1x
- Category: Breakfast
- Method: Griddling
- Cuisine: American
Ingredients
- 1 cup all-purpose flour
- 2 tablespoons granulated sugar
- 1 tablespoon baking powder
- 1/2 teaspoon salt
- 1 cup milk (dairy or plant-based)
- 1 large egg (room temperature)
- 2 tablespoons melted butter (plus additional for cooking)
- 1 teaspoon vanilla extract (optional)
Instructions
- In a mixing bowl, whisk together flour, sugar, baking powder, and salt until well combined.
- In another bowl, whisk together milk, egg, melted butter (cooled), and vanilla extract until smooth.
- Pour the wet ingredients into the dry ingredients and gently fold together until just combined; do not overmix.
- Preheat a non-stick griddle over medium heat. Once hot, pour about 1/4 cup of batter onto the griddle for each pancake.
- Cook for 2-3 minutes until bubbles form on the surface. Flip and cook for another minute or until golden brown on both sides.
- Serve warm with your favorite toppings.
Nutrition
- Serving Size: 1 pancake (about 65g)
- Calories: 140
- Sugar: 3g
- Sodium: 200mg
- Fat: 6g
- Saturated Fat: 3g
- Unsaturated Fat: 2g
- Trans Fat: 0g
- Carbohydrates: 19g
- Fiber: 0g
- Protein: 4g
- Cholesterol: 30mg