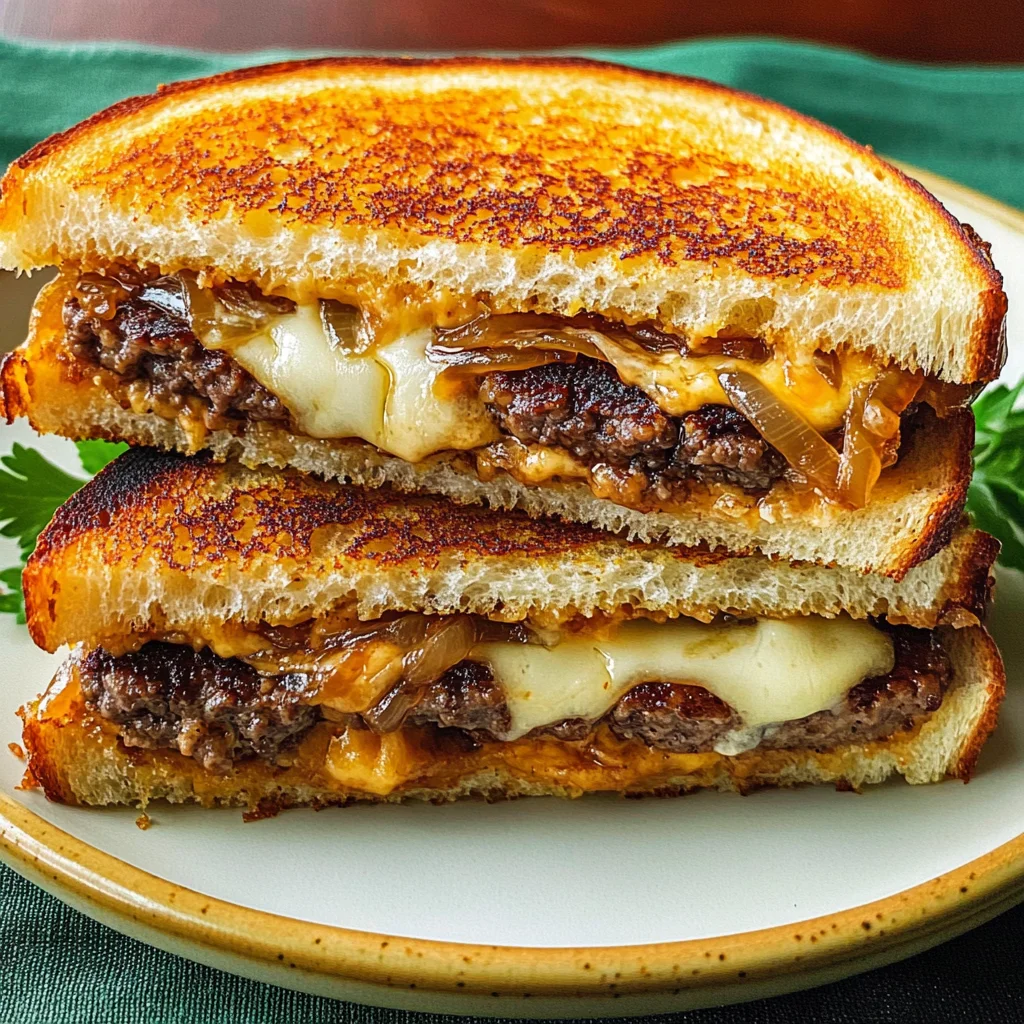
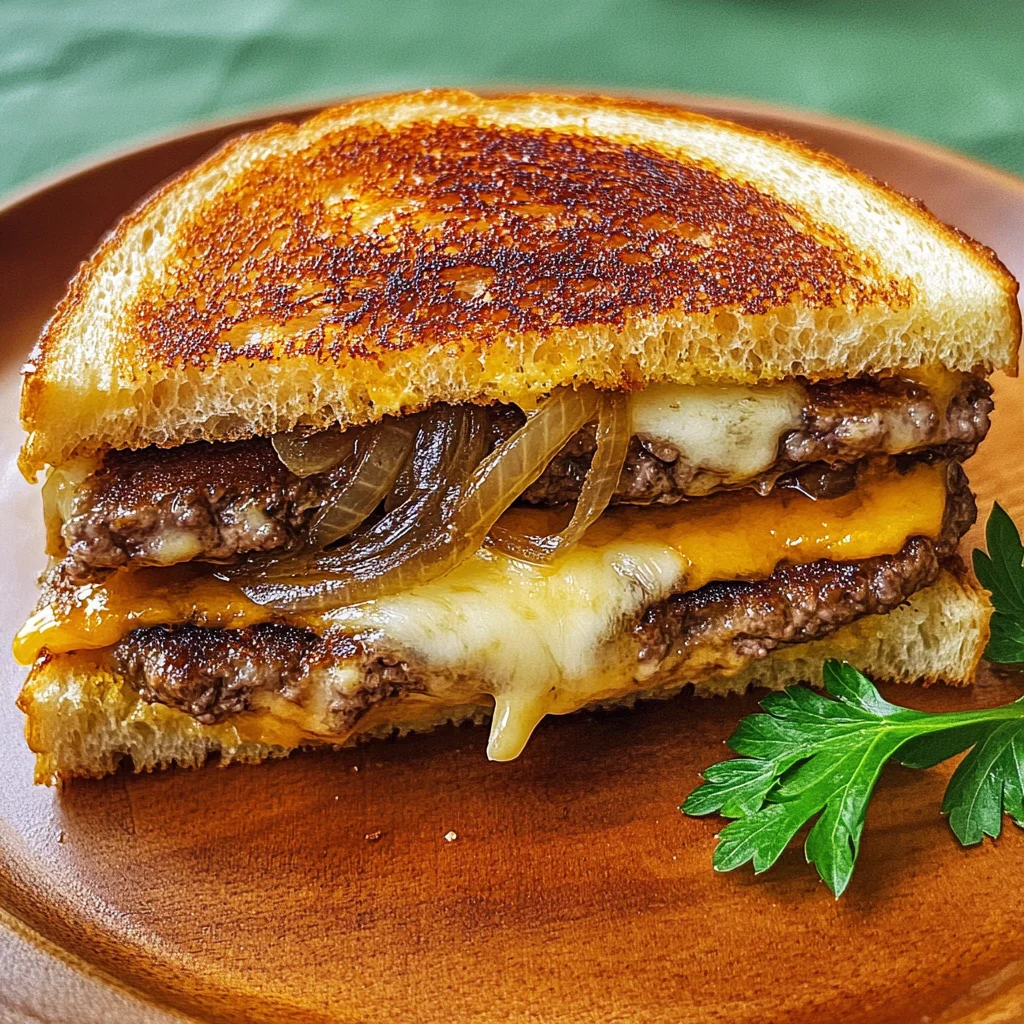
Grilled Cheese Patty Melts
If you’re looking for a meal that feels like a warm hug on a plate, then you’ve come to the right place! These Grilled Cheese Patty Melts are not only delicious but also incredibly satisfying. Combining the gooeyness of a classic grilled cheese with the heartiness of a cheeseburger, they are perfect for busy weeknights or cozy family gatherings. This recipe has always been a favorite in my home, and I can’t wait to share it with you!
Whether you’re feeding hungry kids after school or friends on game night, these melts fit the bill perfectly. Plus, they’re quick to whip up and full of flavor—what’s not to love?
Why You’ll Love This Recipe
- Quick and Easy: With just 25 minutes from start to finish, you can have dinner ready in no time!
- Family-Friendly: Everyone loves melty cheese and juicy patties. This dish is sure to please even the pickiest eaters.
- Make-Ahead Friendly: You can prep the patties ahead of time for an even quicker meal when you’re short on time.
- Versatile: Customize these melts with your favorite toppings or sauces for a personal touch.
- Comfort Food at Its Best: There’s nothing quite like biting into that crispy bread and gooey cheese.
Ingredients You’ll Need
Gathering simple and wholesome ingredients makes cooking so much more enjoyable! Here’s what you’ll need for your Grilled Cheese Patty Melts:
For the Patties
- Ground beef (or plant-based substitute)
- Salt
- Pepper
For the Melts
- Bread (your choice—sourdough works beautifully)
- Cheese slices (like cheddar or American)
- Butter
Variations
One of the best things about Grilled Cheese Patty Melts is how flexible they are! You can easily tailor this recipe to fit your taste preferences or dietary needs. Here are some fun ideas:
- Swap the protein: Use ground turkey, chicken, or a plant-based option if you prefer something lighter.
- Mix up the cheese: Try pepper jack for a spicy kick or Swiss for a nutty flavor!
- Add veggies: Toss in some sautéed onions, mushrooms, or spinach for extra nutrition and taste.
- Go gourmet: Top with avocado slices or a dollop of your favorite sauce for an elevated twist.
How to Make Grilled Cheese Patty Melts
Step 1: Prepare the Patties
Start by mixing your ground beef, salt, and pepper. Form them into patties that will fit comfortably on your bread slices. Making them slightly smaller than the bread will help ensure they cook evenly without spilling over.
Step 2: Cook the Patties
In a heated skillet over medium-high heat, cook your patties until they’re browned and cooked through, about 4-5 minutes per side. This step is vital because it creates that delicious crust that adds flavor. Once done, set them aside while you prepare the sandwiches.
Step 3: Assemble Your Melts
Spread butter on one side of each slice of bread. Place one slice butter-side down in your skillet, layer it with cheese, add the patty on top of that, then add another slice of cheese before topping it off with another slice of bread (butter-side up). This layering helps keep everything together while ensuring every bite is cheesy.
Step 4: Grill to Perfection
Cook each melt over medium heat until golden brown and crispy—about 3-4 minutes per side. Keep an eye out so they don’t burn! The goal is melted cheese oozing out when you take that first bite.
Step 5: Serve Warm
Once they’re done cooking, let them sit for just a minute before cutting in half. This little wait allows the cheese to settle slightly—trust me; it’s worth it! Serve warm with your favorite sides like fries or a fresh salad.
Now that you have this delightful recipe in hand, I hope you enjoy making these Grilled Cheese Patty Melts as much as I do! Happy cooking!
Pro Tips for Making Grilled Cheese Patty Melts
Making Grilled Cheese Patty Melts is all about balancing flavors and textures, so here are some tips to ensure your creation is nothing short of perfection!
- Choose the right cheese: Opt for cheeses that melt beautifully, such as sharp cheddar or Monterey Jack. These cheeses create a gooey texture that enhances the overall experience of your patty melt.
- Don’t rush the cooking: Cooking over medium heat allows the bread to toast evenly while ensuring the patties are fully cooked. This prevents burnt bread with raw meat inside and ensures you get that perfect golden crust.
- Season your beef: A simple seasoning of salt and pepper can elevate the flavor of your patties significantly. Feel free to add garlic powder or onion powder for an extra kick!
- Spread butter generously: Using softened butter on the outside of the bread not only promotes browning but also adds a rich flavor. Make sure to coat each slice evenly for optimal results.
- Use a heavy skillet: A cast-iron skillet retains heat well and provides even cooking, making it ideal for achieving that crispy exterior while keeping everything warm inside.
How to Serve Grilled Cheese Patty Melts
Serving up these delightful Grilled Cheese Patty Melts is all about presentation and pairing them with complementary flavors. Here’s how to make your meal inviting and enjoyable!
Garnishes
- Fresh herbs: Sprinkle some chopped parsley or chives on top for a pop of color and freshness.
- Pickles: Offer dill pickles on the side to add a tangy crunch that contrasts nicely with the richness of the melts.
- Sliced tomatoes: A few slices of fresh tomato can brighten up the plate and add a refreshing element.
Side Dishes
- Sweet Potato Fries: These crispy, slightly sweet fries are a fantastic companion, providing a satisfying crunch alongside your patty melts.
- Mixed Green Salad: A light salad with arugula, cherry tomatoes, and a lemon vinaigrette adds brightness and balances out the heaviness of the grilled cheese.
- Vegetable Soup: Pairing your melts with a warm bowl of vegetable soup creates a comforting meal perfect for chilly nights. The warmth will enhance every bite!
- Coleslaw: A creamy or vinegar-based coleslaw brings in crunch and acidity that cuts through the richness of the cheese and beef, making each bite more enjoyable.
Now that you’re equipped with these tips and serving ideas, it’s time to get cooking! Enjoy your delicious Grilled Cheese Patty Melts – they’re sure to become a new favorite in your household!
Make Ahead and Storage
These Grilled Cheese Patty Melts are perfect for meal prep! You can easily whip up a batch in advance, making them a convenient option for busy weeknights or quick lunches.
Storing Leftovers
- Allow the patty melts to cool completely before storing.
- Place them in an airtight container.
- Store in the refrigerator for up to 3 days.
Freezing
- Prepare the patty melts as directed but do not grill them.
- Wrap each sandwich tightly in plastic wrap or foil.
- Freeze for up to 2 months.
- For best results, label your packages with the date.
Reheating
- Thaw overnight in the refrigerator if frozen.
- Heat a skillet over medium heat and add a little butter or oil.
- Grill each side until golden brown and heated through, about 3-4 minutes per side.
FAQs
Here are some common questions about Grilled Cheese Patty Melts!
Can I customize the ingredients in my Grilled Cheese Patty Melts?
Absolutely! Feel free to swap the cheese for your favorite variety or add veggies like spinach or tomatoes to enhance flavor and nutrition.
How do I ensure my Grilled Cheese Patty Melts are crispy?
To achieve that perfect crispy texture, use a generous amount of butter on the outside of the bread. Cooking on medium-low heat allows for even browning without burning.
What should I serve with Grilled Cheese Patty Melts?
These delicious sandwiches pair wonderfully with a side of soup, salad, or some crunchy pickles for added texture and flavor!
How can I make these Grilled Cheese Patty Melts healthier?
You can use whole grain bread, leaner ground meat alternatives, and low-fat cheese to create a lighter version while still enjoying all the scrumptious flavors.
Final Thoughts
I hope you find joy in making these Grilled Cheese Patty Melts! They blend comfort food nostalgia with a modern twist that’s sure to please everyone at your table. Enjoy every cheesy bite, and don’t hesitate to get creative with your favorite ingredients. Happy cooking!
Grilled Cheese Patty Melts
Indulge in the ultimate comfort food with these mouthwatering Grilled Cheese Patty Melts! This delightful recipe combines the gooey goodness of melted cheese with savory beef patties, all nestled between crispy bread. Perfect for busy weeknights or cozy family gatherings, these melts are quick to prepare and adaptable to your taste preferences. Whether you’re feeding hungry kids after school or hosting friends for game night, this dish promises satisfaction in every bite. With just a handful of simple ingredients and easy-to-follow steps, you’ll have a hearty meal ready in no time. Get ready to savor each cheesy moment!
- Prep Time: 10 minutes
- Cook Time: 15 minutes
- Total Time: 25 minutes
- Yield: Serves 4
- Category: Main
- Method: Grilling
- Cuisine: American
Ingredients
- Ground beef (or plant-based substitute)
- Salt
- Pepper
- Bread (sourdough recommended)
- Cheese slices (cheddar or American)
- Butter
Instructions
- Prepare the Patties: Mix ground beef, salt, and pepper; form into patties slightly smaller than bread slices.
- Cook the Patties: Heat a skillet over medium-high heat; cook patties for 4-5 minutes per side until browned and cooked through.
- Assemble Melts: Spread butter on one side of each bread slice. In the skillet, layer one slice butter-side down with cheese, add a patty, another cheese slice, and top with another slice of bread (butter-side up).
- Grill: Cook each melt over medium heat for 3-4 minutes per side until golden brown and cheese is melted.
- Serve Warm: Let cool slightly before cutting in half; enjoy with your favorite sides.
Nutrition
- Serving Size: 1 Grilled Cheese Patty Melt (200g)
- Calories: 540
- Sugar: 2g
- Sodium: 720mg
- Fat: 32g
- Saturated Fat: 16g
- Unsaturated Fat: 14g
- Trans Fat: 0g
- Carbohydrates: 38g
- Fiber: 2g
- Protein: 28g
- Cholesterol: 75mg