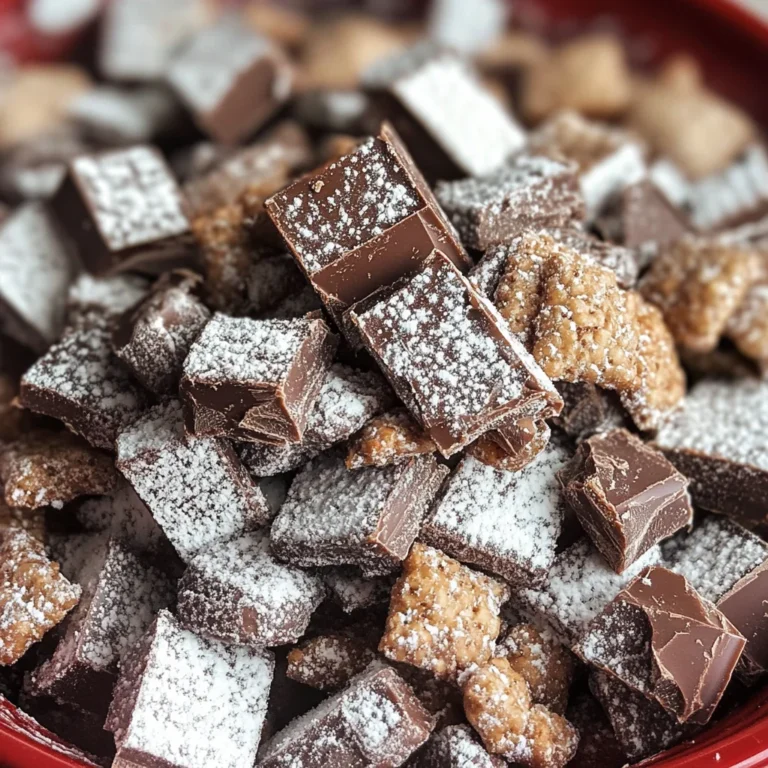
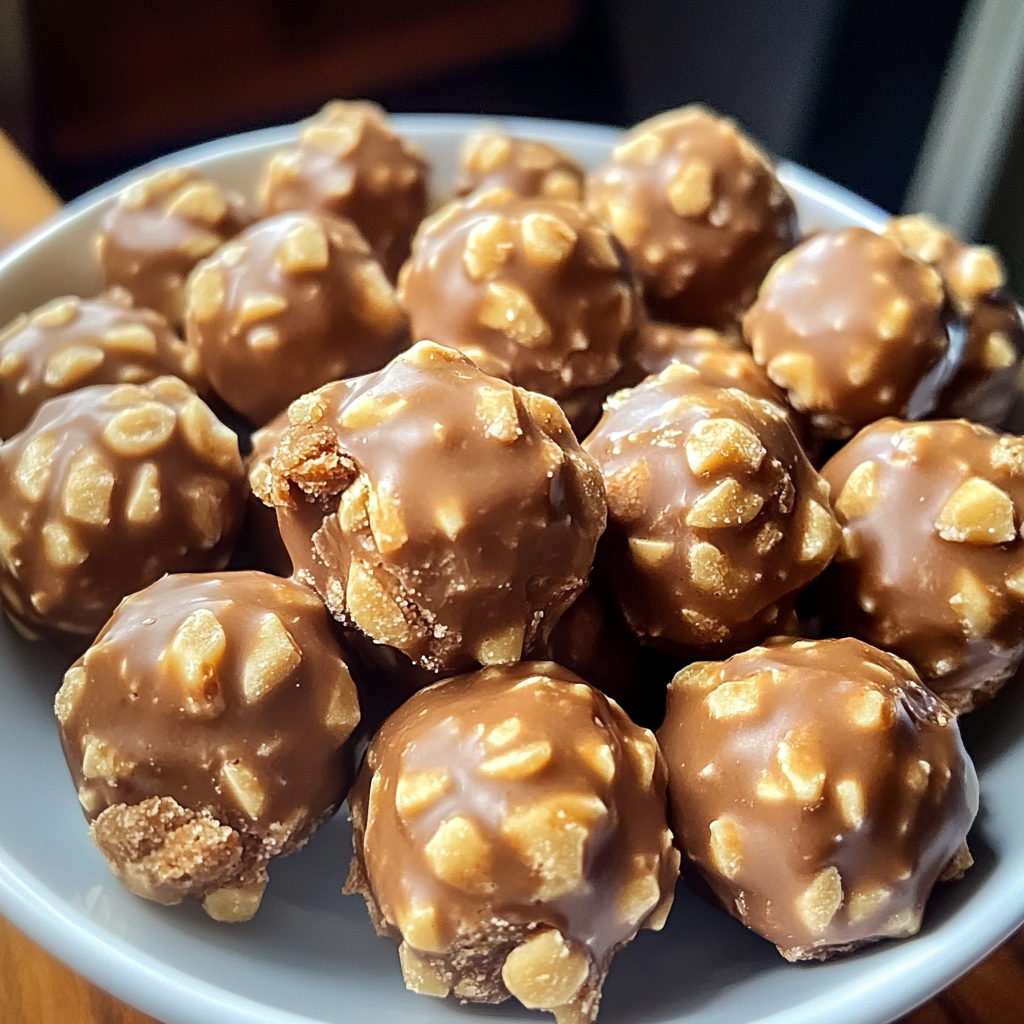
Butterfinger Balls
If you’re looking for a delightful treat that combines sweet and salty in the most satisfying way, these Butterfinger Balls are just what you need! They’re incredibly easy to whip up and perfect for sharing with friends and family. Whether it’s a busy weeknight or a festive gathering, these little bites of heaven will not only please your palate but also brighten your day. Trust me, once you take that first bite, you’ll understand why this recipe has become a favorite in my home!
Why You’ll Love This Recipe
- Quick and Easy: With just 15 minutes of prep time, you can create an irresistible dessert that everyone will adore.
- Family-Friendly: Kids and adults alike will love rolling these treats into balls—what’s more fun than getting hands-on in the kitchen?
- Make Ahead: These Butterfinger Balls can be made a few days in advance, making them ideal for parties or last-minute gatherings.
- Customizable: Feel free to get creative with toppings or variations to suit your taste!
- Deliciously Decadent: The combination of creamy peanut butter, crunchy candy, and smooth chocolate is simply irresistible.
Ingredients You’ll Need
Gathering your ingredients is half the fun! The items needed for these Butterfinger Balls are simple and wholesome. You probably have most of them in your pantry already. Here’s what you’ll need:
For the Base
- 4 tablespoons softened butter (½ stick)
- 1 teaspoon vanilla extract
- 1 cup powdered sugar
- 1 cup peanut butter (avoid all-natural varieties)
- ¾ cup crumbs from graham crackers
For the Coating
- 8 ounces chocolate bark or chocolate chips
- ½ cup Butterfinger bars (crushed)
Optional Garnishes
- Additional crushed Butterfinger bars
- Festive sprinkles
- Coarse sea salt
Variations
This recipe is wonderfully flexible, allowing you to experiment based on what you have at home or what flavors you love! Here are some fun ideas to switch things up:
- Switch Up the Chocolate: Try using white chocolate or dark chocolate for coating instead of regular chocolate.
- Add Some Crunch: Mix in chopped nuts like peanuts or almonds for an extra layer of texture.
- Flavor Infusion: Add a pinch of cinnamon or a splash of almond extract for a unique twist on flavor.
- Dairy-Free Delight: Use dairy-free chocolate chips to make this treat suitable for those avoiding dairy.
How to Make Butterfinger Balls
Step 1: Prepare the Dough
In a mixing bowl, combine the creamy peanut butter and softened butter. Using an electric mixer set to medium speed, blend until the mixture is smooth and uniform. This step is crucial because it creates the rich base for our delicious balls.
Step 2: Add Aromatic Notes
Next, incorporate the vanilla extract into your mixture. Blend thoroughly so that every bite bursts with flavor. Who doesn’t love that warm vanilla aroma wafting through the kitchen?
Step 3: Sweeten the Deal
Slowly add in the powdered sugar while mixing at low speed. Scrape down the sides of your bowl as needed. This ensures everything blends perfectly, resulting in a sweet dough that holds together beautifully.
Step 4: Crunch Time
Gently fold in both the graham cracker crumbs and crushed Butterfinger bars. This adds texture and flavor that makes each ball truly indulgent!
Step 5: Shape ’em Up
Line a large cookie sheet with parchment paper. Scoop out about 1 to 1½ tablespoons of dough, roll it into neat balls, and place them on your prepared sheet. This is where it gets fun—don’t worry if they aren’t perfect; they’ll still taste amazing!
Step 6: Chilling Phase
Pop those dough balls into the freezer for about 30 minutes until they’re firm. Chilling helps them hold their shape when coated in chocolate.
Step 7: Melting the Chocolate
Once chilled, it’s time to melt your chocolate! Use a microwave-safe bowl to heat it gently in 30-second increments at half power. Stir between each session until it’s smooth but be careful not to overheat it.
Step 8: Chocolate Symphony
Now comes the best part! Dip each chilled ball into your luscious melted chocolate. You can coat them fully or leave some peanut butter mixture peeking through—it’s all up to you!
Step 9: Coat and Decorate
After dipping, sprinkle additional crushed Butterfinger bars or festive toppings onto each ball while the chocolate is still soft—this adds a beautiful finish.
Step 10: Finishing Touches
Allow the coated balls to sit until the chocolate hardens completely. Once set, they’re ready for indulging!
Step 11: The Grand Finale
Enjoy every bite of these delightful Butterfinger Bliss Balls! They’re perfect for sharing—and I guarantee they won’t last long at any gathering!
Pro Tips for Making Butterfinger Balls
Creating the perfect Butterfinger Balls is easy and fun, and these pro tips will ensure your treats turn out absolutely delightful!
- Use Room Temperature Ingredients: Starting with softened butter and not cold ingredients helps create a smoother dough that blends well together. This ensures your Butterfinger Balls have a uniform texture.
- Be Gentle When Mixing: When folding in the graham cracker crumbs and crushed Butterfinger bars, do it gently. This preserves the crunchiness of the candy, which adds amazing texture to your balls.
- Chill Thoroughly: Don’t skip the chilling phase! Freezing the mixture not only makes it easier to shape but also helps the chocolate coating stick better when you dip them.
- Experiment with Chocolate: While classic chocolate bark or chips are fantastic, consider using dark chocolate or even white chocolate for a different flavor profile. Each option brings out unique flavors that can enhance your Butterfinger experience.
- Customize Your Coating: Have fun with toppings! Whether you choose additional crushed Butterfinger bars, colorful sprinkles, or flaky sea salt, these small additions can make your treats visually stunning and add an extra layer of flavor.

How to Serve Butterfinger Balls
When it comes to serving your Butterfinger Balls, presentation can elevate them from simple treats to show-stopping desserts. Here are some ideas to make them shine at your next gathering!
Garnishes
- Crushed Butterfinger Bars: A sprinkle of extra crushed bars on top not only enhances flavor but also adds a visually appealing crunch.
- Festive Sprinkles: Colorful sprinkles can transform these treats into a festive delight, perfect for celebrations or holidays.
- Coarse Sea Salt: Just a pinch of flaky sea salt can balance out the sweetness and add an intriguing taste contrast.
Side Dishes
- Fruit Salad: A refreshing fruit salad made with seasonal fruits complements the rich flavors of your Butterfinger Balls while adding a lightness to your dessert spread.
- Ice Cream: Serve alongside a scoop of vanilla or chocolate ice cream for an indulgent treat that pairs perfectly with the creamy peanut butter and crunchy texture.
- Coffee or Hot Chocolate: A warm beverage like coffee or hot chocolate is an ideal pairing; their warmth contrasts beautifully with the chilled Butterfinger Balls.
- Cheese Platter: For an unexpected twist, offer a selection of cheeses; mild cheeses like brie or gouda provide a savory counterpoint to the sweetness of your desserts.
With these tips and serving suggestions, you’ll be well on your way to impressing friends and family with your delicious Butterfinger Balls! Enjoy every moment as you share these delectable bites.
Make Ahead and Storage
These Butterfinger Bliss Balls are perfect for meal prep, making them an excellent treat to have on hand for parties, family gatherings, or just a sweet snack throughout the week. Here are some tips for storing and enjoying these delightful bites later.
Storing Leftovers
- Store any leftover Butterfinger Balls in an airtight container at room temperature for up to 3 days.
- If you want them to last longer, keep them in the refrigerator for up to a week.
Freezing
- For longer storage, freeze the Butterfinger Balls in a single layer on a baking sheet first.
- Once frozen, transfer them to a freezer-safe container or zip-top bag, where they can be stored for up to 3 months.
Reheating
- These treats are best enjoyed cold or at room temperature, so there’s no need to reheat.
- If preferred slightly warmed, let them sit out for about 10 minutes before serving.
FAQs
Here are some common questions about making Butterfinger Balls that might help you!
Can I use another type of candy instead of Butterfinger Bars?
Absolutely! While this recipe highlights Butterfinger Bars for their unique flavor and crunch, you can substitute with any other chocolate-covered candy or your favorite treat. Just keep the measurements similar!
How do I make Butterfinger Balls without using animal-derived gelatin?
This recipe doesn’t include gelatin at all. The creamy peanut butter and chocolate coating provide all the richness and texture you’ll love without needing any animal products.
How long do Butterfinger Balls stay fresh?
When stored properly in an airtight container, Butterfinger Balls can remain fresh for up to a week in the fridge and up to three days at room temperature.
Can I make Butterfinger Balls ahead of time?
Yes! These treats are fantastic for meal prep. They can be made ahead of time and stored in the refrigerator or freezer until you’re ready to enjoy them!
Final Thoughts
These Butterfinger Bliss Balls are truly special – they combine rich flavors with delightful textures that are sure to please everyone! Making these treats is not only easy but also a fun activity you can share with family or friends. I hope you enjoy creating and savoring these delicious bites as much as I do. Don’t forget to get creative with your toppings too! Happy snacking!
Butterfinger Balls
If you’re craving a delightful treat that perfectly balances sweet and salty flavors, these Butterfinger Balls are your answer! These no-bake bites are incredibly easy to make, taking just 15 minutes of prep time. With a creamy peanut butter base, crunchy candy bits, and a smooth chocolate coating, they are sure to be a hit at any gathering. Perfect for sharing with friends and family, these delectable treats can be customized with various toppings or flavorings to match your preferences. Once you take your first bite, you’ll see why they quickly become a favorite!
- Prep Time: 15 minutes
- Cook Time: None
- Total Time: 0 hours
- Yield: About 20 servings 1x
- Category: Dessert
- Method: No-Bake
- Cuisine: American
Ingredients
- 4 tablespoons softened butter
- 1 teaspoon vanilla extract
- 1 cup powdered sugar
- 1 cup peanut butter (avoid all-natural varieties)
- ¾ cup crushed graham crackers
- 8 ounces chocolate bark or chocolate chips
- ½ cup crushed Butterfinger bars
Instructions
- In a mixing bowl, combine the softened butter and peanut butter until smooth.
- Mix in the vanilla extract.
- Gradually add powdered sugar at low speed; mix until combined.
- Fold in the graham cracker crumbs and crushed Butterfinger bars gently.
- Roll the mixture into balls (about 1 to 1½ tablespoons each) and place them on a parchment-lined cookie sheet.
- Freeze for about 30 minutes to firm up.
- Melt the chocolate in increments in the microwave until smooth.
- Dip each chilled ball in melted chocolate, coating as desired.
- Decorate with additional crushed Butterfinger bars or sprinkles while the chocolate is still soft.
- Allow chocolate to harden before serving.
Nutrition
- Serving Size: 1 serving
- Calories: 130
- Sugar: 10g
- Sodium: 45mg
- Fat: 8g
- Saturated Fat: 3g
- Unsaturated Fat: 5g
- Trans Fat: 0g
- Carbohydrates: 13g
- Fiber: 0g
- Protein: 3g
- Cholesterol: 5mg